You are using an out of date browser. It may not display this or other websites correctly.
You should upgrade or use an alternative browser.
You should upgrade or use an alternative browser.
What’s on *YOUR* workbench?
- Thread starter Bricksnbeatles
- Start date

Feral Feline
Well-known member
The JIG is up...


Harry Klippton
Not Interested
I was at an arts festival recently where a speaker was presenting on art and resilience. She mentioned that Martha Washington embroidered some chair cushions and it took her 36 years to finish 12 of them. Talk about perseveranceView attachment 116936
My wife and I have been working on reupholstering our dining room chairs. At this pace it’ll take us over a year to do all 4!")
It works, it sounds pretty not good so I won't be boxing it up, but it was fun for a change from the daisy seed C++ I have been doing! It definitely is missing some buffers and the mixing isn't perfect, but it is functional.
Knobs on the breadboard are DRY LEVEL, FEEDBACK, TOTAL LEVEL, WET LEVEL. The trimmer on the breadboard is a record level for the input signal. The knob off the board is tape speed/delay time and wired to the motor.
The basic premise is the tape passes an erase head (not visible in the pic), then passes the record head (which records the input signal), then passes a playback head to create the WET signal. The wet signal is looped back into the input for a feedback signal if you want. The dry and wet are then mixed, and the faster the tape goes, the shorter the delay time, and the slower the tape goes, the longer the delay time.
Credit goes to this guy:


You should make everyone guess numbers for a week for a chance to win it
JohnnyCreepy
Well-known member

Last friday found this on my bench. Changing new tires revealed old ones had some life inside. Need to adjust my sealant formula considering propylene glycol is that prone for microbial growth.
falco_femoralis
Well-known member
I resized my bass drum yesterday. It was a 22x18, but I made it into a 22x14 so it would fit in my 22x14 case 
I taped where it would be cut. Idk if this helps but I did it
After
Doing the bearing edge. Sharp 45 degree to match for factory edge
Laying out for new lug holes
All done!
The rest of the kit. I also made the 12x9 into a 12x8 because it's infinitely better, and I made the 14" mounted floor tom into a real floor tom.
I'd like to find a 16" for this kit. I can recover it in red sparkle to match, but I'd like the lugs and shell makeup to match as well.
I guess my pedals are on hold until the mood strikes again. There's something simple and straightforward about drums. They are just easy.
I taped where it would be cut. Idk if this helps but I did it

After

Doing the bearing edge. Sharp 45 degree to match for factory edge

Laying out for new lug holes

All done!

The rest of the kit. I also made the 12x9 into a 12x8 because it's infinitely better, and I made the 14" mounted floor tom into a real floor tom.

I'd like to find a 16" for this kit. I can recover it in red sparkle to match, but I'd like the lugs and shell makeup to match as well.
I guess my pedals are on hold until the mood strikes again. There's something simple and straightforward about drums. They are just easy.
vigilante398
Authorized Vendor
You don't miss the extra depth? When I went from a 22x16 kick to a 22x18 kick I knew I never wanted a smaller kick, I can't imagine giving up that extra depth.I resized my bass drum yesterday. It was a 22x18, but I made it into a 22x14 so it would fit in my 22x14 case
I taped where it would be cut. Idk if this helps but I did it
After
Doing the bearing edge. Sharp 45 degree to match for factory edge
Laying out for new lug holes
All done!
The rest of the kit. I also made the 12x9 into a 12x8 because it's infinitely better, and I made the 14" mounted floor tom into a real floor tom.
I'd like to find a 16" for this kit. I can recover it in red sparkle to match, but I'd like the lugs and shell makeup to match as well.
I guess my pedals are on hold until the mood strikes again. There's something simple and straightforward about drums. They are just easy.
Aleph Null
Well-known member
Looking good! Hanging floor toms seem like a good idea until you try to adjust them. Most ball arms just can't handle that much weight for long!The rest of the kit. I also made the 12x9 into a 12x8 because it's infinitely better, and I made the 14" mounted floor tom into a real floor tom.
falco_femoralis
Well-known member
I don't miss it. As a 22x18 it was very boomy, which was a nice sound, though with some high overtones, but I like my kick drum sound to be quicker and shorter, more staccato. Also the thin maple shell helps a ton with projection and tone.You don't miss the extra depth? When I went from a 22x16 kick to a 22x18 kick I knew I never wanted a smaller kick, I can't imagine giving up that extra depth.
Audandash
Well-known member
So I decided to dye the old carpet on the door trim. It’s not perfect but it looks a lot better. New door cards are 650 a piece. I spent $20 on dye. I think I can make these last a little longer. It’s a driver anyway so they don’t have to be perfect. I was also able to use it to dye the vinyl on a mirror finisher and also a burgundy seatbelt cover that was burgundy instead of black.


Aleph Null
Well-known member
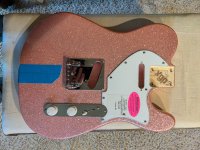
It's getting there! I don't think there's been a single thing that just bolted into place. Everything has had to be fudged or fenangled.
I had to widen portions of the control cavity to accommodate the tone pot and the angled switch. I had to Dremel out little ramps for the string-through holes because the holes in the base plate are offset compared to standard placement. The placement makes sense for a twelve string, but damn!
I wasn't expecting it to snap together like Lego, but this is taking much more finesse than previous builds.
Attachments
Aleph Null
Well-known member
Anyone who has ever attempted to switch from the bridge to the neck pickup on a tele knows how annoying the traditional switch placement is. This solves that problem! I also considered getting a blank plate and drilling for a Gibson style switch, but this gives me the option of installing a four or five way and doing trick wiring later if I want to.Angled switch in a tele? What kind of monster are you???
That's pretty cool, actually. I didn't think it would be possible. The color slays me. I must have been a muskie in a former life.
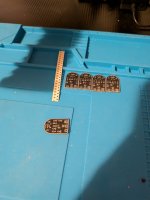
I wasn't planning to leave stuff balled but at this point I wonder if it's better off that way. Hope they all work! I think it'd be great if these and other small smd things were pre done at the factory though unless I get a hot plate or something. Plus I think I switched to too pointy of a tip and it couldn't retain/transfer heat well even for this.
