UtilityBeltFX
Well-known member

Uhh, what's going on here?
I'll have to consider whether I'll go for rasters or not in the future, turning some of the images I've used into vectors is really annoying and takes some fiddling (because they tend to be more detailed and not completely suitable for vectors), but if using rasters they come out much darker, that's annoying too.Good day, For UV printing CMYK is used which is real world colors and look much more different than what you see in your compter screen which is RGB.
For UV printing image printing results are usually unpredictable. If you want awesome looking results you have to go for vector graphics.
How did you fix the issue? I seem to be having the same problem.FWIW the print went through once I fixed that spot color issue. It's a bit annoying since it got delayed by almost a week because of that, or at least a few days if I had fixed it instantly if the error message was more clear - but to be fair, the original mistake was by me when I messed up with that spot color. Now I'm just hoping they look ok since this is the first time I'm printing raster images.
The same settings must exist in affinity.

Scribus definitely calls it stroke alsoYep, Affinity calls it Stroke / Fill. You'll also need to set a stroke width (assuming the stroke is at the default 0pt).
View attachment 56310
")
Thanks so much. I’ll give that a tryYep, Affinity calls it Stroke / Fill. You'll also need to set a stroke width (assuming the stroke is at the default 0pt).
View attachment 56310
The idea was to have the graphics in white and gloss (although I didn’t get to the gloss part due to this problem) over no background. Was hoping to print white/gloss onto a black enclosure.That line appears in your white and gloss layer without swatch.
Just to be sure, you want the graphics to be in gloss only over a big white background ? No colors ?
View attachment 56309
I think mine was a different issue. Basically I had a spot color included in something I rasterized. So now that even though it was a raster image, part of it was in a spot color, and it's not easy to color just part of a raster in Illustrator (if it's vectors, I could just switch that one piece to a different color).How did you fix the issue? I seem to be having the same problem.

Do you select everything in your layer before applying the swatch ? In scribus that is what I need to do.I've tried the stroke/fill but it still seems to fill the entire section in white. My goal is to have no paint at all except for the border (and the other graphics of course).
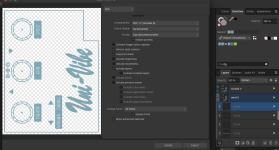
I have attached what it looks like with the stroke/fill and without. What am I doing wrong here?

RDG Gloss is applied correctly, but RDG White is not.Hi again. I'm back and I think I have fixed the solid colour issue. However when I export my affinity file to PDF it seems to forget that I have selected rdg_white and rdg_gloss in the layers.
Can someone please check if these colours are present in the layers or at least show me how to check in affinity?
As you can see in the screenshot bleow i have "honor spot colors" selected and rdg_white is visible. But I can't see that in the pdf.