Tayda UV Printing

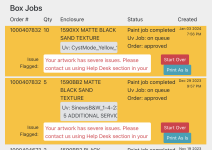
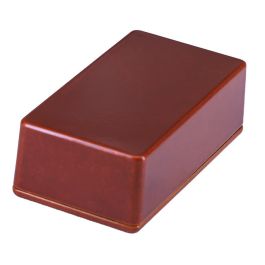
Truth be told, I haven't had the powder coat be so bad I couldn't get a screw in (yet…). With that one above I had an excuse to muck about with it and see what works. (They @#$%ed up; mostly resolved, but this enclosure is currently no good.) Just ran a spare screw back and forth through it a few times with my mini impact. A very negligible amount of Al powder from the experiment, so no harm done and it works fine—no tap required for this one.
 
Has anyone received the "your artwork has severe issues. Please contact the Help Desk..." message in the Tayda dashboard? I made a ticket with the help desk asking what is wrong with my files but they haven't gotten back since my original message on the 5th. I have followed up a few more times but haven't gotten a response. Does it usually take them many days to get back to you? There's an option to print as is and I am tempted. I have check the 2 files and everything looks to be in order.
 

Attachments

  • Screen Shot 2024-01-07 at 8.24.05 PM.png
    Screen Shot 2024-01-07 at 8.24.05 PM.png
    221.8 KB · Views: 20
I had the gloss layer turned off in my file once and had to resubmit it. It’s best to email Hugo directly if you want any response- [email protected]
Has anyone received the "your artwork has severe issues. Please contact the Help Desk..." message in the Tayda dashboard? I made a ticket with the help desk asking what is wrong with my files but they haven't gotten back since my original message on the 5th. I have followed up a few more times but haven't gotten a response. Does it usually take them many days to get back to you? There's an option to print as is and I am tempted. I have check the 2 files and everything looks to be in order.
 
I also had this error in my last order and my problem was that I had 20 gloss layers in my files but ordered only 19.
 
I think I’ve asked this before but can’t seem to find it…
In the past when I’ve done UV prints, I’ve converted all strokes to objects and then merged/flattened all of them. Is that really necessary though, or can I leave them as strokes?

Example: my artwork for a design consists of black linework with a .25mm stroke thickness.

Converting each stroke to an object would more than double the number of nodes for each line, and if I combined/merged/flattened them into one object in order to eliminate overlapping vectors, it would add an additional 4+ nodes for each intersection of two or more lines.
This seems like it would just be needlessly bloating the file size, but it’s what I’ve been doing at this point for the Uv prints I’ve sent out just to avoid any potential problems. Do the UV printers Tayda uses ignore strokes (I know of some hardware does ignore the strokes and only prints what is set as a fill, so it’s not an absurd thought) or can I keep my linework as strokes and have it come out? Anyone have insights into what the printers see exactly when it comes to strokes (and out of more curiosity, how it reacts to alpha values and overlapping objects of different fill colors within one layer)?
 
It’s most likely going to print correctly if you leave your line work as strokes. Converting them to outlines eliminates any possibility that whatever software they’re using will misinterpret the width you’ve defined. It’s always been good practice to do so when providing vector artwork primarily so that if it’s scaled or transformed, the linework will scale properly as well. But since the file is being printed as-is, that’s not a factor here.

It’s just one less thing to worry about in the end. Try it sometime and see how it turns out.
 
Quick question: (apologies if this has been asked and answered already):

In Illustrator, if you have overlapping elements with different colors do you need to merge them, or cut them out of the lower layer for printing? It seems like yes from what I read on the Tayda site but I'm actually not sure (I'm so rusty in Illustrator it's sad).

More specifically, here's my design, which will be printed on a white enclosure. Do I need to cut out or merge the overlapping text/gfx from the blue triangle shape below so they don't overlap, color-wise (all the text has been vectored)? Does that include the stroke around the triangle? Is this a stupid question? I'm a UV print n00b.

TR2023.jpg
 
Quick question: (apologies if this has been asked and answered already):

In Illustrator, if you have overlapping elements with different colors do you need to merge them, or cut them out of the lower layer for printing? It seems like yes from what I read on the Tayda site but I'm actually not sure (I'm so rusty in Illustrator it's sad).

More specifically, here's my design, which will be printed on a white enclosure. Do I need to cut out or merge the overlapping text/gfx from the blue triangle shape below so they don't overlap, color-wise (all the text has been vectored)? Does that include the stroke around the triangle? Is this a stupid question? I'm a UV print n00b.

View attachment 66418
So you'll need to convert text to outlines, expand strokes (to fills), then trap everything (there's a non print term for that, but I can't think of it), but basically, yes, you need to make sure nothing overlaps.

I use the Pathfinder tool (divide) after everything is outlined and converted to fills. It's important that you do those things before trying to cut everything out. Using yhe divide feature in Pathfinder will essentially cut out everything. Let me get to my computer and I can screenshot some things.
 
Tayda also has a long set of FAQs/requirements for UV printing on their website that includes this blurb about overlapping layers:

Very important!! DIFFERENT COLOR THINGS OVERLAPPING EACH OTHER IN COLOR LAYER, LET'S SAY YOU HAVE A BLUE CAT ON RED HOUSE, LET'S SAY CAT IS OVERLAPPING ON HOUSE, YOU NEED TO REMOVE PART OF HOUSE THAT CAT OVERLAPPING, IT IS EASY IN ADOBE ILLUSTRATOR, JUST SELECT AND CAT AND HOUSE AND UNDER PATHFINDER SECTION CLICK MERGE AND SOFTWARE WILL DO THE JOB FOR YOU AND REMOVE ANYTHING FROM BACKGROUND OF CAT. IN OTHER WORDS, IN COLOR LAYER, OVERLAPPING DIFFERENT COLOR THINGS ARE NOT ALLOWED. (EXCEPT WHITE AND COLOR IS OVERLAPPING, THIS IS ALLOWED AND SOMETIMES IT IS NECESSARY)
 
This has likely been repeated in this thread/elsewhere, but it's sort of my checklist of things.

So this element is a stroke effect. It needs to be converted to fills
1705803667220.png
So I'll go to this menu item
1705803706794.png and you should see: 1705803725786.png

if you don't, go to expand again, or expand appearance might be an option, then expand again until it's all plain paths.

Alternatively, with everything selected in your art layer, you could go to this menu item: Flatten transparency
1705803804119.png

and then set these options (the most important is the 'raster vector balance' needs to be 100% vectors, just in case)
1705803867231.png

Which should outline everything:
1705803967254.png

if in doubt, go hit control-y (or command-y) to enter outline mode: outlined items will look like unfilled lines, whereas live text (not-outlined) and strokes will appear as solid and thin lines, respectively. In this example, left is NOT outlined, right IS outlined. If that makes any sense.

1705804152207.png
 
I recommend you save-as and make a separate "art prep" file, so you don't worry about destroying a working file with editable (live) text and so on.

So for an example with color:
that cyan colored guide inside the enclosure area is the Tayda print limit for this 1590B print:
1705804362617.png 1705804409622.png
Turned off the fake enclosure layer I use now we're prepping art, and turned on the transparency grid (shift+ctrl/cmd+d) and set it to dark for my cleanliness and comfort:
1705804486977.png

in outline mode again, we can see there's a lot of overlapping things as well as things outside the printable area. We'll fix that.

1705804626289.png

first, let's fix the overlaps. select everything in your art layer (which should be outlined and expanded) and go to the pathfinder and use "Divide" (lower left):
1705804811565.png
What that does is basically trim everything that's currently overlapping.

In this design's case, I had a stroke around the text in black, to set it off from the patterns of the face, so I'll need to delete those by use the white arrow tool and selecting a part with black (the enclosure color), then going to the select menu> same > fill color

1705804996020.png

now our text has a buffer from the rest of the green
1705805034835.png 1705805046876.png

Now we'll crop it all, so it is within the printable area. Make a rectangle the size of the print area and align it to your guide or artboard
1705805150492.png

Then select all

1705805169460.png
continued....
 
Back
Top