Hand made enclosures.

gonzo

Well-known member
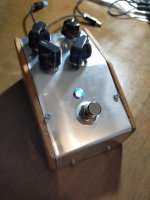
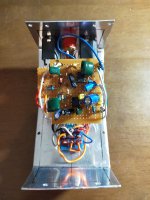
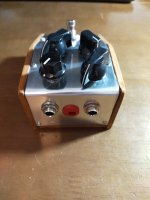
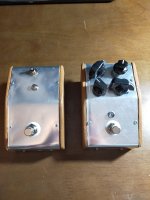
This is my first go at a 100% hand made enclosure. I was pleased with the overall look and stain I used. I need to get a drill bit for the countersunk edges as my hand chisel just didn't work for such thin wood. I also need to find a way to bend the aluminum better without scratches and bumps from the rubber hammer over an edge. It'll get a few treble boosters and maybe a muff or two in these. Might have an update when more parts get in. This one will be a no control rangemaster. IMG20240123134940.jpg IMG20240123134931.jpg
 
All wood on the bottom. I thought about dove tail joints but nothing fancy, just wood glue. It would have taken even longer by hand. Might put some feet pads on the bottom. Hopefully next week I can finish it up and start on number 2.
 
Well flu and family drama sure took me out of getting things done. Up and running again. Not perfect, but I think I enjoy making the enclosures. Has a Moog vibe for sure. I've gotten some tips to improve some things with the metal bending and cutting. I'll try a router type drill bit for the wood edges next time. The thing certainly sounds great. Never use the knob on rangemasters, just an input cap selector, which actually sounded best stock at last night's practice. Also the board -less layout really looks good for low count builds IMG20240209131604.jpg IMG20240209130819.jpg IMG20240209131627.jpg
 
Well flu and family drama sure took me out of getting things done. Up and running again. Not perfect, but I think I enjoy making the enclosures. Has a Moog vibe for sure. I've gotten some tips to improve some things with the metal bending and cutting. I'll try a router type drill bit for the wood edges next time. The thing certainly sounds great. Never use the knob on rangemasters, just an input cap selector, which actually sounded best stock at last night's practice. Also the board -less layout really looks good for low count buildsView attachment 68222View attachment 68223View attachment 68221
I've been making jeweler since 1967, a good technique for making sheet flat is using a hammer and repeatedly turning the piece over and hammering the other side. So you hammer one side and it makes lumps on the other, turn over and repeat, each time the lumps get smaller. For silver I used a very small brass hammer, but for steel probable going to take a small finish hammer. You want to tap, not smash. So a bunch of small taps to make lumps go away.

Major P.I.T.A! A sheet metal brake is the way to go. There are DIY videos on youtube on how to make one.
 
Looks awesome. You may want to consider some shielding tape eventually if you keep with wood enclosures. It may be fine 90% of the time but when it's not, you'll know.
 
You can use a piece of heavy duty angle iron as a kind of make shift stake. Clamp your steel sheet to it firmly and use a mallet to get the crease sharp.

I've used a local sheet metal fabricator to bend some aluminium chassis for me before. I gave him some plans, he made them and it wasn't so expensive.
 
I don’t see a signature anywhere on the inside!

Gotta do that. That thing is an heirloom!

Nice work.
 
Had a second round at it. This time a 1977 opamp big muff with a mid control (a must if you play with drums and bass). Sounds way more raspy and aggressive than my black Russian one. The mismatched knobs are extra parts. Guess cameras don't pick up uv LED color. Things went better with the router and and diy metal brake. Got some good tips, so thanks everyone. Wish I could up it to steel because aluminum scratches so easily and my hand drill slips or drifts even with a pilot at times. But I don't have the right cutting stuff for steel yet. I realized I don't have as much space as I thought inside these. Barely made it. Next time I could move the stomp switch down.
 

Attachments

  • IMG20240228152558.jpg
    IMG20240228152558.jpg
    307.5 KB · Views: 10
  • IMG20240228131953.jpg
    IMG20240228131953.jpg
    397.9 KB · Views: 9
  • IMG20240228152611.jpg
    IMG20240228152611.jpg
    283.1 KB · Views: 9
  • IMG20240228153748.jpg
    IMG20240228153748.jpg
    336 KB · Views: 9
Back
Top