Importing/scaling PCB in Illustrator

jwin615

Well-known member
On a recent illustrator session, I imported the pcb from a PPCB build doc to check for clearance and it didn't scale properly. It was ~2x it's actual size compared to the drill pattern. Is this Robert's fault or did I do something wrong? Is there a simple way to scale it properly?(And accurately) I ended up drawing a box the size of the pcb an shrinking it to that size but I didn't feel great about it being accurate. I'm sure there's a simpler way but my illustrator training wheels are still firmly attached.
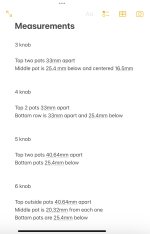
Also, I'm aware the pcb measurements are right there in the build doc, but when you import the pcb it imported those as well. Need to strip that out.
Would creating a new art board the size of the pcb and fitting the image within it properly be the most efficient thing to do?

Thanks in advance.
 
I don't trust the dimensions of anything pasted/placed in Illustrator, though I'd expect placing to more likely retain dimensions. But I do it frequently with boards that don't have drill guides, or drill guides that aren't in metric, or using side mounted jacks, etc. I use a screenshot. Here's my jumble of inefficiencies workflow:

  • Find the outer pot spacing (using a caliper, or the PPCB drill template at Tayda, etc)
  • Place guides in Illustrator by those numbers
  • Take a screenshot of the board from the web/documentation, etc, and copy-paste it into Illustrator
  • Optionally, auto-trace the image and remove its outer background, also flip it if it's not symmetrical
  • Resize/move the screenshot to get the pot centers on the guides
  • Get a vertical measurement and double check, using more guides
  • Pot shaft center is 16.5 from the pad hole center (I just use 16mm)
  • Top of pot body is 25 from the pad hole center

With standard wiggle room, this has gotten close enough.
 
I used to have to match Illustrator output to mate with CNC parts, usually with high enough accuracy to look good from just a few inches away. Scaling in Illustrator is very accurate, you just need to be careful with your calculations and data entry.

If you’re Opening up a pdf into Illustrator, before your print it out, draw a very thin stroked box around it, at a nice even size. When you print it out, measure the box with calipers. Ideally, if they’re not exactly the same, they should be proportionately correct, so it just a matter of figuring the ratio between what you printed and what you hoped for, and scaling up by that amount. The other option is shift key while drag scaling a corner, the proportions stay identical, for all practical purposes. No calculations needed, but can be time consuming.

Rereading the original post, the process at the end you mention should work, and also seems pretty streamlined. I’m going to try that.
 
Been using Illustrator for PCB layout design/copying/tweaking for over 20yrs now.
Turn on the grid in the background, and set it as follows:
Gridline every: 1in
Subdivisions: 10

That's the same (pad per hole) spacing as typical vero or perfboard. Line up or scale your parts (or image) based on that and you should be good to go. Don't know where I'd be without Illustrator - I use that for pedal graphics as well.
 
The PCB image in the build doc isn't to scale, it's sized to fill the page and make the RefDes easily readable.

The image also includes the dimension markers as well as some white space, so importing the image and then scaling it to the actual size of the PCB will give an inaccurate size because of the margin.
 
I've been working on a box for a Grind Customs Aeons. Here's a screenshot of using guides from measurements. I measured the outer pot distances as 36mm (center holes). After dragging the reference point to the center, I placed vertical guides at -18, 0 and 18 (you can select a guide and enter the exact number--if guides are unlocked).
I pasted a screenshot of the board from the docs, and resized it (proportionally) so those holes are centered on those guides. I used temporary guides to make sure the overall board dimensions matched my measurements of them.
After moving the resized board screenshot to what I hope will fit, I placed horizontal guides on the pot centers and made sure they're 25.4mm apart, per measurement of the board. Then, guides 16mm up from that, for the pot shaft holes.
With PPCB boards the numbers are given and consistent, which makes it easier.

1721947521678.png
 
Last edited:
I think I ended up having to scale the images of the PCBs to the dimensions given, checked with the pad spacing in my component library and it came out with a decent margin of error. I think I started scanning some PCBs just to be sure, because
1721960888711.jpeg

But standard templates/spacings are wonderful to have, so thanks, Robert!
 
I've been working on a box for a Grind Customs Aeons. Here's a screenshot of using guides from measurements. I measured the outer pot distances as 36mm (center holes). After dragging the reference point to the center, I placed vertical guides at -18, 0 and 18 (you can select a guide and enter the exact number--if guides are unlocked).
I pasted a screenshot of the board from the docs, and resized it (proportionally) so those holes are centered on those guides. I used temporary guides to make sure the overall board dimensions matched my measurements of them.
After moving the resized board screenshot to what I hope will fit, I placed horizontal guides on the pot centers and made sure they're 25.4mm apart, per measurement of the board. Then, guides 16mm up from that, for the pot shaft holes.
With PPCB boards the numbers are given and consistent, which makes it easier.
That's a fantastic method. Dig it. Thanks.
 
Back in my days of toner transfer/etching PCBs this is how I did it...

Load up the PCB image in a graphics program, zoom in and measure the distance in pixels between two known points to determine the DPI. I usually target a DIP 8 or TO-92 footprint.

For example, the distance between two DIP 8 pins is 0.1". I measured 30 pixels, so that gives a DPI of 300.

Now measure the height/width of the PCB outline in pixels and divide by the DPI to get the actual dimensions of the PCB in inches.


Once you have the DPI of the image you can calculate pretty much any coordinate you need with reasonable accuracy.
 
Back
Top