5-string active bass kit

cwsquared

Well-known member
I have mentioned this kit a few times on here and well it's time to start the show and tell. After waffling on finishes for months now, I think I figured it out. Rit dye and Tru-oil.

I am starting this thread now, with nothing done, as a way of documenting progress and to keep myself accountable to make time for the project.

20220720_124042.jpg

Solo Music - SRBK-200 DIY 5 String Bass
-Ash body, routed for string through
-5 piece Walnut/Maple neck
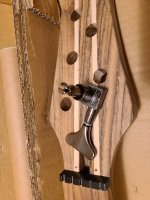
-Black hardware, although I feel like it is more like smoked chrome

20220720_151119.jpg

View attachment 29459
For now, I am going to use the included hardware. I will upgrade things later, as I get a feel for it. The nut needs to go though, it is straight up plastic.
 

Attachments

  • 20220720_151126.jpg
    20220720_151126.jpg
    703.7 KB · Views: 5
SOLO guitar, along with Bitterroot both have decent pricing for nuts in bone, better plastics, and metal. I wish you luck on the build. Only thing I changed on their 56 p-bass was a set of Butler sig(passive) p-ups for the stock. I can't get the neck set juuuust right, either it laughs at me for attempting to slap or has the most atrocious fretbuzz. I hear the occaisonal clang on the E but that's me :ROFLMAO:
 
I decided on dyeing the wood, because I have discovered a love for transparent finishes on open grained woods. Gee, thanks Wudtone finish kit images. I wish the body's grain was a little more interesting, but it's a kit, so you get what you get. I also don't plan on filling the grain. I want it to keep the texture and so it will definitely be a matte finish.

For color, I wanted something "earthy" to go with the walnut, but also needed something that worked with the black hardware. I have a fondness for OD Green, but Olive Drab is too light, I think. I wanted something like all the Green CARC paint on Army equipment. I found Forest Camo on Rit's website, whcih I think meets my requirements. It's 2 parts Dark Green and 1 part Charcoal Gray. It's not quite what I initially had in mind, but I think the grey in there will work well. I guess we'll see what it looks like on wood. Just need to got on some sanding. That will probably be a weekend task, along with a test patch on the back of the body.
Screenshot_20220720-180157_Firefox.jpg
 
SOLO guitar, along with Bitterroot both have decent pricing for nuts in bone, better plastics, and metal. I wish you luck on the build. Only thing I changed on their 56 p-bass was a set of Butler sig(passive) p-ups for the stock. I can't get the neck set juuuust right, either it laughs at me for attempting to slap or has the most atrocious fretbuzz. I hear the occaisonal clang on the E but that's me :ROFLMAO:
Bet you learned some stuff along the way though, so all is not lost. Fret buzz makes it sound like a good setup and maybe some fret work is in order.
 
I'm guessign it's I need to hit a spot on the truss that makes the allen wrench stick and I keep knocking it past when I pull it out, which case it's gonna be like that until the next string change or since I don't attempt RHCP/70s funk songs I'll leave it on the high side.

I'll recheck with a piece of alum angle I use for a makeshift fence on the bandsaw. But I'm not kidding when some plucks I can get the right angle to hear it hit the 14th fret :p

When you sand, stop at 150ish grit(from Keda dyes the other maker of such products) any finer and the dye won't penetrate like most wood stains. It's water/alcohol based not oil.
 
Your own preamp design, or...?
Oh, it is the one that came with the kit. Based on reviews it sounds like it isn't the greatest. I will probably swap it out for something like the Bartolini 3-band I have been eyeing for some time. I will most likely also be swapping out for passive pickups. Not sure which ones yet though.
 
Oh, it is the one that came with the kit. Based on reviews it sounds like it isn't the greatest. I will probably swap it out for something like the Bartolini 3-band I have been eyeing for some time. I will most likely also be swapping out for passive pickups. Not sure which ones yet though.
Cool, but have you considered doing a DIY three band one? ;)
 
Last edited:
Cool, but have you considred doing a DIY three band one? ;)
I had not, until you asked about it earlier today. Mostly due to being a bit new to the hobby. Then I got to thinking, didn't I see a preamp pcb in a @Passinwind post the other day? 🤔

I am definitely not at the "design my own circuit" stage. So, maybe one of my "learned colleagues" here has something they may want to point me to.
I design and build onboard preamps for a number of luthiers as a kind of casual retirement/cottage industry thing. I don't really want to sell hardware or clones, I mainly enjoy doing original design work. I posted an open source three band design with a BOM and board share link on Talkbass several years ago, but most of the builders there have gone with doing that one in pedal format. Parts supply for most of the more modern low current low noise opamps is pretty dire at the moment, but I'd be happy to kick some ideas around here if a few people are interested. That looks like a great project you're diving into in any case!
 
I hate sanding, but it's a necessary evil i'm afraid. The more work you put into this process the better the finished product
 
yes and no, KEDA suggests only going to 150 grit or the wood grain may not fully absorb the dye. that's its own cool effect if you go to 220+ like making reds closer to pink or altering blues.
 
I hate sanding, but it's a necessary evil i'm afraid. The more work you put into this process the better the finished product
Not looking forward to it, but gotta get the shipping sealer off, else nothing is gonna work. I definitely agree that time spent now will save lots of time/heartache later.
yes and no, KEDA suggests only going to 150 grit or the wood grain may not fully absorb the dye. that's its own cool effect if you go to 220+ like making reds closer to pink or altering blues.
I think I ended up at 600, because I had my sanding pads in the wrong color order, but that test piece came exactly how I wanted it to color-wise. I used a light touch on the higher grits, so it may not have really been that high.
 
I decided on dyeing the wood, because I have discovered a love for transparent finishes on open grained woods. Gee, thanks Wudtone finish kit images. I wish the body's grain was a little more interesting, but it's a kit, so you get what you get. I also don't plan on filling the grain. I want it to keep the texture and so it will definitely be a matte finish.

For color, I wanted something "earthy" to go with the walnut, but also needed something that worked with the black hardware. I have a fondness for OD Green, but Olive Drab is too light, I think. I wanted something like all the Green CARC paint on Army equipment. I found Forest Camo on Rit's website, whcih I think meets my requirements. It's 2 parts Dark Green and 1 part Charcoal Gray. It's not quite what I initially had in mind, but I think the grey in there will work well. I guess we'll see what it looks like on wood. Just need to got on some sanding. That will probably be a weekend task, along with a test patch on the back of the body.
View attachment 29469
Definitely try all the dye samples on wood, and ideally similar wood to your body. I wouldn’t go strait to “the back of the body.” Dye is transparent, and you will probably be surprised at some of the variations you get. I’d even go as far as recommending that you also put a few coats of Tru-oil over the test before deciding, as the Tru-oil is going to change the color.

In terms of matte v glossy, you can make a Tru-oil finish look like polished nitro if you want. Just a matter of being patient with the layering, and how you apply your last few coats. While I’m not positive that this is the case, I expect a matte finish would be hard to achieve, as the cured oil is still “soft” enough to polish up pretty easily where you handle it, especially your sleeve on your strumming arm.

But I’m totally with you on the infilled, oil rubbed finishes. I’ve built two with this finish, and will never go back to lacquer (and I have full access to a spray booth and have probably sprayed more than 20 guitars over the years). Besides how lovely a good rubbed finishes looks, it just feels incredible.

If you did want a matte finish, I have a Warwick base that is just waxed, and it’s stayed a lovely matte finish over the years. Would be super easy to do also… But I really love the look and feel of the rubbed oil.

Looks like a fun project, and a cool bass, too! 179480A8-1FE5-48AE-BE76-DA1FF51615B5.jpeg A7F615B0-2E3D-4C42-B3AD-975466914564.jpeg 119691B2-812C-48C8-A01F-C9598CD206C1.jpeg

(the Tele was about halfway through the oiling, so isn’t at the final gloss. I just needed to see what it was going to look like with the pearl on it)
 
Back
Top