Chuck D. Bones
Circuit Wizard
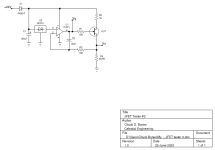
I bought some BF245C JFETs on eBay, so naturally I needed to test them to make sure they were legit. Fairchild (now On Semi) sorts the BF244 and BF245 JFETs by Vgs at Id = 200μA. A-suffix parts have Vgs between -0.4V and =2.2V. B-suffix is between -1.6V and -3.8V. C-suffix is between -3.2V and -7.5V. I ordered C-suffix parts. The mfgr also sorts by Idss. I pulled 10 parts from a bag of 100 and measured Idss and Vgs. The measured Idss fell into the B-suffix range, however the Vgs measurements fell into the A-suffix range. So it's possible that these aren't BF245s at all. But they are functional. I built this circuit on a breadboard.

Q1 is the UUT (Unit Under Test). U1 can be any JFET opamp. U2 is a 10V reference. I used a REF01 because I had one. An LT1021-10 would also be a good option. In a pinch, we could use a 78L09 and change R4 to 45.3K (or use a pair of 91K resistors in parallel). U1 automatically adjusts Q1's gate so that the voltage on the source is equal to the reference voltage (10V). 10V thru 49.9K is 200μA. Source and drain current are the same in a JFET since the gate current is essentially zero. We connect a DMM to the Vg (red lead) and the Vs (black lead) points in the circuit and read Vgs. I used a 10V reference so that the opamp would have enough range to achieve Vgs up to -8.0V. The circuit is powered by 24V, which gets us to Vds = 14V or so; close enough to the datasheet conditions of Vds = 15V. R1 & R2 protect the JFET from mis-connections. R3 and C2 ensure the circuit doesn't oscillate or act as a radio receiver.
I reported the test results to the seller and they promptly issued a refund and an apology and blamed their supplier. Whether they knew they were selling counterfeit parts is unclear, but they should have known. I'd say I won't be buying from them again, but since many of these vendors change their names frequently, I may never know if the next guy selling JFETs is this same guy or not. Lucky for me, EG put some JFETs on sale (2N5638) that have the Vgs,off range I want for use as source followers. I'll find some use for the bogus JFETs, although it is damned inconvenient to have parts that are mis-marked.
In any case, this is a handy rig for testing and matching JFETs.

