- Build Rating
- 5.00 star(s)
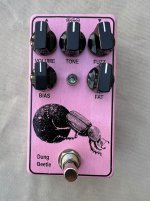
This is my second Dung Beetle build, here is my first.
This is also my first commissioned build. I end up selling most of the pedals I build. Building is most of the fun, and in the interest of keeping clutter to a minimum, I try to keep only a very small number of favorites on hand. I sold my original Dung Beetle not too long ago. The buyer contacted me and asked if I'd be interested in building another. I agreed, and here we are!
This was a very frustrating build. First, I accidentally swapped the input/output wires on the bypass board. So bypass worked, but turning it on resulted in silence. Well, that was a trivial fix. The next problem: it sounded terrible! I mean it made sound, but it was way too distorted, even for a fuzz pedal. I double checked all the component values, no issues there (though I've been known to overlook incorrect values many times over). I spent some time with an audio probe, but I couldn't find an obvious source of the noise. I replaced all the transistors and I re-flowed all the other solder joints. That changed the sound substantially, but it was still very wrong, just in a different way.
So rather than fighting it, I just ordered another PCB. I also had to order a few parts (I managed to exhaust a couple values on the faulty build), and USPS delayed the delivery by nearly a week. I finally got the parts last night, and soldered up the replacement board, and it worked perfectly on the first try. Before I send this to the client, I'm going to take some measurements and use that as a reference for debugging the other board.
Anyway, I'm not a huge fuzz guy, but I like the tones coming out of this box. The controls are fairly interactive. Sometimes it seems like one knob doesn't do a whole lot, but if you adjust another knob, then all the sudden that first knob makes a huge difference. I liked tilting it towards a fuzzy overdrive sound. But maxing out the fuzz is fun too!
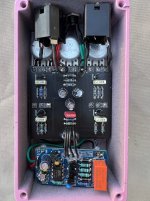
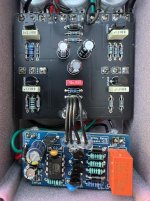
As you can see in the pictures, I put some hot melt glue around the wire-board attachment points to help with strain relief. The lower board is my own relay bypass design.
This is also my first commissioned build. I end up selling most of the pedals I build. Building is most of the fun, and in the interest of keeping clutter to a minimum, I try to keep only a very small number of favorites on hand. I sold my original Dung Beetle not too long ago. The buyer contacted me and asked if I'd be interested in building another. I agreed, and here we are!
This was a very frustrating build. First, I accidentally swapped the input/output wires on the bypass board. So bypass worked, but turning it on resulted in silence. Well, that was a trivial fix. The next problem: it sounded terrible! I mean it made sound, but it was way too distorted, even for a fuzz pedal. I double checked all the component values, no issues there (though I've been known to overlook incorrect values many times over). I spent some time with an audio probe, but I couldn't find an obvious source of the noise. I replaced all the transistors and I re-flowed all the other solder joints. That changed the sound substantially, but it was still very wrong, just in a different way.
So rather than fighting it, I just ordered another PCB. I also had to order a few parts (I managed to exhaust a couple values on the faulty build), and USPS delayed the delivery by nearly a week. I finally got the parts last night, and soldered up the replacement board, and it worked perfectly on the first try. Before I send this to the client, I'm going to take some measurements and use that as a reference for debugging the other board.
Anyway, I'm not a huge fuzz guy, but I like the tones coming out of this box. The controls are fairly interactive. Sometimes it seems like one knob doesn't do a whole lot, but if you adjust another knob, then all the sudden that first knob makes a huge difference. I liked tilting it towards a fuzzy overdrive sound. But maxing out the fuzz is fun too!
As you can see in the pictures, I put some hot melt glue around the wire-board attachment points to help with strain relief. The lower board is my own relay bypass design.