
SillyOctpuss
Well-known member
A few pedal have had questions about finishing pedals in envirotex recently and some people had also asked for some pictures of the process. I've got a large backlog of pcbs ready to go but have been super lazy getting any enclosures finished, so last night I started the first five and thought I'd document them here so if anyone has any questions they can ask them as we go.
The first five
1) Klone on a pedalpcb Kliche board
2) ODR1 - Aion legacy board
3) Red Llama - Vero
4) Sunface silicon - pedalpcb
5) Sunface germanium - pedalpcb
I print my graphics onto self adhesive glossy photo paper, these are all white or clear. You basically design your graphics, print them on the paper, pull of the backing and stick em down.
Here's the Klone and ODR1 graphics after being stuck onto the enclosures


You can see from where I pushed it into the holes I wasn't far off with these ones, the problem with the stickers is you really only get one go and sometimes they're so far off you just need to rip it off and print them again.
Once the backing is peeled off I use the shiny side to rub against the graphics and make sure it's stuck down to the pedal with no air bubbles. If you have one or two small ones it's usually not a problem, the envirotex is thick enough that it hides anything like that.
The next step is to cut out the holes with a craft knife and put some tape over the back of the holes. This will stop the envirotex falling through and creating flow marks which look terrible on the finished pedal. This is also where I realised my first mistake.

I don't cut out the holes for the led, I like to push the led up into the hole and leave it under the envirotex but on the klone I forgot to take off the drill mark from my decal before I printed it so I had to take it off, print another one and start again d'oh.

There that's much better. And the ODR1

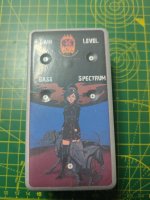
You'll notice there's no LED I'm just going to have this one shine through the graphic, if it's bright enough it works great.
Skipping ahead here's all 5 stuck on the enclosures and ready for envirotex.

The first five
1) Klone on a pedalpcb Kliche board
2) ODR1 - Aion legacy board
3) Red Llama - Vero
4) Sunface silicon - pedalpcb
5) Sunface germanium - pedalpcb
I print my graphics onto self adhesive glossy photo paper, these are all white or clear. You basically design your graphics, print them on the paper, pull of the backing and stick em down.
Here's the Klone and ODR1 graphics after being stuck onto the enclosures
You can see from where I pushed it into the holes I wasn't far off with these ones, the problem with the stickers is you really only get one go and sometimes they're so far off you just need to rip it off and print them again.
Once the backing is peeled off I use the shiny side to rub against the graphics and make sure it's stuck down to the pedal with no air bubbles. If you have one or two small ones it's usually not a problem, the envirotex is thick enough that it hides anything like that.
The next step is to cut out the holes with a craft knife and put some tape over the back of the holes. This will stop the envirotex falling through and creating flow marks which look terrible on the finished pedal. This is also where I realised my first mistake.
I don't cut out the holes for the led, I like to push the led up into the hole and leave it under the envirotex but on the klone I forgot to take off the drill mark from my decal before I printed it so I had to take it off, print another one and start again d'oh.
There that's much better. And the ODR1
You'll notice there's no LED I'm just going to have this one shine through the graphic, if it's bright enough it works great.
Skipping ahead here's all 5 stuck on the enclosures and ready for envirotex.
Attachments
Last edited:


 but just start from the inside and pour outwards in a spiral then use clear stirring stick to start moving the resin towards the edges.


