Fingolfen
Well-known member
I got a request for a Cornish SS-3 pedal. I'd previously built one on the AionFX board. It was a decent build, but I was more focused on designing my Dimetrodon Distortion at the time, so the build sort of sat on the shelf for a while. For the new build I decided to go with the PedalPCB board and give it another try... and honestly I ended up liking it a lot better this time around. I wonder if it's just because I now appreciate what it can do tonally more now or if it is really that much different from the AionFX build I did previously (I'll have to do a side by side comparison at some point).

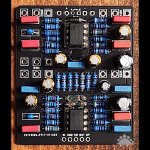
The PedalPCB board is a little more dense and compact than the AionFX board I'd used previously, but it's very well laid out - so populating the tight rows of resistors isn't difficult. I'm using new production bits for most of this build. The resistors are all 1% metal film, including that honkin' 10M in the bottom left hand corner. The film capacitors are all 5% tolerance. There are a couple of MLCC capacitors in the mix along the left hand edge of the board. All of the electrolytic capacitors are Nichicon. I am using some NOS 1N34A diodes for that part of the circuit. I think these are from a batch I picked up at my local electrical surplus store.

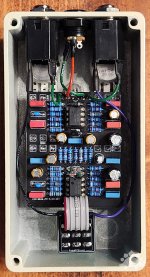
As the board is fairly compact, getting it lined up in the enclosure isn't too difficult. The only slight challenge is the fact that the dual gang potentiometer is in the middle of the board whereas the AionFX board puts that pot at the top of the board. Because it is in the middle of the board, you need some sort of insulator that sits between the pot and the PCB to prevent shorting. This raises up the board a bit and means you're soldering the rest of the pots right at the tips. It's not a big deal, and the PedalPCB dual gang pot insulator works great.
I'm using the PedalPCB buffered 3PDT daughter board for this build, which let me just use ribbon cable rather than having to hand wire the switch. The audio and DC jacks are all grounded directly to the PCB, and all of the jack connections are insulated with heat shrink tubing.

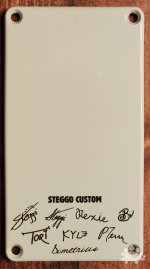
Since this was the first pedal using this board and mascot for, I went ahead and laser etched the back plate. I hadn't tried the laser etcher on one of the Tayda cream enclosures before, and at my standard settings it appears to not have gone completely through the powder coat - which is great, because the result has amazing contrast, very similar to my large form-factor Kloned Centrosaurus in the gold enclosure.

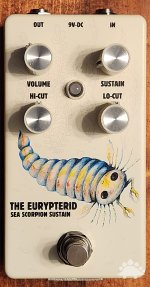
The requestor wanted a prehistoric undersea creature for the pedal mascot this time - so after some back and forth we went with the Eurypterid - or Yuri for short. The art on the pedal is an original watercolor done by my wife which I digitized. Overall I'm incredibly happy with how the enclosure turned out. The pedal sounds great too. The SS-3 is a bit darker and less crunchy than my Dimetrodon - so it occupies a very different, but complimentary, sonic niche. I've made myself a version of this one as well, and it may find a home on the board too!
A little more at the blog: https://steggostudios.blogspot.com/2023/10/is-it-distortion-is-it-sustain-new-ss-3.html

The PedalPCB board is a little more dense and compact than the AionFX board I'd used previously, but it's very well laid out - so populating the tight rows of resistors isn't difficult. I'm using new production bits for most of this build. The resistors are all 1% metal film, including that honkin' 10M in the bottom left hand corner. The film capacitors are all 5% tolerance. There are a couple of MLCC capacitors in the mix along the left hand edge of the board. All of the electrolytic capacitors are Nichicon. I am using some NOS 1N34A diodes for that part of the circuit. I think these are from a batch I picked up at my local electrical surplus store.

As the board is fairly compact, getting it lined up in the enclosure isn't too difficult. The only slight challenge is the fact that the dual gang potentiometer is in the middle of the board whereas the AionFX board puts that pot at the top of the board. Because it is in the middle of the board, you need some sort of insulator that sits between the pot and the PCB to prevent shorting. This raises up the board a bit and means you're soldering the rest of the pots right at the tips. It's not a big deal, and the PedalPCB dual gang pot insulator works great.
I'm using the PedalPCB buffered 3PDT daughter board for this build, which let me just use ribbon cable rather than having to hand wire the switch. The audio and DC jacks are all grounded directly to the PCB, and all of the jack connections are insulated with heat shrink tubing.

Since this was the first pedal using this board and mascot for, I went ahead and laser etched the back plate. I hadn't tried the laser etcher on one of the Tayda cream enclosures before, and at my standard settings it appears to not have gone completely through the powder coat - which is great, because the result has amazing contrast, very similar to my large form-factor Kloned Centrosaurus in the gold enclosure.

The requestor wanted a prehistoric undersea creature for the pedal mascot this time - so after some back and forth we went with the Eurypterid - or Yuri for short. The art on the pedal is an original watercolor done by my wife which I digitized. Overall I'm incredibly happy with how the enclosure turned out. The pedal sounds great too. The SS-3 is a bit darker and less crunchy than my Dimetrodon - so it occupies a very different, but complimentary, sonic niche. I've made myself a version of this one as well, and it may find a home on the board too!
A little more at the blog: https://steggostudios.blogspot.com/2023/10/is-it-distortion-is-it-sustain-new-ss-3.html

