Fingolfen
Well-known member
When I was first learning to use EasyEDA I wanted a couple of straightforward designs to practice on, so I decided to take a crack at laying out the Harmonic Percolator... with a dinosaur twist, of course!
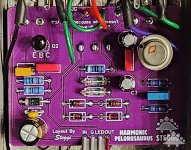
I neglected to get a good shot of the PCB before I dropped it in the enclosure, so I went ahead and enlarged the board from the full interior shot of the enclosure. As you can see, the circuit itself is very simple. Only five resistors and eight capacitors. I'm using my normal mix of 1% metal film resistors and film capacitors for the most part. There are a couple of MLCC capacitors for the lower values. The electrolytic capacitors are all Nichicon.
Past that is where things can get a bit weird or exotic for this build as it is a older pedal. I went ahead and added the clipping switch from the AionFX version which allows you to choose between the normal germanium clipping diodes, silicon clipping diodes, or no clipping diodes. The silicon diodes are 1N914, so they're extremely common. The original pedal used 1N695 germanium diodes, but just about any germanium diode should work. I just 1N34A diodes for my test build.
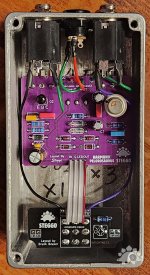
There are two transistors which can be hard to fine if you try and match the original as well. The original used a 2N3565 transistor, but there are others which can be used here. I had one, so I went ahead and used it for my test build. For the germanium side, the original used a 2N404A. These can still be found, but for my test I had a lot of germanium transistors a friend in Ukraine sent me, so I used a P308 that matched the electrical properties of the original.
The rest of the build was straightforward. I'm using my normal 3PDT daughter board that has the LED CLR and LED on it. I decided not to enable the brightness control. The audio jacks are Switchcraft and I'm using a Lumberg DC jack, but no battery. As normal, the jack connections are all insulated with heat shrink tubing and I'm using aviation grade wire from Tube Depot.
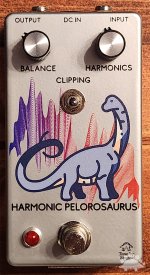
For the enclosure, I ended up going with the Pelorosaurus - largely because it began with "p" and I could use fairly stylized sauropod art with it. In terms of the sound I've always preferred the "standard" version of the percolator to the Albini mod, though I may be in the minority there. This build sounds pretty much like the original AionFX version I built a few years back - so I'm calling the board a success! I've got some ideas for modifications to the percolator design I want to try, so stay tuned!
Original blog entry (with more preamble and dino facts): https://steggostudios.blogspot.com/2024/04/steggos-take-on-harmonic-percolator.html
... and now the Albini mod too!
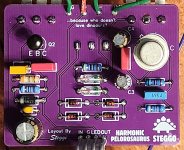
This time I did manage to get a reasonably good picture of the PCB before I got everything boxed up - although it has already been tested for functionality. As with the standard version, I'm using my normal mix of 1% metal film resistors and film capacitors for the most part. I was short one metal film resistor, so I substituted in a 5% carbon film one. There are a couple of MLCC capacitors for the lower values. The electrolytic capacitors are all Nichicon.
As this was another test build, I stuck with the 1N34A and 1N914 diodes for the clipping stage. As with the standard build, I pulled a 2N3565 from my stock and used it. The germanium transistor is another of the P308s I had in my stash. I may try them with alternate diodes and transistors in the future now that I know the board is working properly.
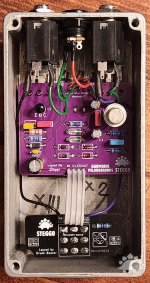
The rest of the build was finished up using the exact same process for the standard version. I'm used the Steggo 3PDT daughter board that has the LED CLR and LED on it. I decided not to enable the brightness control. The audio jacks are Switchcraft and I'm using a Lumberg DC jack, but no battery. As normal, the jack connections are all insulated with heat shrink tubing and I'm using aviation grade wire from Tube Depot.
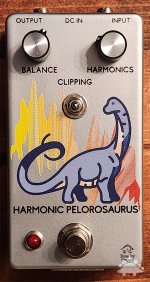
The enclosure itself is similar as well, though the waveform behind the Pelorosaurus is a yellow to red gradient instead of purple to red. As these are really just two variants of the same pedal, I didn't see a big need for completely unique enclosure design.
Again the sound is similar to my previous AionFX build, at least on my Katana. Now that I have some better tube amps, I really need to start testing a lot of these pedals on them to get a feel for how they interact with the different amplifiers. In the past I've generally preferred the standard version to the Albini, but that could change depending on the amp.
Original blog entry (part 2!): https://steggostudios.blogspot.com/2024/04/harmonic-percolator-double-take-albini.html

I neglected to get a good shot of the PCB before I dropped it in the enclosure, so I went ahead and enlarged the board from the full interior shot of the enclosure. As you can see, the circuit itself is very simple. Only five resistors and eight capacitors. I'm using my normal mix of 1% metal film resistors and film capacitors for the most part. There are a couple of MLCC capacitors for the lower values. The electrolytic capacitors are all Nichicon.
Past that is where things can get a bit weird or exotic for this build as it is a older pedal. I went ahead and added the clipping switch from the AionFX version which allows you to choose between the normal germanium clipping diodes, silicon clipping diodes, or no clipping diodes. The silicon diodes are 1N914, so they're extremely common. The original pedal used 1N695 germanium diodes, but just about any germanium diode should work. I just 1N34A diodes for my test build.

There are two transistors which can be hard to fine if you try and match the original as well. The original used a 2N3565 transistor, but there are others which can be used here. I had one, so I went ahead and used it for my test build. For the germanium side, the original used a 2N404A. These can still be found, but for my test I had a lot of germanium transistors a friend in Ukraine sent me, so I used a P308 that matched the electrical properties of the original.
The rest of the build was straightforward. I'm using my normal 3PDT daughter board that has the LED CLR and LED on it. I decided not to enable the brightness control. The audio jacks are Switchcraft and I'm using a Lumberg DC jack, but no battery. As normal, the jack connections are all insulated with heat shrink tubing and I'm using aviation grade wire from Tube Depot.

For the enclosure, I ended up going with the Pelorosaurus - largely because it began with "p" and I could use fairly stylized sauropod art with it. In terms of the sound I've always preferred the "standard" version of the percolator to the Albini mod, though I may be in the minority there. This build sounds pretty much like the original AionFX version I built a few years back - so I'm calling the board a success! I've got some ideas for modifications to the percolator design I want to try, so stay tuned!
Original blog entry (with more preamble and dino facts): https://steggostudios.blogspot.com/2024/04/steggos-take-on-harmonic-percolator.html
... and now the Albini mod too!

This time I did manage to get a reasonably good picture of the PCB before I got everything boxed up - although it has already been tested for functionality. As with the standard version, I'm using my normal mix of 1% metal film resistors and film capacitors for the most part. I was short one metal film resistor, so I substituted in a 5% carbon film one. There are a couple of MLCC capacitors for the lower values. The electrolytic capacitors are all Nichicon.
As this was another test build, I stuck with the 1N34A and 1N914 diodes for the clipping stage. As with the standard build, I pulled a 2N3565 from my stock and used it. The germanium transistor is another of the P308s I had in my stash. I may try them with alternate diodes and transistors in the future now that I know the board is working properly.

The rest of the build was finished up using the exact same process for the standard version. I'm used the Steggo 3PDT daughter board that has the LED CLR and LED on it. I decided not to enable the brightness control. The audio jacks are Switchcraft and I'm using a Lumberg DC jack, but no battery. As normal, the jack connections are all insulated with heat shrink tubing and I'm using aviation grade wire from Tube Depot.

The enclosure itself is similar as well, though the waveform behind the Pelorosaurus is a yellow to red gradient instead of purple to red. As these are really just two variants of the same pedal, I didn't see a big need for completely unique enclosure design.
Again the sound is similar to my previous AionFX build, at least on my Katana. Now that I have some better tube amps, I really need to start testing a lot of these pedals on them to get a feel for how they interact with the different amplifiers. In the past I've generally preferred the standard version to the Albini, but that could change depending on the amp.
Original blog entry (part 2!): https://steggostudios.blogspot.com/2024/04/harmonic-percolator-double-take-albini.html
Last edited:

