Fingolfen
Well-known member
- Build Rating
- 5.00 star(s)
The Dimetrodon Distortion is based on the venerable MXR Distortion+. The original versions of that pedal would have used all "vintage" bits - so I figured it would be fun to try and build a Dimetrodon Distortion using parts similar to the old school Distortion+. I'd also built a couple of Dimetrodons with a Sovtek rather than a '75 Ram's Head tone stack recently for others, and I really loved the slightly different mid notch in the tone knob... so this sort of let me kill two birds with one stone...
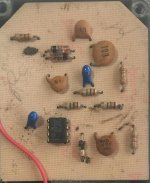
I found a gut shot of an old Distortion+ on Premier Guitar, so I went through to figure out what was used. As you can see from the photo above, the original Distortion+ circuit is fairly simple. In terms of the components, the resistors all appear to be carbon film rather than carbon composition. The capacitors are all appear to be either ceramic or tantalum. There are the two germanium diodes and the op amp as well as what looks like a polarity protection diode. I figured that I could get close to a similar parts load out simply diving into my bits box, and I did manage to get close for this first attempt!
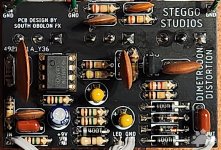
For this build I'm just using my normal Dimetrodon Distortion PCB laid out by South Obolon FX. It's a great little board, and I had several made up in the first batch. As with the old school Distortion+, I went with carbon film resistors. I was almost able to populate all of the capacitors with ceramic capacitors (or tantalum where appropriate), but I was missing a couple of values - so I had to substitute some metal film ones. Interestingly enough, it appears I'm perhaps using the exact same style germanium didoes used in the original. My op amp, and the electrolytic capacitor in the power loop are all modern.
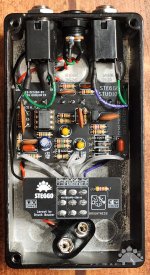
The rest of the wiring follows my normal practice for a Dimetrodon Distortion pedal, as I just snagged an existing enclosure for this one. All of the jack connections are wired with aviation grade wire and the connections are insulated with heat shrink tubing. I'm using my 3PDT daughter board with LED connection laid out by Drunk Beaver Pedals, and I went ahead and included a battery connection.
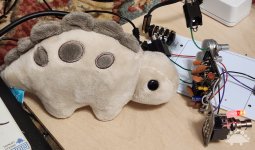
Like all of my builds, Steggi went ahead and tested the board out of its enclosure using one of my PedalPCB test platforms. These are incredibly useful and I now actually have four test platforms built up so when I build pedals in bulk and can get them all set up and tested at the same time. The pedal fired up and worked beautifully - though the noise floor is a touch higher than the all modern versions of the pedal (vanilla and deluxe).
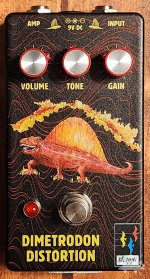
The enclosure itself is the standard production Dimetrodon enclosure. I went with red knobs and a red diffused LED so I'd know this was my Sovtek one just from the enclosure. I liked the idea of making a vintage style one of these so much, I may revisit it again in the future for a special edition pedal, but I have more work to do to get everything the way I'd like it. So stay tuned, there will likely be more builds along these lines in the future!
Original blog entry: https://steggostudios.blogspot.com/2024/01/a-vintage-style-dimetrodon.html

I found a gut shot of an old Distortion+ on Premier Guitar, so I went through to figure out what was used. As you can see from the photo above, the original Distortion+ circuit is fairly simple. In terms of the components, the resistors all appear to be carbon film rather than carbon composition. The capacitors are all appear to be either ceramic or tantalum. There are the two germanium diodes and the op amp as well as what looks like a polarity protection diode. I figured that I could get close to a similar parts load out simply diving into my bits box, and I did manage to get close for this first attempt!

For this build I'm just using my normal Dimetrodon Distortion PCB laid out by South Obolon FX. It's a great little board, and I had several made up in the first batch. As with the old school Distortion+, I went with carbon film resistors. I was almost able to populate all of the capacitors with ceramic capacitors (or tantalum where appropriate), but I was missing a couple of values - so I had to substitute some metal film ones. Interestingly enough, it appears I'm perhaps using the exact same style germanium didoes used in the original. My op amp, and the electrolytic capacitor in the power loop are all modern.

The rest of the wiring follows my normal practice for a Dimetrodon Distortion pedal, as I just snagged an existing enclosure for this one. All of the jack connections are wired with aviation grade wire and the connections are insulated with heat shrink tubing. I'm using my 3PDT daughter board with LED connection laid out by Drunk Beaver Pedals, and I went ahead and included a battery connection.

Like all of my builds, Steggi went ahead and tested the board out of its enclosure using one of my PedalPCB test platforms. These are incredibly useful and I now actually have four test platforms built up so when I build pedals in bulk and can get them all set up and tested at the same time. The pedal fired up and worked beautifully - though the noise floor is a touch higher than the all modern versions of the pedal (vanilla and deluxe).

The enclosure itself is the standard production Dimetrodon enclosure. I went with red knobs and a red diffused LED so I'd know this was my Sovtek one just from the enclosure. I liked the idea of making a vintage style one of these so much, I may revisit it again in the future for a special edition pedal, but I have more work to do to get everything the way I'd like it. So stay tuned, there will likely be more builds along these lines in the future!
Original blog entry: https://steggostudios.blogspot.com/2024/01/a-vintage-style-dimetrodon.html
Last edited:

