Lytt Effects 1984 (Informant - DRV)

Build Rating
5.00 star(s)
Third build of the bunch that I’m doing. This one went well from start to finish, and I added in the buffer/TB switch board. So far I’m 3/3 on pedals working right out of the gate, so I’m feeling good! I nailed down my workflow, wiring, and have all my parts organized now, so this one went much quicker.

As far as the actual pedal goes…this thing rules. This is what I have always wanted a Rat to be, so I absolutely get the hype surrounding the DRV. Love the sound of this thing on basically the entire gain sweep. Very usable. I went with a 1984-themed name for this one, and the eventual final graphic will feature the big brother eye somewhere. I went with a Philadelphia Flyers color scheme on this one, but the final builds will be a red to stay true to the 1984 theme.
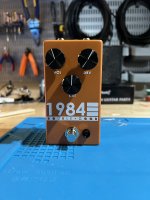
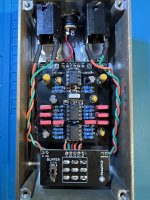
IMG_5300.jpeg
IMG_5298.jpeg
 
Very nice pedal. Clean build. Is the design vinyl?
Thank you! And yes, design is vinyl. For my initial “prototype” builds, I’m just spray painting the enclosures, using a Cricut to make the vinyl decals, and then spraying a few coats of enamel to protect it. It works, but I’ll be building units in hopes of selling, so I’ll be doing more legit powder coated/UV printed enclosures for the production runs.
 
Thank you! And yes, design is vinyl. For my initial “prototype” builds, I’m just spray painting the enclosures, using a Cricut to make the vinyl decals, and then spraying a few coats of enamel to protect it. It works, but I’ll be building units in hopes of selling, so I’ll be doing more legit powder coated/UV printed enclosures for the production runs.

We own a Cricut also every time I see a pedal made with it I feel like I should use it more. Your builds look nice inside and your choice of components seems solid. I wish you the best of luck in your pedal building endeavor.
 
We own a Cricut also every time I see a pedal made with it I feel like I should use it more. Your builds look nice inside and your choice of components seems solid. I wish you the best of luck in your pedal building endeavor.
It’s certainly a cool way to make the graphics, especially once a clear coat is applied over top. I like the raised look it gives when it’s finished. The only downside is that working with the transfer tape on more intricate parts is a hassle, especially the text. Plus, the text at the size it needs to be for the controls is very finicky with getting the cut right, so don’t selection can become limited.

All in all, very inefficient if you’re looking to bang out a run of pedals. For the one offs here and there? Definitely works for that.
I cut a QR code one time and it was a real nightmare. I learned a lot and it did work when I was done. I didn’t realize going into it that there were different strengths of transfer tape and that they had to match the material you were using.

I have 3d printed a lot of enclosures with artwork/text and it’s kind of the same it can be very constrained as far as width and size.
 
Back
Top