Alan W
Well-known member
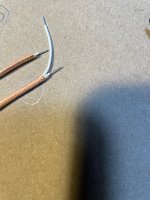
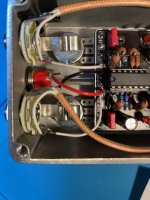
After publishing several build reports, I've been asked about the shielded wire I use at my inputs and output runs. In all honestly, I have no idea if there is a benefit from doing this—Robert's boards are well laid out, with large ground planes on both sides, and we're dealing with a pretty narrow, lowish frequency band. In most of my home build DIY projects, mainly home audio, I know it makes a difference, and it's easy enough to do, so I just throw it in. I will say that my pedals are super quiet, but probably no quieter than others built with these boards.
There's really nothing special you need for this.
A. Is the wire you'd normally run, trimmed to length and stripped. If it's twisted wire, tin it after stripping; I'm using a solid core 24g here.
B. is a shorter piece of the wire, with 1 inch stripped on one end, and the normal length you'd strip at the other end. The covered piece needs to be long enough to go from where your signal connection is to where you're picking up the ground. (On a larger project, with star grounding, the ground leads could potentially be longer than the signal leads.)
C. is the one tool you may need to improvise. If you have knitting needles, a small needle, about 2mm or 3/32 in diameter is perfect. This is some 3/32 brass rod that I tapered the end of.
D. is shrink-wrap. Any color is fine, I like the clear because it helps me see that I've got the ground wire inserted properly, and it looks cool. 1/8th will work, unless you use really thick wire (silicon insulation, etc.)
**Cut the shrink wrap so that it is about 3 mm or 1/8th inch shorter than the insulation on the signal leads in A.
E. Some de-soldering braid. This is a good size. I've used several brands and can't say (for this purpose) that there's much of a difference. I do like the Chemtronics as de-soldering braid quite a bit though.
F. A tool to shrink the shrink wrap. Hot air really is the best, but I did used to make these with my trusty butane "jet" style lighter...

So, you have the wires cut. The trickiest part of this is to open up the braid, so that you get a nice round tube. By holding the braid in one hand, and twisting the knitting needle as you insert it into the braid with the other, you can go maybe 1/2 inch before it gets too frictiony. This is the old Chinese finger puzzle problem. So you have to bunch it up a bit, expanding it so you can push the needle in further. This takes a tiny bit of practice, but goes pretty fast.


After you have more than enough widened for one of the wire runs, pull the needle out, and gently stretch the braid. Cut it about the same length as the insulation on the wires—you'll be trimming it closer the next step.

Before the end of the braid is around your wire, snip off the very end, so that it is nice and clean. Move it onto the wire, and position that clean end so that about 3mm or 1/8th of the insulation is showing, and then, pinching that end with one hand, pull the braid as far as possible out past the other end. You need to trim this end so that there is an equal amount of insulation showing on both ends.


Next, take the matching piece of shrink-wrap, and feed the braid covered wire into it. When the shrink wrap covers both ends of the braid, I heat shrink the first bit of the end that won't get the ground connection; this holds everything in place.

The final two steps are: sticking the bare wire from the ground leads you prepared into the braid, so that the insulation for it is just covered by the end of the shrink-wrap, and then heat shrinking the remaining length of coax.


There's really nothing special you need for this.
A. Is the wire you'd normally run, trimmed to length and stripped. If it's twisted wire, tin it after stripping; I'm using a solid core 24g here.
B. is a shorter piece of the wire, with 1 inch stripped on one end, and the normal length you'd strip at the other end. The covered piece needs to be long enough to go from where your signal connection is to where you're picking up the ground. (On a larger project, with star grounding, the ground leads could potentially be longer than the signal leads.)
C. is the one tool you may need to improvise. If you have knitting needles, a small needle, about 2mm or 3/32 in diameter is perfect. This is some 3/32 brass rod that I tapered the end of.
D. is shrink-wrap. Any color is fine, I like the clear because it helps me see that I've got the ground wire inserted properly, and it looks cool. 1/8th will work, unless you use really thick wire (silicon insulation, etc.)
**Cut the shrink wrap so that it is about 3 mm or 1/8th inch shorter than the insulation on the signal leads in A.
E. Some de-soldering braid. This is a good size. I've used several brands and can't say (for this purpose) that there's much of a difference. I do like the Chemtronics as de-soldering braid quite a bit though.
F. A tool to shrink the shrink wrap. Hot air really is the best, but I did used to make these with my trusty butane "jet" style lighter...
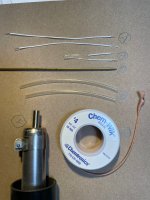
So, you have the wires cut. The trickiest part of this is to open up the braid, so that you get a nice round tube. By holding the braid in one hand, and twisting the knitting needle as you insert it into the braid with the other, you can go maybe 1/2 inch before it gets too frictiony. This is the old Chinese finger puzzle problem. So you have to bunch it up a bit, expanding it so you can push the needle in further. This takes a tiny bit of practice, but goes pretty fast.
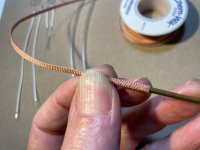
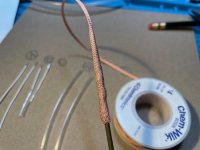
After you have more than enough widened for one of the wire runs, pull the needle out, and gently stretch the braid. Cut it about the same length as the insulation on the wires—you'll be trimming it closer the next step.
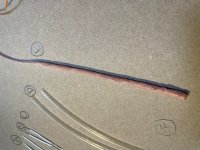
Before the end of the braid is around your wire, snip off the very end, so that it is nice and clean. Move it onto the wire, and position that clean end so that about 3mm or 1/8th of the insulation is showing, and then, pinching that end with one hand, pull the braid as far as possible out past the other end. You need to trim this end so that there is an equal amount of insulation showing on both ends.
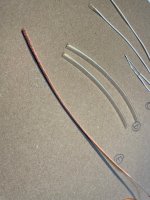
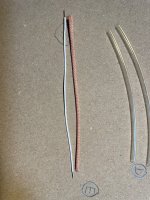
Next, take the matching piece of shrink-wrap, and feed the braid covered wire into it. When the shrink wrap covers both ends of the braid, I heat shrink the first bit of the end that won't get the ground connection; this holds everything in place.
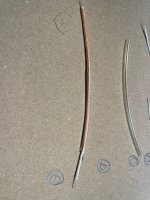
The final two steps are: sticking the bare wire from the ground leads you prepared into the braid, so that the insulation for it is just covered by the end of the shrink-wrap, and then heat shrinking the remaining length of coax.
