My etching procedure pretty much comes from this video:
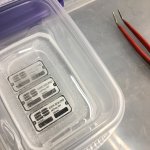
I’ve only done two sets so far, but getting consistent results has been a challenge. I etch three plates at a time for 5 minutes in a small volume of hypochlorous acid (two parts hydrogen peroxide, one part muriatic acid). I’ve started monitoring the acid temp with a non contact thermometer. The reaction generates a lot of heat, and the first few batches will jack the temp up 5-10 degrees F. If the temp goes over 100F the toner starts to release and I lose chunks of the image.
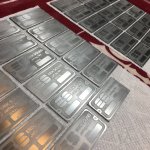
My design is part of the problem. The plates in the video are designed so that only the letters are etched, and very little aluminum is exposed, that would help reduce the reaction running away and generating too much heat. My name plate design is set up so the whole background gets etched, so I’m exposing a lot of aluminum in a small volume of acid.
I’ve also found that the acid loses effectiveness after about the fourth set of three plates. The temp stops going up, and even at longer etch times I don’t get the depth I want.
After I’m done I neutralize the acid with calcium carbonate, testing with swimming pool test strips until it’s about neutral, mix with a couple gallons of water and pour it down the drain. It’s my understanding you would NOT want to do this with any etchant you’ve used on copper as the soluble copper is highly poisonous to the ecosystem, but as far as I know aluminum doesn’t create the same problems.
For the Sproing, and a Hydra delay, I think I’m going to try just stealing and modifying an image of the ppcb faceplates that are available. Those are already set up with the lettering in negative, so they would just need to be reversed, and they’d be good to go for etch resists.
This was also my first experience with any kind of digital graphic design. A good friend made my ES logo for me, but the rest of the layout I did on an iPad with a free app called Vectornator. I was very impressed with that and would highly recommend it.
 I have good ideas though! Definitely going to be etching a plate for sure! Any tips for that? I love your plates. I have used ferric chloride in the past but I have gotten less than ok results.