Silver Blues
Well-known member
- Build Rating
- 4.00 star(s)
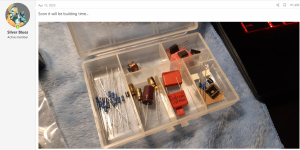
~Two months later~
So long overdue that the project is discontinued, but better late than never, right???
I'd known about Sushi Box for a while, because I spend a lot of time on TalkBass and the bass community is obviously a big fan of Nathan's work. Learning that he offered DIY PCBs was a great plague on my wallet because now I own a board and box for every single Sushi Box project he offers and has offered...
So, Space Heater was my first-ever tube pedal build, and I was a little bit apprehensive due to the potential dangers but also very excited because it's quite amazing to have DIY-friendly full-voltage tube circuits. Since this was a special build, I took some time (and spent way too much money) to pull out all the stops for it. Hence:
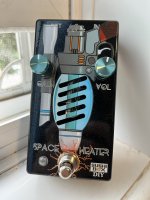
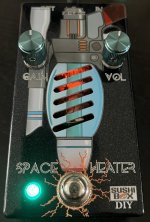
Stop number one is, of course, the graphics. I went with the '30s gangster interpretation of the term "heater", such that "Space Heater" gets translated to mean "sci-fi-esque ray gun/energy blaster", which leaves us with the concept you see above. In particular, I thought it would be cool to stylize the art around the tube vents so it looks like the tube inside the pedal is the source of energy for the blaster; I decided to try to make it look like there was a glass bulb encapsulating the "energy source". This was probably my most ambitious graphic design undertaking to date, although I can't take much credit because I templated heavily off of this really nice piece of concept art by Stephen Chappell (thanks and sorry). Being a huge fan of the Borderlands video game series, I also took some inspiration from there; for those familiar, I was going for a sort of "Maliwan incendiary" colour scheme. The title and controls text is in a font called "Silent Lips" which was used in several places in Borderlands 3 (no spoilers, I haven't actually played it yet!). And of course the scope is a nod to Han Solo's DL-44. I spent probably multiple days worth of uptime in Inkscape laying this out and tweaking details.
Stop number two is the enclosure itself. I bought a pre-drilled 125B from Nathan along with the PCB, hoping I could get it powdercoated with a swanky Prismatic Powders colour of my choice; I was torn between PMB-10266 Peacock Ore (which you're all familar with) and PMB-10338 MWAR. I quickly discovered, however, that no one would do custom powdercoating for me for any cheaper than an arm and a leg (one shop I contacted wanted $300 to powdercoat this single enclosure
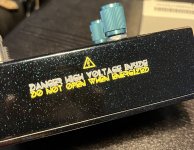
I also left myself and any bystanders a little reminder of the potential hazards, with style:
Stop number three is the professionalism of assembly. Nathan's engineering made this extraordinarily easy, but this is easily my cleanest build ever in terms of interior clutter:
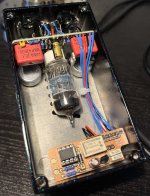
Since I'm a sucker for relay bypass, but I really liked the idea of the "Thwitch" 3PDT daughterboard that was included with the Space Heater PCB, I designed and had fabricated a PCB for this microcontroller-based relay bypass module, but in the same form factor and relative size as the Thwitch board. I used these as a guinea pig to test-drive OSH Park's "After Dark" service. The clear-coated ground plane looks less bomb than the black substrate with the clear-coated traces, but nevertheless I think the result looks amazing and I'll definitely be using this more going forward.
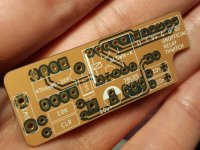
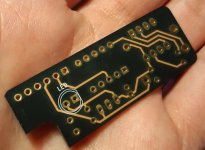
The board is then mounted directly on one of these fancy PCB-pin soft-touch switches:
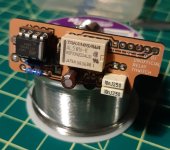
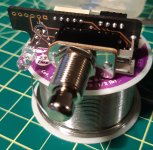
I made a mistake with the LED mounting after having taken this picture and and had to run some flywires from a LED in a bezel back to the bypass board instead of direct mounting it, but I think the bezel looks better and is more stable. This thankfully did not do too much to negatively impact the neatness of the internals.
To tie it all together, I used teal Magpie knobs from LMS and a cyan LED from The Electronic Goldmine. The colour isn't what I'd call truly "cyan" but it works. Strangely enough, the 5-pack of LEDs contained four pieces that I would call "more green" and one that I would call "more blue", and I used the "bluer" one in this build. The tube backlight comes courtesy of an orange LED for the "fire" effect:
So how does it sound? In a word, spectacular, except for one problem. After reading a bit about people's experiences with Space Heater, I decided to go for a JAN-Phillips 12AT7WC as it was relatively inexpensive and robust and had what I believed to be a desirable amount of gain. This turned out to be a great choice as having this pedal in your signal chain brings all sorts of fat, loud (and I mean LOUD, I have to keep the volume below 9:00 almost always) clean tone enhancement. I play (bass) mostly into a DAW with IRs and this pedal makes one question why need an amp at all. I have one bass, a vintage Ibanez RB680, with super low-output (and maybe broken) pickups, and this pedal gives it back all the balls plus much more. The low-end response is expectedly great and turning up the gain lets you get a little bit of round grit.
But therein lies the problem - I get the dreaded squealing/self-oscillation with the gain above 3:00. I tried a few flavours of buffered pedal ahead of it, which didn't help. I also tried swapping the tube for an EHX 12AY7, thinking that the lower intrinsic gain would allow me to use the entire pot sweep without getting to enough gain to squeal, but this didn't really help that issue at all and I didn't like the tone as much as I did with the 12AT7 (the 12AY7 was a lot cleaner and more sterile-sounding whereas the 12AT7 had more character and could let you get a bit into overdrive territory). I think that the 12AY7 also draws a lot more heater current; for testing and short bursts of playing I use a Warwick Rockboard power pack to power my pedals, and I noticed that it drained the battery very fast with the 12AY7 installed. Although I'd like to get that little bit of the pot sweep back (and have more overdrive on tap!), it's not a great loss as most of the gain sweep is usable and the setting that gets me the nice bit of drive happens right before the oscillation starts.
Overall I'm super happy with it and think that it's one of my best-looking pedals, and was certainly a lot of fun to build and play!

