Tayda UV Printing

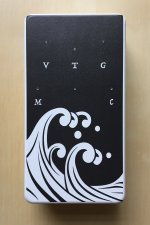
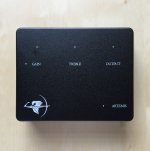
Recently received my first UV printed box from Tayda. Took over a month to arrive but overall I'm happy with what I've received. I've since improved my logo and updated this design with a different font for knob labels as the I and N in GAIN are too close with this font. I also had inconsistent black values in the file I sent Tayda which I've rectified, although I can't physically see too much difference in the blacks. I shot for a simple design that would show off the gorgeous bright enclosure 😁
IMG_20210204_210612__01.jpg
 
Nice job, I hope I can try it, too, sooner or later.

Excuse me, what do you mean about the inconsistent black value? What's the problem?
 
Excuse me, what do you mean about the inconsistent black value? What's the problem?
The black objects in the design didn't all have the exact same CMYK values and could have potentially had a different print hue. Certain printers prefer different CMYK combinations for black. I can't see a difference visually on the actual box but I did start to notice it on my computer screen, which is how I realised the values were not consistent between objects.
 
Ok. Tayda advices, indeed, to use CMYK color. Inkscape can do it.
To print on the brilliant yellow box I guess you didn't need to use white color under the black text, this is what I get.
 
Just received these two UV prints from Tayda. First one is a flat black UV print over glossy white 1590b enclosure. My only complaint is that the top left and right printed further than I'd expected -- lesson learned for future designs. The second is a white UV print with Glossy Matte layer over matte black "sand texture" 1590BB enclosure. I'm really pleased with how this one turned out. Overall, I find if you go with a matte enclosure then going glossy with decals/labels or print balances it out -- vice versa if you go with glossy enclosure, then go matte decals/labels or UV print.

Also decided to scrap using Affinity Design to create these, too many bugs when converting to PDF. It's simpler and easier to just use Illustrator (I happened to find an old version on my old MacBook Pro).
 

Attachments

  • IMG_3774.JPG
    IMG_3774.JPG
    743.8 KB · Views: 223
  • IMG_3773.JPG
    IMG_3773.JPG
    1.1 MB · Views: 225
The second is a white UV print with Glossy Matte layer over matte black "sand texture" 1590BB enclosure. I'm really pleased with how this one turned out.
I was wondering about white on those, I think the matte gloss might be the key indeed, really nice!
 
Has anyone had any success with the solutions for exporting from Affinity Designer yet? I've ordered some UV printed enclosures from Tayda and I'm having the same issue where the RDG_white and RDG_gloss are not the correct swatches in the exported PDF. Did creating a new global colour and setting it to a spot colour with the same name and CMYK values work for anyone?
 
I just sent out an order for 3 pedals that were created in Inkscape and the pdf was exported from Infinity Designer. I have no heard anything about a bad file yet and I ordered and uploaded on Friday the 12th. I will update if I hear anything.
 
Ah great, cheers! I've tried twice and both times Hugo has said that the file doesn't contain the right swatches. I followed your tutorial, but I think I might be doing something wrong on the export settings. Does the type of PDF matter? I had the preset set to PDF (for print).
 
Capture.PNG I imported the datasheet PDF in ilustrator and tried to match it up with the UV printing template they provide, but it doesn't really line up, how can I pinpoint where the holes will be and the exact printable area?
 
I just sent out an order for 3 pedals that were created in Inkscape and the pdf was exported from Infinity Designer. I have no heard anything about a bad file yet and I ordered and uploaded on Friday the 12th. I will update if I hear anything.
I have just got Affinity Designer and I would also be keen to hear about the best practise and way to get the designs from Inkscape over to Affinity and then into a correct pdf from Affinity. If you could elaborate on the steps that would be great, cheers!
 
has anyone tried additional gloss matte layer from tayda.

i tried ordering one but it just looks like a normal print without additional layer. I don't know if it is normal.

Sent e-mail to tayda and still waiting for their response.

The image is too large for the server so i'll just send a link where i uploaded the photo.

I just got one with matte gloss. Instead of just flat colors, it looks a bit "sparkly/checkered" (for lack of a better term) if you check it under a light.
Hope that helps.
 
I just got one with matte gloss. Instead of just flat colors, it looks a bit "sparkly/checkered" (for lack of a better term) if you check it under a light.
Hope that helps.
i thought it'd be like gloss vignette, a little embossed and smooth but has a flat effects.
 
has anyone tried additional gloss matte layer from tayda.

i tried ordering one but it just looks like a normal print without additional layer. I don't know if it is normal.

Sent e-mail to tayda and still waiting for their response.

The image is too large for the server so i'll just send a link where i uploaded the photo.

I've done both Gloss Matte and Gloss Varnish. Echoing what SYLV9ST9R said earlier, the Gloss-M adds a glossy sheen to the otherwise flat (matte) UV print. The Gloss-V takes it up a notch by adding some thickness to the gloss. You can see it and feel it -- think applying vinyl sticker. The Gloss Emboss takes the thickness up even more. Hope this helps. I'll try to post some pics of the Gloss-V that I did on my Informant enclosure when I get the chance and post it.
 
So after some searching around I found a thread on the affinity forum about roland swatches, someone posted this:

'The actual color doesn't matter. It just has to be a Spot Color and must be named exactly like this.
CutContour
PerfCutContour
RDG_WHITE
RDG_GLOSS
RDG_MetallicSilver'

I've created two global spot colours for RDG_WHITE and RDG_GLOSS, I'll send it to Hugo and see if he can try it. Hopefully it'sjust as simple as that!
 
View attachment 9790I imported the datasheet PDF in ilustrator and tried to match it up with the UV printing template they provide, but it doesn't really line up, how can I pinpoint where the holes will be and the exact printable area?

This is a thing I really care, because my labeling and drilling method now.
I drawn my template and graphic. Then I track the hole directly on the box before preparing it to drill, but, in case I noticed that the pots can fit perfectly because too much close to the side of the box, or because it touches the jack, and things like that, I move the parts to fit them, sometime the parts fit for less than a millimeter.
Then I can to apply little labels for the text, name and logos. If I have to apply one label big like the top surface of the box I print some test sheet centering the texts that don't coincide.
So I really need to know that the UV printing position hole and text will be exactly how I calculated.
I mean yeah, it's very important and I don't see how this hasn't been addressed before
 
Back
Top