SOLVED Thermionic - GAIN seems wide open?

muffinscruffin

New member
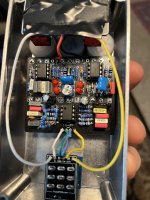
Hi all, my Thermionic Distortion build's GAIN knob doesn't seem to be working.
The trim pot works to modify the gain, but when I use the knob there seems to be no effect when I turn.
It's almost as if it's stuck maxed out, because the volume knob is very very sensitive.

Things I've tried, to no avail:

-Changed the gain pot, no luck
-Measured the resistors in that part of the circuit, seem to be good
-Voltages at pins 1 & 7 of all ICs are all 4.5-5V

Please help! I can't wait to box this thing and put it on my board, I almost like the way it sounds enough already, haha. Thanks all!
 

Attachments

  • unnamed.jpg
    unnamed.jpg
    493.9 KB · Views: 40
Okay, first you need to describe all of the mods that you've made because when I look at that board, 'm not sure what's happening.
I think the thing that’s throwing you is a chain to make the 39k resistor.

On mine I used a b taper on the volume and it’s very touchy like described and I intend to change it to an a at some point. Is the volume b taper?
 
I think the thing that’s throwing you is a chain to make the 39k resistor.

On mine I used a b taper on the volume and it’s very touchy like described and I intend to change it to an a at some point. Is the volume b taper?
Yup, that's a series 39k resistor, and I also had to improvise a 120pf parallel cap for C12 (@chris.knudson).
I used a A50K for volume, it's what the most recent build docs say. B1M for gain, there's just no real change in clipping when I adjust the pot, only the trimmer has any effect on gain.
 
Yup, that's a series 39k resistor, and I also had to improvise a 120pf parallel cap for C12 (@chris.knudson).
I used a A50K for volume, it's what the most recent build docs say. B1M for gain, there's just no real change in clipping when I adjust the pot, only the trimmer has any effect on gain.
I would suggest getting rid of all those R5 resistors in series & put the right 39K value in there.
It happens to control the 1st Gain stage in the circuit, there is no excuse for all those resistors!
You will continue to have issues with your builds if you try to compensate with alternative methods.
Ah man, thanks for the tip, good to know. I always figured if the ohms are right, the part must work. I'll have to make a new special order, none of my packs had 39k in them.
Is it just gain stages that are finicky like that? Or is there a time/place where an improvised resistor/cap isn't going to mess anything up?
My process for building these is to check the resistance and capacitance of each part including the pots as I install them. I also have the build docs up and compare while I do it. This takes a little longer but I don’t end up spending much time troubleshooting. The boards from here are pretty great at working first try.

As far as the improvised parts go on my first builds I had a pretty limited parts supply and did some swaps somewhat like yours and they all worked fine. That being said on the new builds I now have a E12 resistor, E6 capacitor and E3 electrolytic set and I pretty much have every value I would want. Occasionally an in between value I don’t have comes up and when that happens I look at the schematic and if I feel comfortable I swap it with the closest value up or down and if I don’t I put it aside and start on the next boards until I get a decent parts order together. I’m much happier with the building experience and appearance and sound of the pedals with my new process. I stock about 20 of everything but more on the parts I use alot.

If you only plan on a few builds the above advice is probably overkill and I would just carefully order the values I need what adding a few extras in case one is no good. I mostly order from https://www.taydaelectronics.com/

I know this advice probably doesn’t help a ton with your current build but will keep it from recurring frequency.
 
Besides all the component salad happening in there, could it just be that you're running it super high gain to begin with? That could cause little to no audible variation in the gain of this pedal. It looks like your trimmer is set all the way to the right, that's MAX gain. The stock iteration of this pedal has the trimmer centered and even at that setting an insane amount of gain comes on as early as 9-10 o'clock. I've built 4 of these and my trimmer always ends up about halfway between fully LEFT and CENTER (I guess a 1/4 turn left of center?). The result is roughly stock cranked 2203 gain at about 9 o'clock, jose modded gain at noon, and modern metal at 3 o'clock.

Just a thought? But yes, the most likely fix is gutting the experimental parts in there

Edit: I also just noticed the carbon comp a few rows down from the 39k looks like it has little to no solder on the pad
 
With no power applied to the circuit:

Turn the gain pot all the way down, measure the resistance between pins 6 and 7 of IC1.

Now turn the gain pot all the way up and make that same measurement again.
 
With no power applied to the circuit:

Turn the gain pot all the way down, measure the resistance between pins 6 and 7 of IC1.

Now turn the gain pot all the way up and make that same measurement again.
With the gain knob in both positions I have infinite resistance between the pins.

@brightlight I've tried it with the gain all the way down. The trim pot changes the sound, but the knob does not.

@DailyDovetails I do the same, though my capacitance checking tool is the cheapest one on amazon, I feel like I can mostly count on it. I checked both Gain pots before I installed them (I bought a bunch so I choose the ones testing closest to 1M in this case).

I suppose it's possible I burned both pots up while I was soldering them?
 
sounds like the internal pot works. I pulled the back off mine to measure the external. With the gain all the way down resistance was around 0 with the gain all the way up it was around 1M. This is measuring from pin 1 to 3 of the external gain pot. I would check your resistance at those location before pulling it
 
Alright I measured the pot (which I thought would give me wacky values if I measured on-board, should've just done it earlier).
All signs and measurements pointed to a broken pot.
I've been using these pots without pins or solder lugs, so I was soldering my wires into the thru-holes instead of on the tiny mount pins--I'm betting that caused me to burn my two gain pots up while installing.

I replaced it, and it worked. The volume pot somehow broke while I was boxing it up, so I had to pull it apart again to replace THAT.

I guess I just got a really bad batch of pots. In this one project I had 3 busted ones altogether from this mixed value pack I bought off Amazon!

Thanks for all the help everybody. I went ahead and got real 39k resistors and 120pf caps too, so this circuit is looking ad sounding as it should be!
I love it...it's on the board now, pushing my RAT clone and it sounds great.
 
just finished this one tonight, i'm not really thrilled with it but i also used the 33k and 100pf, so i may switch those out in the future.

after building the duocast, everything else feels meh to me.
 
Back
Top