cwsquared
Well-known member
Thanks, but really all the thanks should go to all those who bought in and have given me the time to pull it off.Well done! I’m impressed. The scope of that project was intense.
Thanks, but really all the thanks should go to all those who bought in and have given me the time to pull it off.Well done! I’m impressed. The scope of that project was intense.
She's complete! Bianchi Via Nirrone 7 C2C. I ripped out the original SHimano Sora entry level groupset for early 00's Shimano Dura Ace. I also took out the stock Taiwanese wheels and subbed them for Mavics. The shifting is nice and crisp and the wheels with Shimano Ultegra hubs roll smooth.One for the bike nerds again.
A few months back I got a carbon fiber Trek bike. While I could ride it comfortably after adjustments, I found that it.was simply too big of a frame at 58cm but at least it will fit my dad.
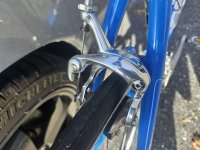
I got myself a Bianchi Via Nirone 7 C2C. great aluminum frame and carbon fork but the Shimano Sora groupset is awful. The shifters feel flimsy. The Taiwanese Jalco wheels also felt rickety. So I sourced a period correct if not slightly older Shimano Dura Ace groupset and Mavic wheels (w/ Ultegra hubs). Cleaned them all up and polished them. Time to build!
View attachment 84953


Bah!Is that an FU to the ozone layer?
That is one fine bike!She's complete! Bianchi Via Nirrone 7 C2C. I ripped out the original SHimano Sora entry level groupset for early 00's Shimano Dura Ace. I also took out the stock Taiwanese wheels and subbed them for Mavics. The shifting is nice and crisp and the wheels with Shimano Ultegra hubs roll smooth.
View attachment 85601

Mighty fine anchoring on that rear unit


Marco's idea was kind of the split the difference on the singlecut thing. The bass as it currently is is not super heavy, so it just boils down to aesthetics really. And I think what finish I go with may dictate how much or little horn trimming I go for, so I want to see everything in bare wood before I do anything else. Could be quite a while before I can do any finish work anyway, so I'll just grab whatever weather windows come along for hand sanding and get there when I get there.That's awesome the body doesn't have any control-holes in it yet.
For the body-mods, I'd start with reducing the lower horn, but I like the top horn as is!
Top horn is somewhere between a horn and a single-cut dealio.
The biggest benefit of cutting down the top horn, IMO, is overall weight-reduction.

 I could take off the sympathetic string board and get to see into a small gap, that allows some tools to reach it from the inside, but not much more. Thank god I got tools for building some tools myself.
Are we looking at a crack in an acoustic instrument here? Looks like a pretty stable situation. I might just rock it. You could maybe water down some wood glue and try and force some in there from the outside with finger pressure.Only hardware fix I need to perform. Problem is, I have no way to get into the resonator without doing more harm to it...
Anyone an idea what's the best approach for this? Online sources maybe?
View attachment 85715

Are we looking at a crack in an acoustic instrument here? Looks like a pretty stable situation. I might just rock it. You could maybe water down some wood glue and try and force some in there from the outside with finger pressure.
I'd take the filings/superglue approach. Scrape/sand/file some of the wood from inside to create some fine powder of that wood and mix with a bit of super glue. Deftly apply that mixture to the crack and allow it to dry. Then carefully sand and buff accordingly.Only hardware fix I need to perform. Problem is, I have no way to get into the resonator without doing more harm to it...
Anyone an idea what's the best approach for this? Online sources maybe?
View attachment 85715

I like the burned look on this it reminds me of Japanese shou sugi ban woodwork.Attempting a rescue on a gifted spare body for my fretless Marco Bass:
The finish on the front was extensively cracked and ratty from fire and then water damage in my friend's shop, and he's been burning wrecked bodies in his wood stove regularly lately.