1590B & Top Jacks: It Can Be Done

I don't remember where I read it, but it was here on this forum. It was mentioned that a 1590B enclosure with top jacks was impossible due to space constraints. This inspired me to see if it could be done. To be honest I have come to love the 1590B enclosure, due to its diminutive size, in favor over the 125B enclosure that seems to dominate the PedalPCB designs. So I laid it out in CAD and here are the results. The next challenge (which actually does seem impossible) is to do all this with a 9 volt battery, but that's another topic for another day. Apologies for the unfinished graphics, I was too excited to show this stuff before I finished the graphics...

new (1 of 7).jpg

1. A 1590B pedal on the left (ADHD, aka OCD) next to a 125B pedal (Unicab, aka Omnicab) on the right. Again, apologies for being delinquent with the graphics. I have a solution coming, it's just not here yet.

new (2 of 7).jpg

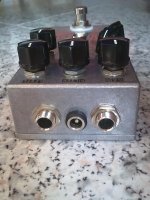
1. Front view. Note that the 1590B doesn't have room for a 9 volt battery, so I pushed the 3PDT switch close to the front of the casing. In the case of the 125B enclosure on the right, between the 3PDT switch and the front wall is the appropriate space for a 9 volt battery.

new (3 of 7).jpg

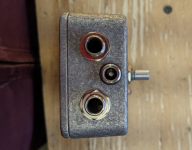
3. Jacks view. The cramped spacing with the 1590B enclosure (right pedal) demanded I put the power jack above centerline. Also, I couldn't fit in a switching style, which would permit a 9 volt battery, and my goal of adding that later is probably not solvable.

new (6 of 7).jpg

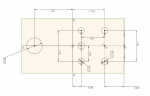
4. Screenshot of CAD showing the layout. This CAD file happens to be using the Cobalt Drive (Boss Blues Driver) board, because I was too lazy to mockup the different boards. Note the milled walls on the enclosure, designed for CNC machining to permit some of the wider boards that span 2.25" width (ahem, Angry Charles).

new (4 of 7).jpg

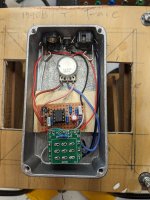
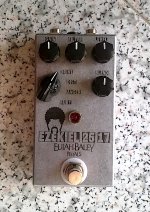
5. Photo of ADHD (Fulltone OCD) corresponding to previous CAD screenshot.
 

Attachments

  • new (1 of 7).jpg
    new (1 of 7).jpg
    564.3 KB · Views: 24
That is awesome! I’ve got a few 1590B boxes I ordered accidentally but I am in no way, shape or form a CAD guy haha. Could you make a drill template or something for us luddites to use? I can punch and drill just fine:ROFLMAO:

Sure, but keep in mind that everything works together. My CAD layout assumes certain 1/4" jacks (and not others), it assumes the body of a certain 3PDT LED jack (and not others), and so on. So with those caveats...

This first picture shows a 1.300" spacing between the outer pots/switches. Note that PedalPCB also uses a 1.600" spacing on some designs, and maybe others that I haven't seen yet. The 1.00" spacing between rows seems fairly routine. Also note that since the walls are sloped, what I am dimensioning everything off of is the midpoint centerlines of the enclosures, not the outer edges.

1569813971580.png

This is my layout of the 1/4" jacks and the power jack. Again, the dimensioning is off of the enclosure centerlines, not the outer edges. The audio jacks and the power jack assumes lumberg branded jacks. Change the hole diameters to adjust for whether the hole location is a 16mm pot or a 1/4-40 toggle switch.

1569814131787.png
 

Attachments

  • 1569813971669.png
    1569813971669.png
    128 KB · Views: 111
I use full size Switchcraft switching jacks but I don't know if you could fit a battery in there! This is my Contact OD. I have built things like the Screwdriver and Angry Charlie into 1590B boxes too but built them on Vero Contact ext.jpg Contact int.jpg .

If you remove the little plastic pot condom that Tayda uses you can fit three pots next to each other in a 1590B. FWIW I drill the jack socket holes 10mm from the lower edge of the box and 16mm in from the sides. The DC socket is 9mm from the upper edge and centred horizontally. When you install them the jack sockets will want to poke up because of contact with the pots but when you wrench down the nuts the sockets straighten up nicely. I've never had a issue doing this. If the lid doesn't fit properly you may need to grind a little off the flange but it's invisible once the box is done up.

There is just about enough room to fit a battery in this box but I haven't tried these jack sockets with a switching DC power socket. However I HAVE used a switch DC socket with Switchcraft 12C sockets. But you have to Dremel out some of the screw channel in the box then. It can be done! It's a pain. I swapped over to these plastic Switchcraft sockets so I didn't have to Dremel anything and I don't use batteries anyway.
 
I use full size Switchcraft switching jacks but I don't know if you could fit a battery in there! This is my Contact OD. I have built things like the Screwdriver and Angry Charlie into 1590B boxes too but built them on Vero...

Great job, it looks awesome. A few questions:
  1. What's Vero?
  2. Are you saying the 1/4" jacks physically touch the pots?
  3. What kind of paint is that on your enclosure?
Regards,
Bravin Neff
 
Vero board = strip board (like perf board but there’s a trace across the rows.

This site has by far the biggest collection of layouts on vero. It’s slowed down in the last couple years, but that’s probably because they feel like they’ve covered most of the good stuff that can reasonably be done on vero.
 
Vero is a great way to cut your teeth as far as soldering technique and other beginner stuff goes. I came to a point with it where I wasn’t really learning anything new as much as I was just building for buildings sake. Switched to PCBs with proper schematics and kept on that train as I was forced to learn much more.
 
PCB and Vero both have their place. For straight-up builds, it's PedalPCB all the way for me. When I want to get creative and color outside the lines, Vero provides a blank slate. Here's an 8 knob Big Muff variant I built on Vero. OK, I'm off topic. Sorry.

Guitar FX Layouts is a fantastic resource. Also checkout Revolution Deux.

Good job getting 10 lbs into a 5 lb bag! Sanitary build as usual. You make it look like the board was designed to go into a 1590B. Just enough room to slide the connectors in after the board & pots are mounted. The Neutrik board-mount jacks are smaller, might clear the pots better. Thanks for the dwgs!

front.jpg board 01.jpg solder side.jpg
 
Bravin - well I think other have explained Vero. I like Vero build because it's cheap and i can design all sorts of weird stuff on it without having to etch PCBs. Maybe one day I might learn to design PCBs but I don't really need to if I have Vero. And converting a schematic to Vero is like a puzzle. It's very satisfying - at first it seemed daunting but after a while it becomes straightforward. And Timmys were (still are?) made on Vero for ages.

Yes the jacks in the pics above of my Contact build do indeed contact the back of the pots. But the bits which make contact are plastic so there are no issues. If I use open jacks (like those you see used in guitars) then I need to Dremel. The plastic ones don't need the Dremel.

The enclosure is a Hammond 1590B which is powdercoated in texture black at the factory. You can buy Hammond enclosures in a range of colours from Mouser - I have used gloss white, red, blue, green, purple and the texture black. I really like the texture black. So much so my Triumph motorcycle which has a texture black engine now also has texture black fenders, tank and side panels. :) I like the Hammond enclosures because they are easier on my drills than the enclosures from Tayda. They cost more but that's ok - Tayda don't do texture black.

Anyway there are lots of circuits which fit into a 1590B. Quite a few Pedal PCB boards are just a 1/2 a millimetre too wide for a 1590B which is slightly frustrating sometimes! Oh well, that's what 125 boxes are for.

Thanks for the detailed info. Funny you mention Mouser and Hammond cases, because I've been buying from Mouser for years and it never occurred to me they sold Hammond, which I have been buying elsewhere. What are those knobs you are using by the way? I notice there doesn't appear to be a lock screw, so they're probably knurled style, yes? I've totally switched over to knurled style myself.
 
I did this successfully too! Thank you!

The veroboard is a layout from Tagboard Effects for the Op Amp version of an EHX Muff Fuzz.
 

Attachments

  • Top View.png
    Top View.png
    806.9 KB · Views: 15
  • Inside view 1.jpg
    Inside view 1.jpg
    484.6 KB · Views: 15
  • Inside view 2.jpg
    Inside view 2.jpg
    518.3 KB · Views: 18
I did it, too, a few months ago. :)
It wasn't easy at all, because a three pots line close the upper side. But I did it.
 

Attachments

  • 051020233444.jpg
    051020233444.jpg
    228.3 KB · Views: 11
  • Ezekiel.jpg
    Ezekiel.jpg
    358.5 KB · Views: 13
Back
Top