Not much room to spare…

pdfermat

Active member
So this is my first PedalPCB build, and 3rd overall - the other 2 were Amazon/Sweetwater kits. And while the previous 2 were somewhat of a success, the bug has bit hard with regards to how much I’m enjoying this new hobby.

I’ve been lurking the forums, watching YouTube tutorials, and learning a bunch. However unexpectedly, the steepest part of the learning curve is enclosure-related (I thought it would be soldering or something else…).

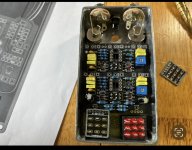
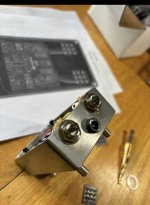
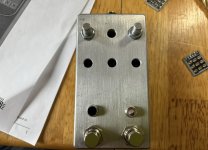
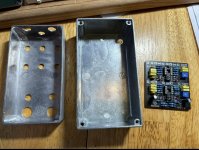
This is a Paragon Mini, and I used the posted drill template (printed out at 100%). The size seemed off when I taped it to the enclosure (125b). The face seemed fine but the top jacks and 9v in seemed off. Even with me moving them up a bit, I still drilled things too low as you can see.

However, it’s kind of a non-issue, since I had to drill out the enclosure back plate screw holes in order to get the jacks and buttons to seat. I’ll benefit from this learning experience for next time and know to be mindful of that, and knowing that the drill templates are not a slam-dunk no-think thing (unless I did something wrong I don’t realize yet). However, I’m not sure that moving things in a bit wouldn’t just present new problems - there is basically little/no room to spare. Are things always this tight for space? Just trying to dry-fit stuff has been more than a little challenging, and I can’t see how I’m going to accomplish the off-board wiring.

Ugh…frustrating, challenging, and fun all rolled into one. Anyone have some tips/advice/etc…?
 

Attachments

  • IMG_1530.jpeg
    IMG_1530.jpeg
    361.9 KB · Views: 52
  • IMG_1529.jpeg
    IMG_1529.jpeg
    353.8 KB · Views: 51
  • IMG_1528.jpeg
    IMG_1528.jpeg
    295.5 KB · Views: 51
im in the same boat as you, I can solder fine Although sometimes can be a pain in certain boards...its the drilling enclosures and graphics that are the big learning curve. I seem to be having issues with printing and it not lining up correctly. id personally probably build that in a 1590bb just to have more space.
 
I hand drill all my enclosures. The paper drill templates are the hardest. They are prone to taping errors and other issues.

If you are not doing UV graphics, then I would suggest getting a pilot hole jig. PedalPCB sells one. Here is a link to another jig maker: https://www.keechdesign.com/

If you have access to a 3D printer, you can use this link to build your own jig. One of the members in the forum made it. It works well.

You can buy pre-drilled enclosures at Tayda or use there drill service. Lastly, I use UV prints. When creating the graphics, I place a dot to guide my pilot holes.
 
Anyone have some tips/advice/etc…?
Hello and welcome to the forums!

In tight builds, like this one, you may find that enclosed or low-profile jacks may be more suitable. Where did you source the 125B enclosure? Most of the drill templates seem to be closely aligned to the dimensions of a Tayda Electronics 125B. There isn't really a "standard" when it comes to 125B enclosure dimensions. It's possible that the one you're using is a little smaller than most, making fitment challenging, especially on tighter builds. I'm not sure of your location, but if you can order from Tayda or StompBoxParts for the next 125B enclosure, you may have better luck getting things to fit/align like they should.
 
I hand drill all my enclosures. The paper drill templates are the hardest. They are prone to taping errors and other issues.

If you are not doing UV graphics, then I would suggest getting a pilot hole jig. PedalPCB sells one. Here is a link to another jig maker: https://www.keechdesign.com/

If you have access to a 3D printer, you can use this link to build your own jig. One of the members in the forum made it. It works well.

You can buy pre-drilled enclosures at Tayda or use there drill service. Lastly, I use UV prints. When creating the graphics, I place a dot to guide my pilot holes.
That keech template thing is probably the best 30$ ive spent on this hobby.
 
Welcome to the forum. Yes, the enclosures are often the most difficult part of these builds (at least they are for me). The first thing I learned is that where you get your parts counts, and the second thing I learned is that putting your little masterpiece in a tiny metal box an making it look good is probably the hardest part. It doesn't help that you picked a tight fitting board to begin with. To answer your question, they aren't all as tight as this one. You picked a tight build. Also, be careful which enclosures you buy. Not all 125B enclosures are the same dimensions. As @Brett suggested, if you can buy your enclosures from Tayda, you'll get enclosures that work well with the PPCB boards. Beware of the Gorva enclosures. Their 125B dimensions are slightly smaller than a true Hammond 125B enclosure.
 
This is awesome everyone - and thanks for the more than warm welcome. Those jigs look like a nice solution, and it’s definitely good to know not all 125b’s are created equal. I may end up trying to work this one into a 125bb for some extra breathing room.
 
Echoing what’s already been said, but tayda’s the way to go for enclosures. Their drill and print services seem very reasonable, and I read about and admire a lot of pedals made that way.

I buy blank tayda enclosures and drill at home using the paper templates. All the templates I’ve used have been right on. I bet that enclosure is under size.

Considering you had zero room for error in that box, I’m impressed with the fit.
 
Just a followup - that enclosure was indeed undersized or not a 125b. I just received some 125b’s from stompbox parts dot com, and as you can see - noticeably larger. I’ll have to look up where I got the previous one - I thought it was the same place, but I’d be willing to bet I inadvertently purchased a smaller size.

Anyway - I have some bb’s coming now as well - so I’ll have to decide if I want to try again with this or the bb on the way. Either way it’s all good - more builds to think about!!

Thanks again everyone for the warm welcome - hopefully I’ll have a success with this to post about.
 

Attachments

  • IMG_1545.jpeg
    IMG_1545.jpeg
    525.7 KB · Views: 9
PedalPCB paper templates and a good hole punch always work perfectly for me (making a small pilot hole aligned with the hole punch divot is also a useful method, before going to the full-size drill). Just remember to verify that the template is printed at *** 100% scale *** on your printer, don't use auto-fit! I learned that goof on my first build, lol.
 
Back
Top