Effects Layouts Desertron

VanWhy

Well-known member
Build Rating
5.00 star(s)
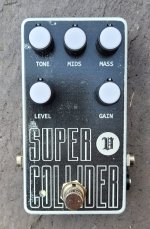
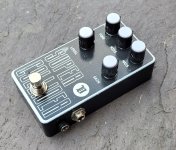
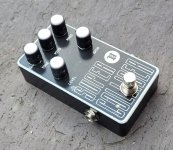
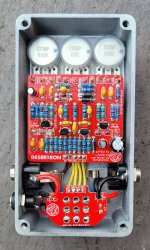
Highly modified Russian Muff-style fuzz based on the Earthbound Audio Supercollider. As I'm told, it's an older PCB from EL. Sounds good. I seem to like the 2N5089's in my Muffs.

The build is pretty noisy but from the demo's it seems to be about right. No film caps likely didn't help.

Either way I dig. Can get those doomy, muffy tones.

Still trying to nail down the film free decals. Supposed to be all black background but a few air bubbles showed up. Still looks fine to me. Took liberties with the SC logo.

All in all, I'm satisfied with it. Nice and compact in a 1590B.
 

Attachments

  • 20240622_170148.jpg
    20240622_170148.jpg
    528.9 KB · Views: 63
  • 20240622_170155.jpg
    20240622_170155.jpg
    801.6 KB · Views: 53
  • 20240622_170200.jpg
    20240622_170200.jpg
    783.7 KB · Views: 54
  • 20240622_170206.jpg
    20240622_170206.jpg
    472.7 KB · Views: 63
Looks awesome! Don’t sweat the film free issues, it’s “made by hand” :)

Once the decal is set with multiple wetted squeegee passes, I also wet my finger and circular rub gently (so as to not move the decal) but firmly (to help it adhere). I don’t know how much that helps… I’m positive some of my film-free routine is superstition haha.
Thanks :) do you use the oven or a heat gun? I use the heat gun and basically wipe dry the decal before heating/curing. I'm wondering if I should cure it while it's still a bit wet
 
Thanks :) do you use the oven or a heat gun? I use the heat gun and basically wipe dry the decal before heating/curing. I'm wondering if I should cure it while it's still a bit wet

Oven, 235F for 10 minutes. 10 minutes or more cool down before removing the film.

I don’t think the outside water wetness matters a ton except to lubricate the squeegee (and finger rubbing hah). And of course any water on the inside is bad news as it would dilute the glue.
 
Looking to build this to get all the doom out there. So, this board would merely need a clipping switch to change the diodes for a LED to become the current iteration of the circuit? As I read on dirtboxlayouts: "if you want to make this one really fun put the 4001s on a switch and switch between led and 4001s. im pretty sure this is all they did in the newer version. I used water clear red."

Also, does the mid knob still work in reverse, as the comment on the layout page say?

Via: http://dirtboxlayouts.blogspot.com/2019/07/earthbound-audio-supercollider.html
 
Last edited:
Looking to build this to get all the doom out there. So, this board would merely need a clipping switch to change the diodes for a LED to become the current iteration of the circuit? As I read on dirtboxlayouts: "if you want to make this one really fun put the 4001s on a switch and switch between led and 4001s. im pretty sure this is all they did in the newer version. I used water clear red."

Also, does the mid knob still work in reverse, as the comment on the layout page say?

Via: http://dirtboxlayouts.blogspot.com/2019/07/earthbound-audio-supercollider.html
Not sure at all about the newer versions but to me it doesn't seem like it's toggling clipping diodes. According to the latest model on the site "The toggle switch selects between the standard gain setting (down) or an even higher gain setting (up) for extra creamy sustain." To me adding an LED would just make it louder, not add more gain. Would still be pretty cool but I don't think that's what's going on in the latest iteration. I could be wrong though since it is in the 2nd gain stage. https://earthboundaudio.bigcartel.com/product/supercollider

I didn't see that comment on that post, but I'll have to check on that. I honestly built and played a lot of pedals since then so I can't remember. I'll break it back out and let you know.
 
Thanks. Migh be the difference between the DIY and the original.

I ordered the PCB today; tossed some questions at the seller so lets see what I can learn from this.

Here's the original big box version with switch, showing the red LEDs next to the diodes...

51933015895_2ef1cc14a6_c.jpg

Edit: For completeness' sake, the old schematic floating around. The Desertron is based on this.

"SUPERCOLLIDER modified Sovtek Big Muff - The Collider was yet another modified Russian Big Muff clone (discontinued), this one a tweakable, bass guitar friendly circuit, built by Earthbound Audio in 2008. Mark at Earthbound added a Depth pot at the input stage, similar to the Focus pot in the Muskett schematic shown above. The tone section has been modified to include a 50k mid range pot at R27, a variant on the AMZ tone/presence control, allowing adjustment to the mid-range frequency. Limiting resistors at R12 and R19 are half the size of the resistors in a Russian Big Muff, and feedback resistors at C12 and R15 are 1M (1000k), around double the size of a Russian Big Muff. This creates a lot more drive, crunch, and gain in each clipping stage than a traditional Russian BMP.

The Pharaoh by Black Arts Toneworks followed a few years after the Collider shown above, but was apparently inspired by it. Both use MPSA18 transistors in Q4 and 2N5089 in Q1-3, along with tantalum input and output caps."

Supercollider Big Muff Schematic.jpg

Via: http://www.bigmuffpage.com/Big_Muff_Pi_versions_schematics_part4.html

I also found some partial innard pics of the Beast version with oscillators. Not sure if I would really want that addition to the pedal, but we'll see. I read that @Fuzzonaut owns (or owned?) the beast. So lets see what he thinks of it. He seems to know his fuzzes. I wouldn't mind seeing a photo telling us what's going on on the other side. 🫠

nktgzlu3t8ts5lyxuah0.jpg
 
Last edited:
I read that @Fuzzonaut owns (or owned?) the beast. So lets see what he thinks of it.
Well, I actually still have it, and I think it's one of the coolest muffs money can - or could - buy.

There are 2 types of oscillation, one rather lowtuned that can be kept like in the background somehow, thickening the tone with a hint of crazyness lurking around the corner and the other is more high pitched and jumps in yer face and screams ....
And of course you can kick in both which gives you a combination of the two - or a third flavour so to speak.

So, I'm pretty sure you would want that addition.

Love it on bass, if that matters.
 
Thanks. Migh be the difference between the DIY and the original.

I ordered the PCB today; tossed some questions at the seller so lets see what I can learn from this.

Here's the original big box version with switch, showing the red LEDs next to the diodes...

View attachment 80471
I also found some partial innard pics of the Beast version with oscillators. Not sure if I would really want that addition to the pedal, but we'll see. I read that @Fuzzonaut owns (or owned?) the beast. So lets see what he thinks of it. He seems to know his fuzzes. I wouldn't mind seeing a photo telling us what's going on on the other side. 🫠

View attachment 80469
Okay there you go. Definitely toggling LED's and Schottkys
 
Well, I actually still have it, and I think it's one of the coolest muffs money can - or could - buy.

There are 2 types of oscillation, one rather lowtuned that can be kept like in the background somehow, thickening the tone with a hint of crazyness lurking around the corner and the other is more high pitched and jumps in yer face and screams ....
And of course you can kick in both which gives you a combination of the two - or a third flavour so to speak.

So, I'm pretty sure you would want that addition.

Love it on bass, if that matters.
I want. :)

I need it on bass. Its why I came to check this out next to the all-rounder, the Pharaoh. Curious if the pcb traces are as clear on the other side, so I can do the mod myself? *wink wink* It a re-arrangement of components, but next to the vero and perf layouts of the Desertron / Supercollider that are readily available, it shouldn't be too hard to see where the additonal switches and pot go. Looks like there's only 4 extra resistors if my quick counting is correct...

The photo of the Beast above also shows the first model, without the clipping switch, but that's an easy addition anyway.

Would you mind showing us this? 🙈
 
Last edited:
This is the only Supercollider (and in extension Beast) thread on the site. There isn't such a thing as gut shot request thread on this site, as far as I am aware? So, it seems an appropiate enough place, if @VanWhy agrees. Otherwise a new thread somewhere is in order, to throw all the info we got on these effects in one place. But I guess this is the perfect place to see the only available PCB for purchase nicely populated by him, alongside the original variations. :)
 
So, here we go, I just had a few minutes, if you want more pics, let me know. PCB says 2014, 1x MPSA18 and 3x 2N5089 as in the schematic above.

I'm not too thrilled about taking it apart and/or out of the enclosure, but I might be persuaded to do some "continuity beeping/checking" with a DMM between the solder points of your choice. ;)

IMG_1485.jpeg IMG_1486.jpeg IMG_1487.jpeg IMG_1488.jpeg IMG_1489.jpeg IMG_1490.jpeg IMG_1493.jpeg
 
So, here we go, I just had a few minutes, if you want more pics, let me know. PCB says 2014, 1x MPSA18 and 3x 2N5089 as in the schematic above.

I'm not too thrilled about taking it apart and/or out of the enclosure, but I might be persuaded to do some "continuity beeping/checking" with a DMM between the solder points of your choice. ;)

View attachment 80624View attachment 80625View attachment 80626View attachment 80627View attachment 80628View attachment 80629View attachment 80630
You're the king! <3 The PCBs are on their transatlantic journey so it'll be awhile until I come back for the inevitable continuation requests. No need to take them apart; I won't want you to suffer through that wiring.

Likely will have to know where which pot value sits where as this PCB of yours has a different layout from the other I found. And where the middle red wire on the bottom left goes. But we'll do all of that later. Most beast-specific wiring is nicely visible from this side. I can move ahead quite nicely for a while thanks to these excellent photos... 😌
 
Last edited:
Back
Top