Jam Pedals Rattler V2 Design Speculation

Flying

Well-known member
I had the opportunity to play my mate’s Rattler V2, and thought the boost was a very nice addition, once we’d taken it down from it’s default maximum. As far as I know it’s not been traced and I thought it might be a bit of fun to bread board a circuit that might give a close approximation of what they did. So I thought I’d start this thread to get some of my initial impressions down in writing and see if anything stands out to any of you, or suggestions on things to try.

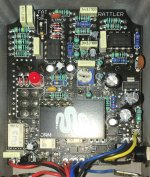
Rattler.jpg

I’m presuming all the SMD components at the bottom are for the switching, and that the through hole components are for the audio sections.

I’m guessing the RAT side of it is still very much a traditional RAT circuit, the main differences being that the tone control is a C100K (if it’s the same as the original rattler) so works in reverse compared to the filter control on a RAT. Symmetrical clipping with 1N4148s and asymmetric clipping with one 1N4148 and a red LED via a switch.

Their proprietary desecrate op amp development is interesting. JHS say the OP07 is effectively the same as the LM308, so I wonder why go to the trouble? Are they fearful that production of the OP07 is going to be discontinued in the near future? Or maybe it’s simple enough to do and adds a certain mystique to the product, I’m not planning on delving into that and will use an OP07.

The boost side I speculate is Boss SD1 inspired using asymmetric clipping with a fixed tone and output settings. The internal trim pot (105) is 1M so I think that is going to be in the feedback loop of the op amp rather than being an output level control. This suggests it is more about tone shaping and clipping than signal boosting.

There are a couple of things that I’ve noted but not worked through yet, if you are simply switching between two clipping options you only need a SPDT switch, but they have chosen a DPDT. Also, there appears to be a trace from one of the outside switch lugs to what looks like a ceramic capacitor, so would this form a low pass filter in the clipping section (the switch in that position would be for symetrical clipping)?

The second op amp might be being used as an input and output buffer for the boost instead of transistors as used in the SD 1.

Of course I could be, most likely am, completely wrong!

I’ve not built pedals or played around with breadboarding for a few years now and realised I missed it, so I want to get back into it, and to progress out of the painting by numbers phase and to have some notion as to what’s going on.

This will also me my first project using KiCad as I try and move away from the free version of Eagle.

If anyone has any thoughts or sees any errors in my assumptions so far, please let me know.
 
Make fun of it? I want to build one.... :)

View attachment 86899

Hi @Robert,

I noticed in another thread you seem to be exploring the idea of making a surface mount discrete op amp, and lets say hypothetically it is a LM308. Is the schematic in the specification document, complete? Only it says, “The inputs are shunted with back-to-back diodes for overvoltage protection” and there are no diodes in the schematic. Nether is there any indication as to what the specification of the transistors is.

Screenshot 2024-12-11 at 21.49.50.png

I guess I’m wondering, how close would it be possible to get to clone it?
 
gonna take a swing and say they ditched the usual rat jfet output buffer section in favor of an opamp buffer (which is smart if they're considering longevity). Then an active mid boost circuit a la the clapton style or something with fixed gain but adjustable volume (trimmer) and input caps (fat).
 
Thanks for you ideas on this Nostradoomus,

I’d not though of the Clapton mid boost as a possible design route. It will be interesting to mock it up and see how it works into the RAT. Without really thinking about it I looked at the PCB, saw three diodes in what could be a asymmetric soft clipping configuration, along with op amps and a 1Meg trimpot for adjusting the boost and jumped to an SD1 as the basis for the design.

Why would an op amp be better than a JFET for the output buffer?

not better, really just easier. The output buffer on a rat isn't anything special and jfets are a pain in the ass :ROFLMAO:
 
I breadboarded the RAT over the weekend,

Should I be able to hear a difference putting 30pF between pins 1&8 of the OP07?

I know it’s needed for the LM308, but remembered seeing something somewhere that said it should be omitted on the OP07. I can’t hear a difference, but it’s not on a switch so maybe I’m not doing a quick enough AB test.

For the JFET I’m using an SMD 5458, I see JHS is using a J202, I don’t know if in this configuration the type of JFET make any difference.

The JHS 3 series distortion is my only current Rat reference, and my bread boarded circuit sounds close but not quite as full, so I’ll go over it checking values again. I’m using a A100K pot for the filter control as I don’t have a C100K (as used in the JHS series 3 and in the Rattler) in stock and the A100K is what what used on the Rat. Oh and I didn’t have any 4u7 electrolytic but did have 4u7 tantalums (no idea why I have them) so used them.

Anyway I’ll have a play with ideas for the boost next weekend.
 

Attachments

  • BreadBoard RAT.jpg
    BreadBoard RAT.jpg
    177.4 KB · Views: 4
30p is what jhs used in the 3 as well with OP07. The difference in fullness could come down to the forward voltage of the diodes or other part tolerance specs (pots/caps being 20% etc). The filter pot won't make a difference really, using C vs A is just a matter of having it sweep left to right or right to left in relation to bass/treble. The only thing JHS did was change some values on the power rails and an extra set of clipping diodes.
 
I figure the differences are likely to be within the tolerances, but I’ll still double check the values just in case I slipped up. I’ve also just order a pair of LCR tweezers so I might open the Series 3 pedal and have a poke around when they arrive. Not that I suspect the schematic JHS published is different from what they did in the pedal, but you never know!
 
Hi @Robert,

I noticed in another thread you seem to be exploring the idea of making a surface mount discrete op amp, and lets say hypothetically it is a LM308. Is the schematic in the specification document, complete? Only it says, “The inputs are shunted with back-to-back diodes for overvoltage protection” and there are no diodes in the schematic. Nether is there any indication as to what the specification of the transistors is.

View attachment 86918

I guess I’m wondering, how close would it be possible to get to clone it?

Q3 and Q4 are wired as diodes for input protection. There’s two categories of transistors in the lm308 - superbeta transistors (hfe ≈ 5,000) and standard transistors with an hfe around 200. On the schematic above the transistors with wider bases are the standard ones.

There’s a lot of interesting analysis of the lm308 out there:
- https://pe2bz.philpem.me.uk/Parts-A...ional/AN-29-OpAmp-BeatsFET-onInputCurrent.pdf
- http://www.righto.com/2016/12/inside-lm108-op-amp-superbeta.html?m=1

I don’t know of any discrete bjts with betas exactly that high but there’s a fair amount in the 2,000+ range.
 
Q3 and Q4 are wired as diodes for input protection. There’s two categories of transistors in the lm308 - superbeta transistors (hfe ≈ 5,000) and standard transistors with an hfe around 200. On the schematic above the transistors with wider bases are the standard ones.

There’s a lot of interesting analysis of the lm308 out there:
- https://pe2bz.philpem.me.uk/Parts-Active/IC-Analog/- AN-National/AN-29-OpAmp-BeatsFET-onInputCurrent.pdf
- http://www.righto.com/2016/12/inside-lm108-op-amp-superbeta.html?m=1

I don’t know of any discrete bjts with betas exactly that high but there’s a fair amount in the 2,000+ range.
I fear much of it will go over my head, but thanks for posting those two links @finebyfine, I'll endeavour to understand as much as I can, the interactive chip viewer is amazing.
 
Still a few more connections to trace, but here's what I can tell you so far...

The discrete opamp is comprised of 2N3904 / 2N3906. 11 transistors, 5 resistors, and 5 capacitors. It's somewhat similar in structure to one half of the Orange discrete opamp. (Although the Orange has JFET inputs) Nowhere near as complicated as the schematic above.

The boost is a soft clipping overdrive circuit similar to the OD-1.

The clipping switch is DPDT because while one side toggles the clipping LED in/out of the circuit the other alters a gain stage to make up for the difference in clipping threshold.

The Rat portion looks like a Rat with a reversed tone control, as you noted.
 
Last edited:
Super excited for this one.

I made a board for a dual discrete opamp based on the blues driver. I'm going to make a few and drop one into my morning glory for a blues driver/breaker hybrid. Like this

I think anything with discrete opamps is fun build and mod
 
Last edited:
Robert is that trim pot controlling the amount of gain on the midboost/OD-1 section?
I think it's a 1Meg trim pot, so I've been working on the basis that it is in the feedback loop of the op amp, so a gain control rather than a level control.

The boost takes up at least one of the two TL072s, making me wonder where the other one fits in?
 
The TL072 stages are the boost gain stage, a buffer, the clipping makeup gain stage, and a VREF buffer.

The trim pot is not in the feedback loop, in fact, it doesn't appear to be in the boost circuit at all, and that's puzzling me.

I have to trace the relay switching next to see how all of these sections tie together... I'm sure it'll all make more sense after that.

Normally I would have done that first, but since I can't easily remove the relays (there are three SMD relays in tight quarters) I'm saving that fun for last.
 
Last edited:
Back
Top