Chela Overdrive

aperaturek3

New member
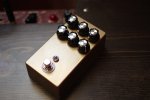
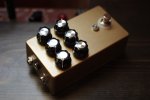
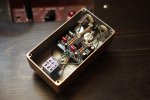
Here is a Chela overdrive I recently finished. Got a mixture of resistors going on, trying to use up some stuff I have sitting around...
Really happy with how it sounds and how versatile it is, sounds really cool on bass as well as guitar. The drive has
a pretty wide sweep, everything from a pretty transparent boost to pretty saturated.
Here is a few photos of it, and also here is a link to a track I made testing it out if anyone wants to hear what it sounds like.
Not that great at mixing and all that but whatever. Used a telecaster for all the guitar tracks and a 5F1 champ with a 12" speaker I built for the amp.


225

226

227
 
Last edited:
"Not that great at mixing and all that but whatever. " he says, then posts a ready for radio pop-rock track that I would absolutely listen to. :LOL:

That sounds excellent, the build is sharp as hell, and the pics are top notch too. All around awesome job man, really.
 
hey thanks everyone! I will pass on the good sound compliment to the pedal... it doesn't have any eq or fancy mastering or production because I have no idea how to do any of that. Just some software drums!

Im proud of how clean this one turned out, it is probably my best. I have a lot of bad ones in the past year, including 3 ruined pcb boards... thats how you learn i guess!
 
Thanks for posting a picture of what the inside supposed to look like. Now I can use it as a reference. I chose this one one as my very first pedal build. I got the PCB for Christmas. Ruined it by trying to de-solder a pot that I put in the wrong spot. Got another one and got everything together. Plugged it in and the LED came on and it works some what. I was just happy that it came on and I got some sound out of it. Now I get to learn how to troubleshoot. Don't feel bad I'm learning by messing up too and having fun doing it. Already looking at the Blue Breaker as my second attempt at one. looks a lot simpler.
 
Last edited:
Thanks for posting a picture of what the inside supposed to look like. Now I can use it as a reference. I chose this one one as my very first pedal build. I got the PCB for Christmas. Ruined it by trying to de-solder a pot that I put in the wrong spot. Got another one and got everything together. Plugged it in and the LED came on and it works some what. I was just happy that it came on and I got some sound out of it. Now I get to learn how to troubleshoot. Don't feel bad I'm learning by messing up too and having fun doing it. Already looking at the Blue Breaker as my second attempt at one. looks a lot simpler.

All the boards I have ruined, I did so by de soldering something and not being able to get the part back in the pad. Overheating the pad and then it falls off. Really frustrating when you spend so long on the components! Learn something new with every screw up though which is the key.
 
PCB boards are pretty fragile when you are removing a part, because the traces to the hole can be damaged when pulling the component out of the board. Sometimes you can patch the problem by soldering a lead that you clipped off of another part to the new component and whatever the hole in the board was supposed to connect to. Also, FWIW, I've had better luck removing a lead from a board by first cutting it off from the part, melting the solder on the board, and pushing the clipped lead through the board and pulling it out from the other side.
 
A trick I use are dressmaker pins with the Ball on the end. Because of type of material ie Stainless Steel, they don't stick. Remove Item from pad.
Put the Soldering Iron on long enough to melt the Solder & drop the Pin through the Hole at the same time wiggling the Pin Up & Down til it sets. For Larger Holes, I use a babies Nappy Pin.
With removing PCB Pots, Just move the Soldering Iron short & quickly between Outer & Middle Leg pads at the same time Pushing Lightly.
Then do the same to the other Outer Leg & Middle Leg pads.
If you have Spares, Cut the Legs & remove separately for the sake of the PCB.
Then use the Nappy size Pin to clean the Holes out!
 
Last edited:
Looks great, love the photography and minimalistic design. I will be finishing up this build today. Does anyone how the sound is altered with switching up the color of the pair of LEDs used?
 
Does anyone how the sound is altered with switching up the color of the pair of LEDs used?

All other colors have higher Vf which will increase increase the clean headroom in the overdrive stage, but... the active tone controls will run out of headroom if you crank any of the tone controls. It will sound different. Better or worse, depends on your personal taste.
 
Back
Top