New Version with a Tone Switch!:


Do we know is this using the same drill template as the new adhd?

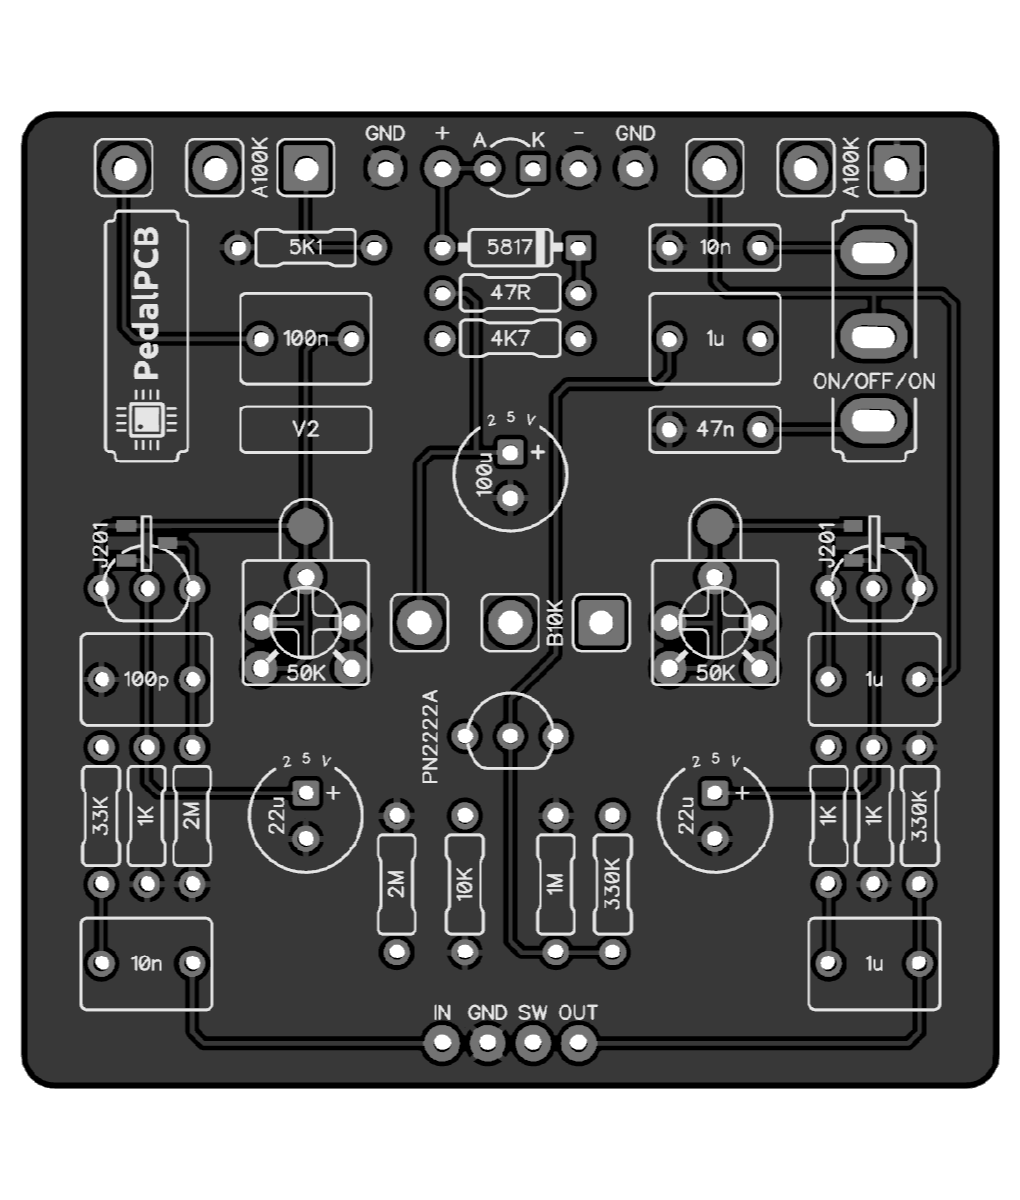
While the original version 2 has a Vol Pot of 100KA,
Awesome wanna race to the post office ?Yep. You're not going to believe this, but the doc is already up....
It just means it's going to be one helluva combo pedal with all 3 in 1 enclosure. Yes, 3-in-1.Does this mean I'm gonna have to get the third version of this board without having built the previous two yet?
Yep. You're not going to believe this, but the doc is already up....

Crank up the volts all the way to the right, turn them down to the left. Makes total sense.
Want sag? Turn down the volts to the left.
Why not commit fully to the Chop Shop name and make the others volume-cut and gain-cut too? Think of all the UV print thematic possibilities!Yep, I guess so.... but then shouldn't it be called "Volts" and not "Sag"?
If I turn up the Sag knob I expect more... well... sag.
We can pull a "Timmy" though and just consider it a Sag-cut control.
It varies, as we get older we Sag & it's definately turning down not up!!!Why not commit fully to the Chop Shop name and make the others volume-cut and gain-cut too? Think of all the UV print thematic possibilities!
What do you use to draw these up? Very cool!
Photoshop, my son gets phone calls when it freezes coz I hit the wrong icon.What do you use to draw these up? Very cool!
Very cool.. I thought it was a 3D program or somethings. So the knobs in the pic are real and you just cut them from something else?Photoshop, my son gets phone calls when it freezes coz I hit the wrong icon.
He is a Graphic designer & uses programs that are beyond my computer skills.
I actually started with finished pedals on the jarrah coffee table & slowly removed Footswitches, Knobs & toggle switches from the photo in Photoshop. You have to learn how to separate the Enclosure from the background first so it's like adding layers all the time.
When I got different size enclosures, I would take a photo of it as a blank enclosure on the Table so I could paste things on it in Photoshop.
I also use blank enclosures from the web.
The first thing I do is design the Graphic then save it as psd & also a jpeg.
Then I get rid of what I dont want in the background & lay the graphic like a sheet on top of the blank enclosure & then using the Transform & Skew mode, I can stretch & shrink it to shape so it looks like it has been stuck in place.
All the drill holes are on the graphic so then its just a matter of putting all the knobs, footswitch, leds on top of the circles.
You have options that allow you to change the pedal to any colour you want & light & shade.
i've been doing it for around ten years so it took a while to get to this level & I'm still learning!
This took a minute to change:That's basically what I've done & you can use the same knob like the plain Aluminium one & stretch it or make fatter in diameter, Change the colour, add white pointer line to it , the MXR style with or without the skirt on the bottom
Same with that raw finish on the chop shop above, I can change the enclosure to any anodized colour your want.
