Fingolfen
Well-known member
- Build Rating
- 4.00 star(s)
So when a friend asked if I could whip him together a Monarch clone for a bandmate, I figured - it's an EQD pedal... how hard could it be? Little did I realize the rat hole I would find myself going down on this one, and honestly I haven't quite hit bottom yet. First I want to give a huge thank you and shout out to @Chuck D. Bones with his amazing analysis of the Monarch and EL Tangerine board. I ultimately decided to go with the "minimal change" version of the Tangerine, but my next goal is to really exercise the Viceroy board for some future builds...

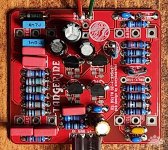
Even though I knew I was going to make modifications, I went ahead and started with the Effects Layout Tangerine board. This board is essentially a PCB version of the etchable trace on his blog. Unfortunately the PCB now seems to be out of stock. This particular board is designed to fit either in a 125B with top mounted jacks or a 1590B with top mounted power and side mounted audio jacks. As it can fit in the smaller enclosure, it is a fairly tight board. The solder pads are all generously sized, and the through holes seem to be a bit larger in diameter than what I'm used to. This made soldering everything to the board a little different as I was initially concerned I might have issues with jumping, but everything ultimately soldered down very nicely.

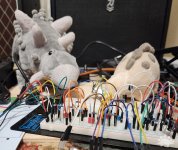
Since I knew I was going to modify the original circuit, I went ahead and breadboarded the whole thing first just to make sure everything worked as expected with the modifications before I began soldering down components. The modifications I used are mostly detailed in the PedalPCB forum thread linked above, but I also used FuzzDog's version of the board and his circuit diagram (which was largely based on the Boneyard modifications) as a reference. I then made changes to the schematic in the Tangerine instructions to use as my reference document for the bread board and later PCB builds. Once I had the breadboard version of the pedal working correctly, I began populating the PCB itself.
For both the breadboard and PCB builds, I used all 1% metal film resistors from Yageo and KOA Speer. The build calls for a couple of 10M Ohm resistors, which to get in metal film are a bit more expensive than your average resistors, but it keeps all of the resistors the same type and tolerance. The film capacitors are a mix of WIMA and KEMET. The MLCC capacitors are from KEMET and Vishay. All of the electrolytic capacitors are Nichicon.
As you can see from the PCB, there are a few major modifications to the circuit, mostly to improve the bias path for the transistors. C9 is eliminated and replaced with a jumper. R11 - normally a 470K Ohm grounding resistor after C9 is left out entirely (no jumper!). Both C10 and C12 are replaced with 10K Ohm resistors. The PedalPCB Viceroy makes several more changes to the base circuit, but I stopped there for these initial builds.

As I was putting resistors in slots on the PCB originally designed for capacitors, I grabbed a couple of the vertically oriented 10K Ohm resistors I still had lying around from pandemic era shortages. Not only did they fit better, but they helped me keep all of the changes to the circuit straight in my head as I was populating the boards. Another change from my normal process for building a circuit was actually building with the circuit diagram pretty much in order rather than just populating with a parts list. This allowed me to validate that each component was actually hooked up correctly. I also discovered at least one error in the silkscreen. The outline orientation of Q1for a BS170 transistor is correct on the silkscreen, but the source and drain are mislabeled. Fortunately I was able to verify the correct orientation with my multimeter on the board itself.
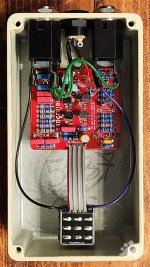
Once the board was populated, boxing the PCB was fairly straightforward, with a couple of minor twists. Because the LED connects directly to the main PCB as opposed to a daughter PCB, I wanted to make sure the height and orientation of all of the potentiometers and the LED was correct. Therefore rather than trying to solder the pots on first, I went ahead and put them into the enclosure along with the LED and soldered them to the board from the component side. However, the treble pot (upper left) is sandwiched between two film capacitors. I therefore had to take the board back out of the enclosure (which I often do for testing anyway) and solder Leg 2 from the other side. I went ahead and used a PedalPCB daughter board as it lines up perfectly with the Effects Layouts main board. All of the jacks are insulated with heat-shrink tubing, and as there is only one ground connection to the main PCB, I used a star ground to the input jack like I would on an AionFX board.

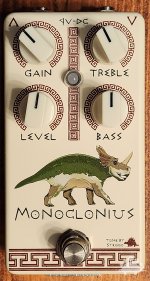
As you can see from the interior shot, there is more than ample room to include a battery in a 125B enclosure, but I made the decision early on to not go that route to allow more room for enclosure art! Once again the art is provided by Ukrainian artist Kate (@estelkatrin on Instagram), and our mascot is the Monoclonius.
As to the sound of the pedal, this is another one that actually surprised the heck out of me. I figured it would be a decent dirty boost, but it has a lot more range than I originally thought. The treble and bass controls aren't roll offs, they're boosts - though the treble boost appears to be stronger than the bass boost. The level gives you a very wide range of volume control, with unity coming very early in the rotation! I'm going to experiment with mine a bit more, but this one may end up on the permanent studio board!
In terms of my final rating, I'm going to give the board 4 stars - simply because of the minor error on the board itself. If you're not careful, you can get your Q1 turned around fairly easily. In terms of the build, honestly going through the full breadboard process, taking the base board, and then making the modifications was incredibly satisfying, and from that standpoint it is one of my favorite builds ever.
A bit more at the blog (mostly preamble and dino and enclosure design info): https://steggostudios.blogspot.com/2023/04/cloning-famous-eqd-monarch.html

Even though I knew I was going to make modifications, I went ahead and started with the Effects Layout Tangerine board. This board is essentially a PCB version of the etchable trace on his blog. Unfortunately the PCB now seems to be out of stock. This particular board is designed to fit either in a 125B with top mounted jacks or a 1590B with top mounted power and side mounted audio jacks. As it can fit in the smaller enclosure, it is a fairly tight board. The solder pads are all generously sized, and the through holes seem to be a bit larger in diameter than what I'm used to. This made soldering everything to the board a little different as I was initially concerned I might have issues with jumping, but everything ultimately soldered down very nicely.

Since I knew I was going to modify the original circuit, I went ahead and breadboarded the whole thing first just to make sure everything worked as expected with the modifications before I began soldering down components. The modifications I used are mostly detailed in the PedalPCB forum thread linked above, but I also used FuzzDog's version of the board and his circuit diagram (which was largely based on the Boneyard modifications) as a reference. I then made changes to the schematic in the Tangerine instructions to use as my reference document for the bread board and later PCB builds. Once I had the breadboard version of the pedal working correctly, I began populating the PCB itself.
For both the breadboard and PCB builds, I used all 1% metal film resistors from Yageo and KOA Speer. The build calls for a couple of 10M Ohm resistors, which to get in metal film are a bit more expensive than your average resistors, but it keeps all of the resistors the same type and tolerance. The film capacitors are a mix of WIMA and KEMET. The MLCC capacitors are from KEMET and Vishay. All of the electrolytic capacitors are Nichicon.
As you can see from the PCB, there are a few major modifications to the circuit, mostly to improve the bias path for the transistors. C9 is eliminated and replaced with a jumper. R11 - normally a 470K Ohm grounding resistor after C9 is left out entirely (no jumper!). Both C10 and C12 are replaced with 10K Ohm resistors. The PedalPCB Viceroy makes several more changes to the base circuit, but I stopped there for these initial builds.

As I was putting resistors in slots on the PCB originally designed for capacitors, I grabbed a couple of the vertically oriented 10K Ohm resistors I still had lying around from pandemic era shortages. Not only did they fit better, but they helped me keep all of the changes to the circuit straight in my head as I was populating the boards. Another change from my normal process for building a circuit was actually building with the circuit diagram pretty much in order rather than just populating with a parts list. This allowed me to validate that each component was actually hooked up correctly. I also discovered at least one error in the silkscreen. The outline orientation of Q1for a BS170 transistor is correct on the silkscreen, but the source and drain are mislabeled. Fortunately I was able to verify the correct orientation with my multimeter on the board itself.
Once the board was populated, boxing the PCB was fairly straightforward, with a couple of minor twists. Because the LED connects directly to the main PCB as opposed to a daughter PCB, I wanted to make sure the height and orientation of all of the potentiometers and the LED was correct. Therefore rather than trying to solder the pots on first, I went ahead and put them into the enclosure along with the LED and soldered them to the board from the component side. However, the treble pot (upper left) is sandwiched between two film capacitors. I therefore had to take the board back out of the enclosure (which I often do for testing anyway) and solder Leg 2 from the other side. I went ahead and used a PedalPCB daughter board as it lines up perfectly with the Effects Layouts main board. All of the jacks are insulated with heat-shrink tubing, and as there is only one ground connection to the main PCB, I used a star ground to the input jack like I would on an AionFX board.

As you can see from the interior shot, there is more than ample room to include a battery in a 125B enclosure, but I made the decision early on to not go that route to allow more room for enclosure art! Once again the art is provided by Ukrainian artist Kate (@estelkatrin on Instagram), and our mascot is the Monoclonius.
As to the sound of the pedal, this is another one that actually surprised the heck out of me. I figured it would be a decent dirty boost, but it has a lot more range than I originally thought. The treble and bass controls aren't roll offs, they're boosts - though the treble boost appears to be stronger than the bass boost. The level gives you a very wide range of volume control, with unity coming very early in the rotation! I'm going to experiment with mine a bit more, but this one may end up on the permanent studio board!
In terms of my final rating, I'm going to give the board 4 stars - simply because of the minor error on the board itself. If you're not careful, you can get your Q1 turned around fairly easily. In terms of the build, honestly going through the full breadboard process, taking the base board, and then making the modifications was incredibly satisfying, and from that standpoint it is one of my favorite builds ever.
A bit more at the blog (mostly preamble and dino and enclosure design info): https://steggostudios.blogspot.com/2023/04/cloning-famous-eqd-monarch.html
Last edited:

