Gravitation Reverb (EQD Levitation)

MichaelW

Well-known member
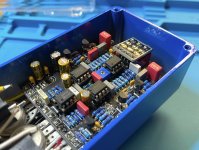
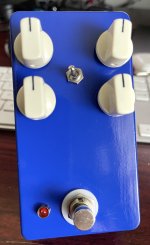
Well after a moment of stupidity of being confused by the PCB layout (thank you @Harry Klippton and @thewintersoldier!!) I just buttoned up this build.

I needed another reverb pedal so I didn't have to keep moving my Spatialist between my desktop recording setup and my amp setup, which are two different signal paths.

I wasn't looking for anything particularly fancy and the Gravitation sounded like it would fit the bill nicely. And it DOES!
It's my first Belton Brick reverb and it's got some nice sounds in it. As the ad copy says you can do the short delay slap back small room sound as well as more luscious sounds to all the way wacky with all the controls dimed.

The Tone knob is super useful and I wish more reverbs had a tone control. The toggle controls long tail vs shorter tail on the decay.

Not much else to say except that it's a great sounding reverb pedal. It's sitting in my buffered loop box loop going into my recording interface and works well with the Hydra Delay before it.
IMG_3194.JPG

IMG_3193.JPG
 
Hey cool you made yours! This is a great pedal and I’m still loving mine. Lots of useful sounds from subtle to wacky and ambient. And totally agree about the tone knob.

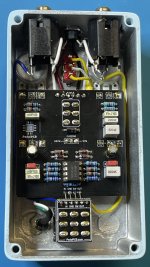
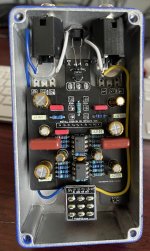
Nice and tidy guts too! How did you wire from the PCB to the breakout board? I was going to use the breakout on mine but ended just wiring the switch up directly because there was no room. Same issue on my Magnetron and Caesar builds too. Do you have short wires running from the underside of the PCB to the underside of the breakout?
 
I'm not sure how @MichaelW does it, but I install all of the hardware and PCB into the enclosure, solder the breakout board onto the footswitch, then drop solid core wire straight down through both PCBs, solder the joint at both boards, then clip.

I use a dental pick to guide the wire into the lower PCB when needed.

On this board it'd be easier if you wait to put the lower IC into the socket until afterwards so it's not in the way.

Another little trick is to leave a small piece of insulation on the solid core wire, then let it slide back as you push the wire through the two PCBs. When you get to the depth you want the piece of insulation on top will hold the wire in place (so it doesn't fall all the way down and hit the enclosure). Solder the lower board, pull back the insulation, solder, clip, repeat.
 
Hey cool you made yours! This is a great pedal and I’m still loving mine. Lots of useful sounds from subtle to wacky and ambient. And totally agree about the tone knob.

Nice and tidy guts too! How did you wire from the PCB to the breakout board? I was going to use the breakout on mine but ended just wiring the switch up directly because there was no room. Same issue on my Magnetron and Caesar builds too. Do you have short wires running from the underside of the PCB to the underside of the breakout?
I usually either use pin headers or Buss wire. Both tips I learned from @fig. In the case of this pedal since the breakout board lines right up over the main board I used pin headers. Just break off a 4 piece section and solder it into the main board. Then I put the 3PDT in then drop the daughterboard over the headers and solder lugs of the switch. I tack the board in place with one of the solder lugs then solder the pin headers. Then do the switch lugs last.
 
Good tips thanks @PedalPCB and @MichaelW! I’ll have to try on my next build with a bigger board where the breakout would align like this.

@MichaelW I see why you solder the lads last, to make sure the switch isn’t at an odd angle when using the pin headers.

I still find wiring up the switch a bit fiddly and time consuming so looking for ways to make my life easier!
I'm a big fan of the 3pDT breakout boards. I don't like to wire switches old school as it just looks messy to me and yes "fiddly":)

It doesn't HAVE to line up. On projects where they don't exactly line up I use buss wire and bend it to reach. Like the pic below:

IMG_3024.JPG
 
@MichaelW I like them too! But sometimes wiring them is awkward. Definitely going to try bus wire and/or solid core wire for these situations.

I’ve used ribbon cables from love my switches as well, which makes it super easy, but those are way too long in most cases.

Is that last one a Timmy? We have a lot of the same pedals haha. You have excellent taste :D
Yah, it's the Timmy. I have the ToneKing Blues Power board en route, very interested in seeing how they compare. It's supposed to be a "Timmy with more tonal options".
 
@MichaelW I like them too! But sometimes wiring them is awkward. Definitely going to try bus wire and/or solid core wire for these situations.

I’ve used ribbon cables from love my switches as well, which makes it super easy, but those are way too long in most cases.

Is that last one a Timmy? We have a lot of the same pedals haha. You have excellent taste :D
I've tried using solid core for 3PDT wiring but I guess I'm too dumb to figure out how to strip really really short pieces of it. When I strip one side then try to strip the other side the whole piece of insulation comes off. That's when I saw how @fig was doing it with Buss wire and decided that since he's my hero, I'd just do what he does.....:)
 
I've tried using solid core for 3PDT wiring but I guess I'm too dumb to figure out how to strip really really short pieces of it. When I strip one side then try to strip the other side the whole piece of insulation comes off. That's when I saw how @fig was doing it with Buss wire and decided that since he's my hero, I'd just do what he does.....:)
Strip the whole length you want off first, then snip it but I just use resistor legs
 
Lots of good advice here!

@MichaelW oh boy you're tempting me to add yet another pedal to my build backlog, though I already have 4 drive pedals teed up to build.

Anyway, great/clean build on the reverb pedal!
 
Back
Top