Hand drilling tips

jwyles90

Well-known member
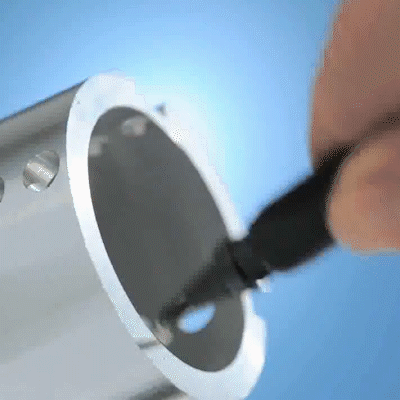
Hey y’all! So I’ve been drilling my own enclosures for a while now and was curious about other people’s experiences with how clean they get their drillings. I’ve been using a hand drill with a stepped bit, drilling a pilot hole first after center punching, all that jazz. Overall they turn out pretty solid, but I’ve noticed that the holes sometimes have these little edges around the rim that cave inward a bit.
Has anyone else dealt with this before, and if so have you been able to figure out a way to get the holes a little more clean and flush with the enclosure? Overall it’s not a huge deal, but can make putting on water slides or pour painting a little more tricky since the edge will start to pull stuff towards it.
E8B1AEC6-357F-4DDD-BB0B-02CB1D158CD1.jpeg
145A1241-8A99-4B95-9B03-CB826849E01F.jpeg
 
Wheew, I thought this was going to be a thread about "hand drilling", some new fashion trend or social media challenge. :oops:

:ROFLMAO::ROFLMAO:

Seriously though.

Are your bits actually stepped or are they smooth graduated?

If they're stepped it looks like you're letting the bit go deep enough that the next step is hitting. I actually do that a little on purpose, just because I like the countersunk appearance better than a rough edge, but you can avoid it by watching the bit and not letting the drill "drop" at the end of the last step.
 
Last edited by a moderator:
Wheew, I thought this was going to be a thread about "hand drilling", some new fashion trend or social media challenge. :oops:

:ROFLMAO::ROFLMAO:

Seriously though.

Are your bits actually stepped or are they smooth graduated?

If they're stepped it looks like you're letting the bit go deep enough that the next step is hitting. I actually do that a little on purpose, just because I like the countersunk appearance better than a rough edge, but you can avoid it by watching the bit and not letting the drill "drop" at the end of the last step.
Haha dammit, I probably should have thought about my phrasing before I posted that.

They’re stepped (although I had to google graduated smooth just to be sure). Dropping the bit is probably what’s doing it though, I’ll try to keep it from doing that the next time I’m drilling some enclosures to see if that makes a difference.
 
Mine do that on occasion as well. One thing that I do for the tops is start the hole from the face, don’t drill completely through, and then flip it over and finish from the back (aight you naughty bastards keep it clean?). If nothing else that puts the “countersink” on the inside of the enclosure
 
And you guys think my threads take unexpected turns. I came in here to prevent a horrible accident and look what I've stepped in.
 
That’scommon when using a step bit, one good way to get a clean close tolerance hole is use a slightly undersized standard drill bit then move up to the desired diameter using a stove burner drill bit. Or try not using so much pressure with the step bit , so when you punch through you don’t counter sink the hole with the next step.
 
Last edited:
I drilled these with a stepped bit (although it was in a drill press)...

1657241199840.png

Yeah, I'm using the enclosure to prop up the vacuum sealer while I change the oil...
 
I like to run a de-burring tool around the rims of the holes...

294e8df4ca35c3bd73aa6a118784fbc3_480x480.gif
 
You’re just letting the next gradation of the step bit come into contact with the enclosure when you’re finishing up the hole. When you’re approaching the final step of the hole size you’re drilling. Just take it slow and lower the Chuck more slowly, ensuring that you only go deep enough to drill all the way through without accidentally “starting” the next hole.
 
I was having problems making the pilot holes. I have a cheap 12V cordless drill. I used a 1.5mm bit to make the first hole after using a center punch. The bit liked to skid on the surface. I bought a new 1.5mm cobalt bit and use a low speed and it seems to drill very quickly and precisely. I still don't trust myself with an expensive enclosure, which is one of the reasons I haven't started my Electrovibe build yet.

Thanks for the tip about the step bit.
 
I have found that drilling with the step bit from the inside has worked well, after center punching and drilling pilot holes on the outside. I drill it on top of a piece of scrap wood, allowing the enclosure to hang over the side to give space for the bit to go through, and not into my workbench. I have done this on 4 or 5 so far and have had good results. Make sure to tape off the paint side so you don't blow it out.
 
Drilling from the inside is a good tip. I've never done that, although I'm not sure how you'd drill the top jacks from the inside.

I might have to get one of those deburring tools and reamers, but before I'd go buying a bunch of tools to correct this problem I'd start with a low cost drill press and a set of regular drill bits.

I still use stepped bits for the top jacks and footswitch, but otherwise I use standard bits for everything else.

I tried a 1/2" bit in my drill press once and nearly rattled the fillings out of my teeth. :LOL:
 
I've got a drill press last week and it made things easy. It is hard not to go too far with the step drill bit with a hand drill, where on the press you can adjust the table so you will not go to far. My step bit came from amazon, and not all the steps are spaced the same, for some sizes, it's about the thickness of the enclosure. I'll admin having the right size bit helps a lot... as taking your time even on the press. I messed a hole by 1 mm because I thought I could skip punching the hole first.
 
Back
Top