southpaw-dd
Active member
- Build Rating
- 5.00 star(s)
Hey fellow DIYers. This is my first review here, first PedalPCB build and first Tayda UV print. I've built 10 or so Aion kits in the past two years and have a few more of those to finish in hand, too. I had a lot of experience with soldering in my 20's (BSEE is my education and I did PCB design for a few years), but as I'm getting older, I'm experiencing some near-sight vision issues, need reading glasses and magnification, and sometimes have shaky hands. I'm trying out some different soldering tips with varying success, but have improved my workflow to use larger tips and heat up surfaces quicker when working on the 3PDT board, pots, or jacks.
Now, onto the specifics for the Mach 1 build.
I went ahead with the OPA2134 for this pedal because I like to stick with like kind where I can even if it is very subtle or no difference at all. Worked on first power up which is always a relief. I specifically picked this board to complete first because of the relatively low part count, and no JFET or other special parts to test/check and worry about.
Parts:
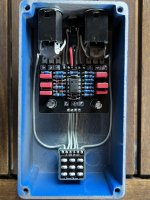
I used a lot of the misc Aion build sheets to identify parts for this and ordered from Mouser and SBE for just about everything. The pre-bonded wire is a welcome addition to my supplies and I greatly prefer it now!
Enclosure:
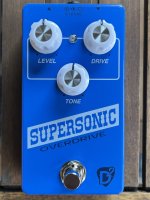
This is the Tayda PedalPCB 3 knob pre-drilled spec in the blue gloss finish. I used a 3mm LED bezel from Tayda and needed to hot glue from the inside of the enclosure to have it hold position. Affinity Designer 2 was used for the artwork and submittal to Tayda for UV printing. There is a gloss-matte layer that covers the entire top surface (you can see the rounded corner in the top right).
I compared it directly with a Greer Lightspeed and it was just about a dead match in sound and feel.


