MichaelW
Well-known member
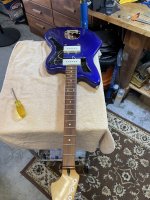
New Pickups, Vibrato, Neck, Wiring.....!
I posted about this guitar when I got it in this thread.
Honestly, after doing my bit with it, it played and sounded beautiful. The CV line from Squier are some of my favorite affordably priced guitars. There's not one of them that don't punch way above their weight class and they all look great and the stock pickups are all very good.
Having said that, I'm am incessant tinkerer and had always planned to do some upgrades. I really was not planning to put a new neck on it but the more I played the stock neck the more I didn't like it. There's nothing wrong with it, just the profile felt a little weird to me.
So recently at the Fender.com Labor Day sale I picked up a new neck and some Fender Pure Vintage 65 pickups for ridiculously cheap. It just happened that these two accessories I needed was 30% off if purchased together and then I had a Capitol One Shopping coupon to stack on top of that.
I like nice stuff, and I am blessed with having some really nice guitars. But I also LOVE a great bargain!
The neck I got was a Fender Player Series Jazzmaster neck with the Pau Ferro fingerboard. I know this neck profile and knew that it would fit me well.

These Pau Ferro fingerboard necks come from Fender a bit "unfinished". It's a little disappointing that they come this way on their finished Mexican Strats and tele's as well. I find that the wood is rough and needs some work, so that's the first thing I worked on.
Since I was working on the wood part and needed to sand it at some point, I masked off the frets themselves so they wouldn't get too scratched up. I'll do a fret level and polish later. (I did not document that as you've seen my process in both my P90 Tele and first Jazzmaster report.

Using a razor blade I started with scraping the fretboard to start smoothing it out and get it less rough feeling. Not sure if this pic shows up well but this is the before (right) and after (left) scraping. You can see how rough the FB comes stock.
A little bit of a different angle....
After scraping, I rolled the the fingerboard edges like I've documented elsewhere. I finish sanded it with 2400 micro mesh pads.
Next I soaked it with a couple coats of Danish Oil.
I let the Danish oil sit for about 20 minutes, wiped it off, second coat, another 20 minutes, wiped that off then a couple coats of F1 fingerboard oil.
The plastic nut that came on the neck had to go, those things are crap and can rob you of tone. After oiling, I buffed it out. Forgot to snap a pic at that stage but it came out beautifully smooth. Here's a pic after it was all done.
This neck comes drilled for the modern style Fender sealed tuners....which I detest. I'm a fan of the Gotoh vintage style inline tuners and usually use them on most of my F-style builds. But for this build, I came across these Wilkinson vintage style tuners. The packaging looks suspiciously identical to the Gotoh tuners. So for $27 (less than 1/2 the price of the Gotoh's) I decided what the heck, I'd give them a shot. I can always return them if I didn't like them. VERY pleasantly surprised, I believe they are actually the same OEM Gotoh tuners. They feel the same to me, work the same. So I think I may have found my new tuners! Can't beat the price.

Since the peghead was drilled out for 10mm bushings, I had to get some conversion bushings to make the Vintage style tuners fit. I usually have to pinch my nose, hold my breath and make a face and pony up for the Stew Mac 3/8" conversion bushings. Like everything else Stew Mac, they are stupidly priced.
But for this build I found some inexpensive Kluson ones on Amazon and decided to give them a try.
They look right on the headstock and work great! I may have found a new alternative to Stew Mac.
I had to do a slight bit of reaming to get them to fit. And I mean SLIGHT. Basically I'm just scraping a layer of finish off with the reamer.
You want to be REAL careful not to over do it here and take too much off. Half a turn of the reamer, then check, another half turn then check again.
You want to wind up with the hole wide enough for the bushing to sit in about 1/2 way before pressing.
There are elaborate contraptions made to seat bushings, or some people like to use clamps. I've done all different ways but the easiest and most efficient way I've found is just to tap it in with a plastic hammer. MAKE SURE the headstock is laying FLAT on your work surface before tapping. If it isn't going in with a few taps, then don't force it. Pop it out and ream a little more.
Continued in next post.....
I posted about this guitar when I got it in this thread.
Honestly, after doing my bit with it, it played and sounded beautiful. The CV line from Squier are some of my favorite affordably priced guitars. There's not one of them that don't punch way above their weight class and they all look great and the stock pickups are all very good.
Having said that, I'm am incessant tinkerer and had always planned to do some upgrades. I really was not planning to put a new neck on it but the more I played the stock neck the more I didn't like it. There's nothing wrong with it, just the profile felt a little weird to me.
So recently at the Fender.com Labor Day sale I picked up a new neck and some Fender Pure Vintage 65 pickups for ridiculously cheap. It just happened that these two accessories I needed was 30% off if purchased together and then I had a Capitol One Shopping coupon to stack on top of that.
I like nice stuff, and I am blessed with having some really nice guitars. But I also LOVE a great bargain!
The neck I got was a Fender Player Series Jazzmaster neck with the Pau Ferro fingerboard. I know this neck profile and knew that it would fit me well.


These Pau Ferro fingerboard necks come from Fender a bit "unfinished". It's a little disappointing that they come this way on their finished Mexican Strats and tele's as well. I find that the wood is rough and needs some work, so that's the first thing I worked on.
Since I was working on the wood part and needed to sand it at some point, I masked off the frets themselves so they wouldn't get too scratched up. I'll do a fret level and polish later. (I did not document that as you've seen my process in both my P90 Tele and first Jazzmaster report.


Using a razor blade I started with scraping the fretboard to start smoothing it out and get it less rough feeling. Not sure if this pic shows up well but this is the before (right) and after (left) scraping. You can see how rough the FB comes stock.

A little bit of a different angle....

After scraping, I rolled the the fingerboard edges like I've documented elsewhere. I finish sanded it with 2400 micro mesh pads.
Next I soaked it with a couple coats of Danish Oil.
I let the Danish oil sit for about 20 minutes, wiped it off, second coat, another 20 minutes, wiped that off then a couple coats of F1 fingerboard oil.

The plastic nut that came on the neck had to go, those things are crap and can rob you of tone. After oiling, I buffed it out. Forgot to snap a pic at that stage but it came out beautifully smooth. Here's a pic after it was all done.

This neck comes drilled for the modern style Fender sealed tuners....which I detest. I'm a fan of the Gotoh vintage style inline tuners and usually use them on most of my F-style builds. But for this build, I came across these Wilkinson vintage style tuners. The packaging looks suspiciously identical to the Gotoh tuners. So for $27 (less than 1/2 the price of the Gotoh's) I decided what the heck, I'd give them a shot. I can always return them if I didn't like them. VERY pleasantly surprised, I believe they are actually the same OEM Gotoh tuners. They feel the same to me, work the same. So I think I may have found my new tuners! Can't beat the price.

Since the peghead was drilled out for 10mm bushings, I had to get some conversion bushings to make the Vintage style tuners fit. I usually have to pinch my nose, hold my breath and make a face and pony up for the Stew Mac 3/8" conversion bushings. Like everything else Stew Mac, they are stupidly priced.
But for this build I found some inexpensive Kluson ones on Amazon and decided to give them a try.

They look right on the headstock and work great! I may have found a new alternative to Stew Mac.
I had to do a slight bit of reaming to get them to fit. And I mean SLIGHT. Basically I'm just scraping a layer of finish off with the reamer.
You want to be REAL careful not to over do it here and take too much off. Half a turn of the reamer, then check, another half turn then check again.

You want to wind up with the hole wide enough for the bushing to sit in about 1/2 way before pressing.

There are elaborate contraptions made to seat bushings, or some people like to use clamps. I've done all different ways but the easiest and most efficient way I've found is just to tap it in with a plastic hammer. MAKE SURE the headstock is laying FLAT on your work surface before tapping. If it isn't going in with a few taps, then don't force it. Pop it out and ream a little more.
Continued in next post.....
Last edited:


")