mkstewartesq
Well-known member
OK, well, people here who may have seen my other build threads hopefully are aware that, even though I’ve only been building for a few months, my skills and attention to detail have improved, and I always put a lot of effort into designing a nice thematic UV printed enclosure.
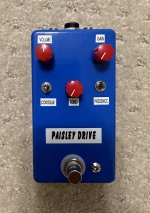
To all those people, I’m sorry for the big disappointment incoming. This is easily the ugliest pedal seen around these parts in a very long time.
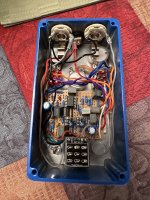
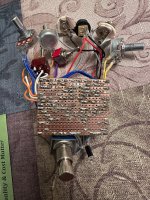
This is my very first stripboard build. It’s the Paisley Drive (equivalent PedalPCB board would be the Boteh). Boy, I was really flying by the seat of my pants here. What a completely different build process, especially the soldering. Soldering stripboard is, at least for me, a completely different technique – after building about 25 pedals from PCBs, I never once had a bad solder joint; even though all my joints looked good on this build, it didn’t work when I fired it up and, sure enough, doing a ton of resoldering fixed almost all of the issues. (I did have one leg of one component in the wrong place as well, so the build was not completely without error otherwise). You can still build these using the same “paint by numbers” method as you might use with a PCB-just expect the end picture to come out a lot uglier than if you had started with a PCB.
Because it’s virtually the same circuit as the Boteh (and the original pedal) the schematic for the Boteh was invaluable for troubleshooting, as was an audio probe.
I’ve rarely had to do this much offboard wiring, and it shows. Still, I learned some new skills and some new troubleshooting methodologies. At the same time, my attention to detail on wire management and routing pretty much just went out the goddamned window, making this a phenomenally ugly pedal. Because I had some leftover enclosures and I wasn’t going to go through the heartache of doing a design and having Tayda print it for a project that I had a low confidence in would even work, I just made do with the old power drill and label maker. Maybe I will give waterslide decals a shot to spruce it up later.
As far as the pedal itself – it sounds pretty good. I have been told that stripboard builds can be prone to excess noise, but I haven’t noticed anything in that regard. It has a nice rumble at low gain and can go to pretty heavy overdrive if you max the gain control; I personally think that you get a great lead tone when the gain is maxed out as well. One toggle (Contour) gives three different tones, with the middle being very much a scooped tone. The other toggle (Presence) basically does what it says exactly on the (crappy looking) label – flip it up and you get a bit of extra high end.
I’ll do better next time, I promise. Thanks for looking.
Mike


Last edited:

