MichaelW
Well-known member
- Build Rating
- 5.00 star(s)
So 4am this morning, my smoke alarms started chirping.....sigh....low batteries on 2 of them.
And of course one of them is the one that always gives me fits, I have to try 3 different sets of batteries until it's good and satisfied that its batteries have been replaced.
So I was wide awake when all was said and done. I decided to finish the pedal project I started yesterday afternoon.
This is another @szukalski influenced overdrive. I actually didn't even know it existed but when I looked for it on the website I was pretty stoked to see it was based on a Barber Burn Unit Small Fry.
I almost bought the Burn Unit right before I started DIY pedals, I was looking for a Zen Drive and the Burn Unit was mentioned in a number of forums as a "better Zen Drive". Instead, I bought a Zen clone off Reverb that I've talked about in other posts, that turned out to be a Mayahana and that's how I found PedalPCB and fell into the DIY black hole....haha.
Dave Barber is like one of the OG boutique pedal builders and I still have a Direct Drive that I got probably 16 years ago. I remember that was about when the whole "transparent drive" thing started taking off and I was looking pretty hard at the Direct Drive and the Voodoo Labs Sparkle Drive. I've always liked the Barber low gain drives and his designs are always unique and there's always lots of different sounds in his pedals.
Taking a look at the Tator Tot schematic, it's pretty evident that this is not a Zen Drive clone. There's a lot more going on that I'm still trying to wrap my head around.
The pedal can certainly do the Zen Drive/Dumble thing but it can do a whole lot more as well. I'm still learning the controls and using the Barber Burn Unit Small Fry manual as a guide. There's a couple of different complements of silicon and Ge clippers that are controlled in a number of different ways.
The "Burn" pot is equivalent to a "drive" control and brings in 4 of the 4148's, then you can also toggle an additional 3 4148's in asymmetrical clipping.
Then the other side of the toggle adds one of the Ge diodes to the 4148's. Then there's a "Dynamics" control, that adds an additional 2 1N34A's, so it's definitely not like the shelving control of the Zen Drive's "Voice" which I originally thought it was going to be. Then there's 4 internal trimmers to further fine tune Mid, Bass, Presence and Shape.
The internal "Shape" trimmer is more like the "Voice" control of the Zen, so I suppose there's at least a couple of elements of the Zen circuit in here.
This is definitely one pedal that it's going to take me some time to figure out and delve into all the tones available. I've set all the internal trimmers to mid-way for now
and I'm getting some really nice low gain sounds out of it. I've also tried some of the suggested settings from the Barber manual.
Like most of the Barber Overdrives there's lots of different configurations and sounds available, although most of the options are subtle.
After chatting with @szukalski I decided to socket the diodes "just in case" I wanted to mess with some alternatives, but I have to say, this sounds pretty darn good with the stock 4148's. I used 1N34A's for the Ge that clocked in around .650 Vf. For now I'm going to leave it as is.
The only other substitution was a JRC4560D instead of a JRC4559D that the BOM called for, although I'm sure it wouldn't make much of a difference if I used a 4558 or TL072.
I also used the PPCB Relay board and the is my first relay switching build. (My first attempt at using the Relay was in a 1590B and it just wasn't happening.... )
)
I have to say, I REALLY LIKE relay switching and my credit card is already trembling at the prospect of needing to stock up on boards and components for future builds.
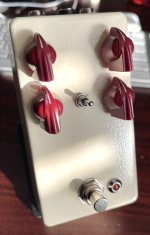
The sun was just breaking this morning when I snapped this pic.

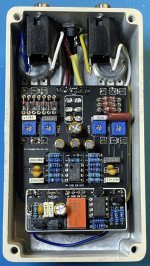
I definitely need to get some low profile 100U caps for the relay boards. This barely squeaks in with the back cover on.

And of course one of them is the one that always gives me fits, I have to try 3 different sets of batteries until it's good and satisfied that its batteries have been replaced.
So I was wide awake when all was said and done. I decided to finish the pedal project I started yesterday afternoon.
This is another @szukalski influenced overdrive. I actually didn't even know it existed but when I looked for it on the website I was pretty stoked to see it was based on a Barber Burn Unit Small Fry.
I almost bought the Burn Unit right before I started DIY pedals, I was looking for a Zen Drive and the Burn Unit was mentioned in a number of forums as a "better Zen Drive". Instead, I bought a Zen clone off Reverb that I've talked about in other posts, that turned out to be a Mayahana and that's how I found PedalPCB and fell into the DIY black hole....haha.
Dave Barber is like one of the OG boutique pedal builders and I still have a Direct Drive that I got probably 16 years ago. I remember that was about when the whole "transparent drive" thing started taking off and I was looking pretty hard at the Direct Drive and the Voodoo Labs Sparkle Drive. I've always liked the Barber low gain drives and his designs are always unique and there's always lots of different sounds in his pedals.
Taking a look at the Tator Tot schematic, it's pretty evident that this is not a Zen Drive clone. There's a lot more going on that I'm still trying to wrap my head around.
The pedal can certainly do the Zen Drive/Dumble thing but it can do a whole lot more as well. I'm still learning the controls and using the Barber Burn Unit Small Fry manual as a guide. There's a couple of different complements of silicon and Ge clippers that are controlled in a number of different ways.
The "Burn" pot is equivalent to a "drive" control and brings in 4 of the 4148's, then you can also toggle an additional 3 4148's in asymmetrical clipping.
Then the other side of the toggle adds one of the Ge diodes to the 4148's. Then there's a "Dynamics" control, that adds an additional 2 1N34A's, so it's definitely not like the shelving control of the Zen Drive's "Voice" which I originally thought it was going to be. Then there's 4 internal trimmers to further fine tune Mid, Bass, Presence and Shape.
The internal "Shape" trimmer is more like the "Voice" control of the Zen, so I suppose there's at least a couple of elements of the Zen circuit in here.
This is definitely one pedal that it's going to take me some time to figure out and delve into all the tones available. I've set all the internal trimmers to mid-way for now
and I'm getting some really nice low gain sounds out of it. I've also tried some of the suggested settings from the Barber manual.
Like most of the Barber Overdrives there's lots of different configurations and sounds available, although most of the options are subtle.
After chatting with @szukalski I decided to socket the diodes "just in case" I wanted to mess with some alternatives, but I have to say, this sounds pretty darn good with the stock 4148's. I used 1N34A's for the Ge that clocked in around .650 Vf. For now I'm going to leave it as is.
The only other substitution was a JRC4560D instead of a JRC4559D that the BOM called for, although I'm sure it wouldn't make much of a difference if I used a 4558 or TL072.
I also used the PPCB Relay board and the is my first relay switching build. (My first attempt at using the Relay was in a 1590B and it just wasn't happening....
I have to say, I REALLY LIKE relay switching and my credit card is already trembling at the prospect of needing to stock up on boards and components for future builds.
The sun was just breaking this morning when I snapped this pic.

I definitely need to get some low profile 100U caps for the relay boards. This barely squeaks in with the back cover on.


