Tuning a Tonebender MK II - Part I
So in light of the Board + I/O debacle of the other day, I went back to more traditional breradboarding:

 Setting Up the Circuit
I mostly went from memory but had the Fuzz Central schematics in mind:
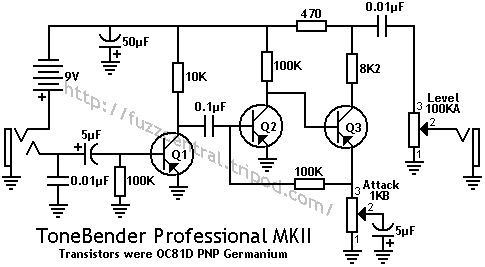
Without dedicating too much of the page to a Tonebender MK II history lesson, the OC81Ds had much less leakage than OC75s. Rb1 was typically 10k when using OC75s and 100k when using OC81Ds. Rc2 was generally 47k with OC75s and 100k with OC81Ds.
The General Electric 2N169 ("Flat Hats" or "Top Hats") units I use (and love) are low leakage like the OC81Ds so I started with the Tonebender MK II Professional schematic above but subbed Rc2 for 47k to begin with.
The first thing you want to do with a Tonebender MK II is tweak the collector voltages. In my case, I am also trying to tune the trimmers that will be on my board. I wired up 2 16mm 50kB pots for use in conjunction with Rc1 and Rc2. I left the Rc3 string at stock with 470/8.2 k (more on that in Part 2).
Side Note: The first thing I had to address was the voltage coming out of the power supply. It's a cheap Snark adapter that I keep at my work table. It was putting out 9.75 vDC. I subbed in a 100 ohm resistor between the DC jack and board power and dropped that to 9.22 vDC.
Initial Tuning
Q1 = hFE - 87, Vbe = 176 mV, Iceo = 14 µA
Q1 = hFE - 114, Vbe = 181 mV, Iceo = 28 µA
Q1 = hFE - 112, Vbe = 112 mV, Iceo = 21 µA
Rb1 = 100k
Rc1 = 10k + 50kB (Voltage Range = 9.25 vDC - 9.63 vDC)
Rc2 = 47k + 50kB (Voltage Range = 0.31 vDC - 0.45 vDC)
Rc3a = 470
Rc3b = 8.2k (Voltage Range = 6.95 vDC - 7.86 vDC)
So the first thing I noticed was the very high voltage on Q1. (Grabs soapbox...) In my opinion, I like to bias Q1 lower than is traditionally thopught of for the MK II. Stock units in the past and present sometimes have voltages exceeding 8.2 vDC, but I've found that voltages lower than 8vDC and, more specifically, around 7.7-7.8 vDC help with cleanup when rolling down the volume. That said, since i'll have an internal trimpot in series with RC1, I wanted a range from about 7.7-8.2 vDC.
As you can see, Q3 is most effectively biased by changing Q2's bias. The range i got at the outset is lower than I target. Again, traditionalists will go for something above 8 vDC and vintage units typically biased up around 8.2 vDC. I personally think note bloom, sustain, and general kerrang is increased by lowering the bias for Q3 into the 7.6-7.8 vDC range. This has one major side affect: Noise. We'll tackle the noise issue in Part 2.
Revised Tuning
With all this in mind, I swapped some resistors to get things in line. Rc1 in particular had a few iterations:
Rc1 = 68k + 50kB (Voltage Range = 8.31 vDC - 8.68 vDC)
Rc1 = 100k + 50kB (Voltage Range = 8.05 vDC - 8.42 vDC)
Rc1 = 150k + 50kB (Voltage Range = 7.78 vDC - 8.16 vDC)
Rc2 = 68k + 50kB (Voltage Range = 0.27 vDC - 0.36 vDC)
Rc3a = 470
Rc3b = 8.2k (Voltage Range = 7.02 vDC - 7.94 vDC)
Here you can see the voltages more in line with what I wanted. At this point I swapped out all three transistors from the spares i was tuning with to the ones I'll be using in my personal build on the universal board. They needed a little further tweaking but I quickly settled on the values I'd be using for this final testing iteration:
Q1 = hFE - 99, Vbe = 180 mV, Iceo = 28 µA
Q2 = hFE - 117, Vbe = 174 mV, Iceo = 35 µA
Q3 = hFE - 101, Vbe = 185 mV, Iceo = 15 µA
Rb1 = 100k
Rc1 = 100k + 50kB (Voltage Range = 7.68 vDC - 8.14 vDC)
Rc2 = 82k + 50kB (Voltage Range = 0.24 vDC - 0.29 vDC)
Rc3a = 470
Rc3b = 8.2k (Voltage Range = 7.61 vDC - 8.06 vDC)
Quick Note: As is sometimes required in this circuit, the Q3 I originally picked here was swapped in at Q2. It's higher (relatively speaking) leakage made it a better candidate for that slot.
This is pretty much what the final configuration will be like. What I may do is sub in 100kB pots to increase the range of the internal trimmers but other than that, the resistors are tuned for my build at this point!
Next we'll talk about noise, how to stop it and frequency shaping.


.jpg")