andare
Well-known member
- Build Rating
- 5.00 star(s)
Hello everybody. I'm very happy to present my most rewarding build to date: a Tone Bender MK I.
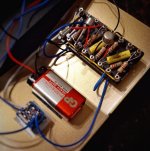
I built it on turret board with 1W carbon film resistors (but there's a 1k8 1/4W metal film resistor in there too) and big axial capacitors.
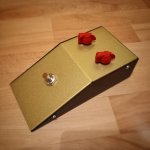
The coolest thing about it, however, is the vintage style wedge enclosure, courtesy of our friend and fellow Cracovian @temol
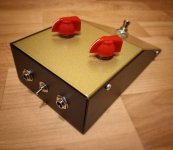
I had the pleasure of meeting him this week and over a coffee we talked shop. He brought a few enclosures to show me and I picked this one in a sparkly metallic gold. Very light construction, beautifully executed and quite solid. The top has a smooth finish, the bottom has a textured matte surface.

I added a toggle switch to turn the battery off when the input cable is connected:

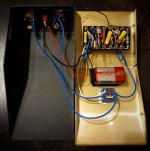
Gut shots:

Together we planned how to assemble it. The board is mounted on top of the pot dust caps with double-sided foam tape. The carbon zinc battery is held in place with velcro.
You can see how Temol left the enclosure raw in strategic locations so it can be grounded. A very nice touch.

Turret board is not easy to work with and quite heavy so it's not ideal for pedals but look at how groovy it looks!
Nerdy stuff
Circuit tweaks
I spent a lot of time with this circuit on a breadboard. The Protoboard Micro definitely got a workout. I read every thread I could find about Tone Benders on several forums, noted down what gain and leakage worked and which voltages were measured in original units and great sounding clones.
Here's some tweaks that worked:
I only have 90 or so Germanium transistors so I tested and numbered all of them and I keep them in a binder each with their own individual card.
Q1
Sound samples
Here's the range on the Attack knob (The riff is Evil by Cactus - originally played with an Ampeg Scrambler octave fuzz). The first usable tone is at 10 o'clock but it's cool to have those weak sounds in there. The higher the Attack the louder and brighter it gets and the more attack the notes have. Truth in advertising. Fender Strat on the bridge pickup with 10-42 D'Addario flatwounds (plain G).
Here's a riff I came up with today. Level and Attack at 2 o'clock. The intro is my Strat rolled back to 7, the main riff is at 10.
Conclusions
This was such a wild ride. I only started breadboarding earlier this year (thanks to @BuddytheReow 's tutorials) and I can't believe how much I've learned.
Special thanks to @temol for the tips and for making this fantastic enclosure. How cool is it that we both live in the same city?
I built it on turret board with 1W carbon film resistors (but there's a 1k8 1/4W metal film resistor in there too) and big axial capacitors.
The coolest thing about it, however, is the vintage style wedge enclosure, courtesy of our friend and fellow Cracovian @temol
I had the pleasure of meeting him this week and over a coffee we talked shop. He brought a few enclosures to show me and I picked this one in a sparkly metallic gold. Very light construction, beautifully executed and quite solid. The top has a smooth finish, the bottom has a textured matte surface.

I added a toggle switch to turn the battery off when the input cable is connected:

Gut shots:

Together we planned how to assemble it. The board is mounted on top of the pot dust caps with double-sided foam tape. The carbon zinc battery is held in place with velcro.
You can see how Temol left the enclosure raw in strategic locations so it can be grounded. A very nice touch.

Turret board is not easy to work with and quite heavy so it's not ideal for pedals but look at how groovy it looks!
Nerdy stuff
Circuit tweaks
I spent a lot of time with this circuit on a breadboard. The Protoboard Micro definitely got a workout. I read every thread I could find about Tone Benders on several forums, noted down what gain and leakage worked and which voltages were measured in original units and great sounding clones.
Here's some tweaks that worked:
- Lowering the 470k resistor reduced the gated tones with Attack turned down. 330k was very nice but ultimately I kept the stock value because I enjoy having those starved tones at the beginning of the Attack sweep.
- I bumped up the 15k resistor to 120k to lower Q3c below -8.5V. A major departure from the stock value but hey, it works!
- A50k for the Attack pot. B50k had almost no sound at 0 and a sudden increase in gain at 9 o’clock. The log pot has sound at 0 and a more gradual gating range at the beginning of the sweep (see demo below).
- Swapping transistors with different hFE and Iceo didn’t fix the sound with Q3c above -8.5V. The battery in the pedal is new and it reads 9.3V so the actual voltages are now higher but the pedal sounds great. In fact the decay is much better now than on the breadboard with standard components and a slightly used battery.
- Increasing the value of the Attack pot makes it less useful IMO. I tried values up to 500k but there was too much gain too early and no variation after that.
- Lowering the 2.2M resistor to 1M made it a tad louder but it ruined the decay of the notes. 2.2M reaches unity at 2 o'clock. Increasing the Attack makes it louder.
I only have 90 or so Germanium transistors so I tested and numbered all of them and I keep them in a binder each with their own individual card.
Q1
- #002
- AC125
- hFE 86
- Iceo 202uA
- #029
- ASY34S
- hFE 117
- Iceo 43uA
- #031
- ASY34S
- hFE 490
- Iceo 133uA
- Q1e -1.25V
- Q1b -1.3V
- Q1c -9.14V
- Q2e 0
- Q2b -0.05V
- Q2c -9.11V
- Q3e 0
- Q3b 0
- Q3c -8.60V
- Q1e -1.26V
- Q1b -1.3V
- Q1c -9V
- Q2e 0
- Q2b -0.19V
- Q2c -4.61V
- Q3e 0
- Q3b -0.01V
- Q3c -8.34V
Sound samples
Here's the range on the Attack knob (The riff is Evil by Cactus - originally played with an Ampeg Scrambler octave fuzz). The first usable tone is at 10 o'clock but it's cool to have those weak sounds in there. The higher the Attack the louder and brighter it gets and the more attack the notes have. Truth in advertising. Fender Strat on the bridge pickup with 10-42 D'Addario flatwounds (plain G).
Here's a riff I came up with today. Level and Attack at 2 o'clock. The intro is my Strat rolled back to 7, the main riff is at 10.
Conclusions
This was such a wild ride. I only started breadboarding earlier this year (thanks to @BuddytheReow 's tutorials) and I can't believe how much I've learned.
Special thanks to @temol for the tips and for making this fantastic enclosure. How cool is it that we both live in the same city?


