Fama
Well-known member
Hello!
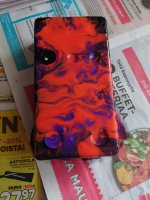
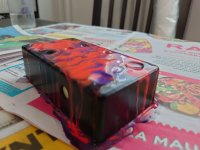
I've done a couple of acrylic pour paintings with my wife (they come out very cool for the amount of effort, especially if you like a stoner/nebula/space aesthetic, IMO) so I figured I would try something similar to paint a pedal enclosure.
It came out looking great (well, it's still wet, but shouldn't change too much). However, since I am not very experienced in this the paint came out as a very thick coat. I've sprayed varnish (or, well, some sort of car lacquer? Not sure what it's called in English) at hand painted pedals before, and they seem decently durable, but nothing this thick.
Mainly the question I have is: Should I try to cut out a small circle for the washers for the pots and footswitches? Anything else I should be careful with? Or will it be better than I think?
I'm a bit afraid that tightening the nuts could tear the paint coat and cause it to bunch up, ruining the look. If I cut a small circle for the pots, they would be hidden by the knobs. Not sure about footswitches tbh.
I don't gig, so I would only use the pedal at home with socks or by hand, so the pedal will be handled carefully. I'm mostly concerned about putting it together and tightening everything. It's a Tayda matte black enclosure, so the paint is on top of their powder coat.