mkstewartesq
Well-known member
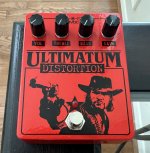
So, being honest, this was not a pedal I would have normally built (mainly because I didn’t even know the Scholz Ultimatum Distortion Generator existed, much less the Proposition version). But I was very lucky that, when the ever-generous @fig sent me some matched JFETs for a phaser build, he very kindly included this board in the package as a gift. And thus we build.
This is most definitely a distortion pedal, not an overdrive. You can turn all the knobs counter clockwise and still this pedal will remain a barren landscape where clean tones can find no purchase. The specialty of this pedal is distortion (a la the Boston sound) coupled with tape saturation compression. In fact, because I had never heard of the original pedal until now, I didn’t know exactly how it works (and we all know that Robert is far too busy creating excellent product to get distracted by things like pedal descriptions in his documentation) - so it wasn’t until I found the original product manual online that I discovered that the gain knob doesn’t actually provide “gain” as we normally think of it. Instead the gain knob adds tape saturation compression to get you even closer to that Boston sound.
So it sounds great for the specific sound it is trying to emulate but, if you are looking to have only one overdrive/distortion, this is not going to give the flexibility of something like a Tube Screamer or Big Muff. In addition, because the gain knob is really a compression control, be advised that cranking up the gain knob is going to make the pedal super noisy, especially with single coil pickups. That being said, it also makes the sustain just go on darn near forever. So it all comes down to what you’re looking for in a dirt pedal.
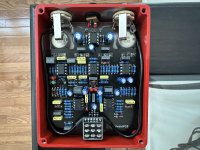
Some random notes on my build.
1. For the first time, Tayda kind of failed me, although we’re only talking about a dime’s worth of components. The 560p ceramics they sent me were supposed to be + or -20% tolerance; they were actually all about 60% off, measuring in the high 800/low 900 range. So I ended up going through my 680p ceramics until I found some that were in the low 600s and used those instead since they would actually be within the tolerance range for a 560.
2. The specs call for a 1044 charge pump, but I elected to use a 7660 instead to hopefully take any whine out of the audio frequency; I also used shielded input and output cables.
3. In the documentation, Robert takes great pains to note that this build requires a J201 within a very specific value range in order to achieve compression. Having neither the equipment nor the expertise to test for the right value, I just bought 10 J201s and figured I would test them all out to see which sounded best in the pedal. I was very happy with the first one I put in (a ton of compression available) so I’m not gonna worry about auditioning the others right now.
4. For the enclosure, I took my first stab at using film-free decals. Super happy with the way it turned out. I didn’t have any lifting or flaking out the decal while applying it and, after I baked it in the oven to fully cure it, I’ve been surprised at how durable this finish is. It won’t completely replace Tayda UV printing but the final effect is close enough that I no longer feel the need to go through the rigmarole of having them do the printing and waiting a couple of weeks except in unusual circumstances (i.e., where I want a colorful design on an enclosure that is a darker color).
Thanks for looking.
Mike


