Brett
Well-known member
- Build Rating
- 5.00 star(s)
The first in the installment of "don't build shit for a while, then build a lot of shit all at once..." series.
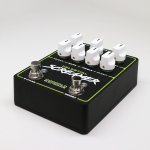
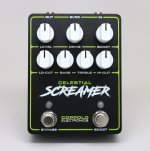
The Celestial Screamer
Where it came from...
If you're unfamiliar with our resident circuit guru, @Chuck D. Bones, you're missing out. His forum sub-section contains a wealth of information and some very tastefully thought-out circuits/mods. The Celestial Screamer is one such circuit. See the original Chucks Boneyard post here.
What is it...
The name would imply that it's Yet Another Tube Screamer, and we all need another tube screamer like we need another hole in the head, right? This one's a little different. According to Chuck, he's combined a few familiar elements from drive circuits into a combination that he's not seen before. The circuit places a boost in front of a tube screamer, add high and low cut stages, and replace the tone stage with a Baxandall EQ.
The adjustable boost circuit determines the level of input saturation that is sent into the overdrive section resulting in a wide range of gain, and in combination with the drive control, the circuit’s overall compression. The LO-CUT control adjusts pre-drive bass frequencies to mitigate muddiness while the HI-CUT control adjusts post-drive treble frequencies for fine tuning the signal before setting the overall output level and active EQ.
Modifications...
I can't leave well enough alone, so when I designed the circuit board that I'd use to build this project, I wanted to be able to switch the boost in or out of the circuit for a wider range of options. I went ahead and used a modified version of Chuck's Simple Relay Bypass for the bypass and boost functions on the board.
Sounds
It's a great sounding circuit, but I find tube screamers generally work pretty well in my mid-scooped rig. The Celestial Screamer has all the qualities that are desirable about the Tube Screamer but is far more flexible in terms of EQ. The switchable boost is useful and I'm glad I went that route instead of having it always on.
Enclosure
Matte black sand 1590BB from Tayda. Tayda handled the UV printing as well (double white, gloss varnish).
I rated this build at 5 stars, but I may be a little biased...
Thank you @Chuck D. Bones for all your contributions to the community!
Attachments

Last edited: