I'm experimenting with a modified Fuzz Face circuit and I'd like to have a 3 way switch that goes between 2 capacitor values plus an off position that acts as if there was no connection. This will be placed across the Base and Collector of Q1 as a 2 position LPF and no LPF. Would this be the correct switch to use and if so, how would I wire it to achieve the result I'm after?

You are using an out of date browser. It may not display this or other websites correctly.
You should upgrade or use an alternative browser.
You should upgrade or use an alternative browser.
3 way switch for 2 different capacitor values plus off position
- Thread starter zakco
- Start date
Thank you for the detailed explanation!
If I were to use the 2nd example:
If I used the following values:
C1 - omitted
C2 - 220 pF
C3 - 470 pF
I would end up with 690 pF when the switch is in TOGGLE UP position, correct?
If I were to use the 2nd example:
TOGGLE DOWN and you have C1
TOGGLE CENTRE and you have C2
TOGGLE UP sums parallel C2 & C3
If I used the following values:
C1 - omitted
C2 - 220 pF
C3 - 470 pF
I would end up with 690 pF when the switch is in TOGGLE UP position, correct?

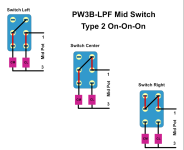
From the same thread. Most DPDT are type 2, but always check.
No, the second example is basically an or switch, no series or parallel. 1 2 or 3.
This is nice because you get
Some
More
Even more
Vs.
More
Some
Even more
Like a lot of lazy/cheap commercial builders do to save 59 pesos on a 2 pole switch
If you don't populate C1, it's an open.l to ground .Wire in place of C1 and it's a short to ground.
The first example uses series caps.
I'm confused. What is meant by "TOGGLE UP sums parallel C2 & C3" here? Or am I looking at the wrong diagram?No, the second example is basically an or switch, no series or parallel. 1 2 or 3.
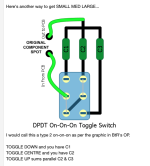
Also, I'm looking at the datasheet for these and I don't see a diagram or notation that specifies whether it's type 1 or 2. Man this stuff is confusing for a beginner!

 www.taydaelectronics.com
Model # 1MD6T1B1M1QES
Mini Toggle Switch 1M Series DPDT On-On-On
DAILYWELL ELECTRONICS - Get It Fast - Same Day Shipping
www.taydaelectronics.com
Model # 1MD6T1B1M1QES

Feral Feline
Well-known member
I'm confused. What is meant by "TOGGLE UP sums parallel C2 & C3" here? Or am I looking at the wrong diagram?
View attachment 121588
Bear with me a moment...
When you add resistors in series, like a train hauling boxcars, the resistors add up together; so 10k + 12k = 22k
There is some weird stuff that happens when you stick resistors in parallel, like two pontoons on a catamaran:
10k + 12k = 5k4545.
Two identical values in parallel halve, so 10k + 10k = 5k, but the math (for me) is complicated when using differing values so I use this handy online parallel-resistor calculator https://www.1728.org/resistrs.htm.
NOW, capacitors are the opposite of resistors when it comes to the math.
Parallel caps SUM: so if C2 = 100n and C3 = 56n then C2+C3 in PARALLEL = 156n
Caps in series behave exactly like resistors in parallel, in fact you can use the same 1728 calc link above to determine C2+C3 in series = 35n897
The toggle diagram posted by Jwin615 operates in such a way that with toggle UP both C2 and C3 are in play and since they are parallel you get whatever the two values are added together, simple math, no need for the online calc nor the formula (said formula is posted on the 1728 site if you insist on doing the math yourself for series capacitors).
Also, I'm looking at the datasheet for these and I don't see a diagram or notation that specifies whether it's type 1 or 2. Man this stuff is confusing for a beginner!
Mini Toggle Switch 1M Series DPDT On-On-On
DAILYWELL ELECTRONICS - Get It Fast - Same Day Shipping
Model # 1MD6T1B1M1QES
The info is there, but it IS rather convoluted.
Normally when we talk about switches we're looking at the bottom of the switch, its lugs, and typically numbered from top-left down and then back up to the top of the next pole... here a DPDT:
1 — — 4
2 — — 5
3 — — 6
Pole 1 or Pole A being on the left in orange,
and Pole 2 or Pole B on the right in purple.
I prefer to call them Pole A and Pole B because the lugs are numbered and it seems less confusing if you differentiate poles from lugs alphanumerically.
In MY experience MOST DPDT on-on-on are TYPE-1... took me so long to find a TYPE-2 that by the time I did, I'd already pulled apart a Type-1, flipped the widget inside to MAKE IT a Type-2.
The problem with Tayda, as I recall, was they were selling Type-1 switches but since they were looking at them, IIRC, top-down (like an x-ray through the top down to the lugs) and so then called them a Type-2.
At any rate, Tayda or the manufacturer of the switch WHOEVER wrote the damned datasheet has the lug-numbers all screwed up, so it takes some deciphering to determine what's really what, but all the info needed is there...
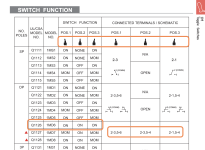
The above shows you what's connected in each toggle-bat position, with the unintuitive "5-4" instead of 4–5, and "2-1" instead of 1-2...

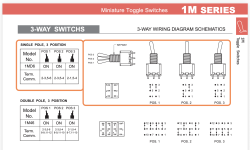
I mean, look at that
 — they're calling a DPDT on-on-on a "SINGLE POLE, 3 POSITION" switch.
Look at the numbering! It's not wrong, just ROTATE IT 180º and you've got lug-1 in the upper left corner where it belongs.
What they're calling "DOUBLE POLE" in the above datasheet snippet is actually a 4P3T.

As per Jwin615's post#2 above, first post in the thread and in addition to it this thread all about switches and how to (ab)use them:

[EditWADJA-GAWT?]
I'm hoping this thread can be a catch-all for interesting and unconventional ways to use switches, whether rotaries, relays, footswitches, toggles...
Here's one for a starter:
I saw this a long time ago, supposed to be a DPDT "wired as on-on-on" that can act like a3PDT.[EDIT SP3T]

and info collector that I am I DL'd the diagram, thinking it might have some use down the road.
Recently came across it again and thought the diagram is a wee-bit confusing so I fired up DIYLC to make better sense of it:

Simply add a...
I'm hoping this thread can be a catch-all for interesting and unconventional ways to use switches, whether rotaries, relays, footswitches, toggles...
Here's one for a starter:
I saw this a long time ago, supposed to be a DPDT "wired as on-on-on" that can act like a

and info collector that I am I DL'd the diagram, thinking it might have some use down the road.
Recently came across it again and thought the diagram is a wee-bit confusing so I fired up DIYLC to make better sense of it:

Simply add a...
- Feral Feline
- Replies: 102
- Forum: Modifications
Therein you'll find an easy-peasy method posted by PauloB:
For a CENTRE-OFF position, just swap the diagonal cap for a jumper.
Here's another level of wizardry posted by Cybercow:
Just remember that the TOGGLE-BAT points to the opposite side of the switch, so if you want small cap when toggle is left, you attach it to the lugs on right as below in orange:
I thought I'd posted a Rangemaster switcheroodoohickie, but I can't find the post...
Voila, still on the confuser's HD:
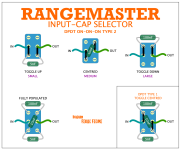
Yeah, okay. Enough.
Last edited:

Nostradoomus
Well-known member

Feral Feline
Well-known member
Can't stop laughing. Good thing I'm working in the basement two floors away from my sleeping wife...

Nostradoomus
Well-known member
Can't stop laughing. Good thing I'm working in the basement two floors away from my sleeping wife...


tegendemuur
Well-known member
With all the effort you've put into explaining switches, I'm baffled as by why @Robert hasn't given you a custom name in the "well-known member" spot yet.Bear with me a moment...
When you add resistors in series, like a train hauling boxcars, the resistors add up together; so 10k + 12k = 22k
There is some weird stuff that happens when you stick resistors in parallel, like two pontoons on a catamaran:
10k + 12k = 5k4545.
Two identical values in parallel halve, so 10k + 10k = 5k, but the math (for me) is complicated when using differing values so I use this handy online parallel-resistor calculator https://www.1728.org/resistrs.htm.
NOW, capacitors are the opposite of resistors when it comes to the math.
Parallel caps SUM: so if C2 = 100n and C3 = 56n then C2+C3 in PARALLEL = 156n
Caps in series behave exactly like resistors in parallel, in fact you can use the same 1728 calc link above to determine C2+C3 in series = 35n897
The toggle diagram posted by Jwin615 operates in such a way that with toggle UP both C2 and C3 are in play and since they are parallel you get whatever the two values are added together, simple math, no need for the online calc nor the formula (said formula is posted on the 1728 site if you insist on doing the math yourself for series capacitors).
The info is there, but it IS rather convoluted.
Normally when we talk about switches we're looking at the bottom of the switch, its lugs, and typically numbered from top-left down and then back up to the top of the next pole... here a DPDT:
1 — — 4
2 — — 5
3 — — 6
Pole 1 or Pole A being on the left in orange,
and Pole 2 or Pole B on the right in purple.
I prefer to call them Pole A and Pole B because the lugs are numbered and it seems less confusing if you differentiate poles from lugs alphanumerically.
In MY experience MOST DPDT on-on-on are TYPE-1... took me so long to find a TYPE-2 that by the time I did, I'd already pulled apart a Type-1, flipped the widget inside to MAKE IT a Type-2.
The problem with Tayda, as I recall, was they were selling Type-1 switches but since they were looking at them, IIRC, top-down (like an x-ray through the top down to the lugs) and so then called them a Type-2.
At any rate, Tayda or the manufacturer of the switch WHOEVER wrote the damned datasheet has the lug-numbers all screwed up, so it takes some deciphering to determine what's really what, but all the info needed is there...
View attachment 121591
The above shows you what's connected in each toggle-bat position, with the unintuitive "5-4" instead of 4–5, and "2-1" instead of 1-2...
View attachment 121592
I mean, look at that
Look at the numbering! It's not wrong, just ROTATE IT 180º and you've got lug-1 in the upper left corner where it belongs.
What they're calling "DOUBLE POLE" in the above datasheet snippet is actually a 4PDT.
As per Jwin615's post#2 above, first post in the thread and in addition to it this thread all about switches and how to (ab)use them:
[EditWADJA-GAWT?]
I'm hoping this thread can be a catch-all for interesting and unconventional ways to use switches, whether rotaries, relays, footswitches, toggles...
Here's one for a starter:
I saw this a long time ago, supposed to be a DPDT "wired as on-on-on" that can act like a3PDT.[EDIT SP3T]
and info collector that I am I DL'd the diagram, thinking it might have some use down the road.
Recently came across it again and thought the diagram is a wee-bit confusing so I fired up DIYLC to make better sense of it:
Simply add a...
- Feral Feline
- Replies: 102
- Forum: Modifications
Therein you'll find an easy-peasy method posted by PauloB:
For a CENTRE-OFF position, just swap the diagonal cap for a jumper.
Here's another level of wizardry posted by Cybercow:
Just remember that the TOGGLE-BAT points to the opposite side of the switch, so if you want small cap when toggle is left, you attach it to the lugs on right as below in orange:
I thought I'd posted a Rangemaster switcheroodoohickie, but I can't find the post...
Voila, still on the confuser's HD:
View attachment 121590
Yeah, okay. Enough.
Nostradoomus
Well-known member
With all the effort you've put into explaining switches, I'm baffled as by why @Robert hasn't given you a custom name in the "well-known member" spot yet.
His wife prefers that it stays that way.

ok I’m done with that now

tegendemuur
Well-known member
Nothing wrong with keeping a classic alive!
Nostradoomus
Well-known member
Nothing wrong with keeping a classic alive!


Feral Feline
Well-known member
Nothing wrong with keeping a classic alive!
I don't know who the person/meme is or nuttin' — I was just amused by the ennui-yet-exasperated expression on the guy's face.

Maybe it's funnier/more-insulting than I'll ever know!

PS: Oh, and I don't need a special name, I already get called lots of names and somehow "Switch-hitter" or similar may not give the right vibe I'm not going for.

pricklyrobot
Well-known member
The good thing about switches is they don’t require any electrical knowledge or theory to figure out.
If you don’t already have one, get a multimeter with ‘continuity mode’, sit down with your switches, see what connects to what in which toggle position, make notes/diagrams. It may be an exercise in tedium, but there’s zero theories/formulas/etc. involved.
Once you understand what’s happening in e.g. this:

rather than just following it paint by number style, you can figure out any switch.
If you don’t already have one, get a multimeter with ‘continuity mode’, sit down with your switches, see what connects to what in which toggle position, make notes/diagrams. It may be an exercise in tedium, but there’s zero theories/formulas/etc. involved.
Once you understand what’s happening in e.g. this:
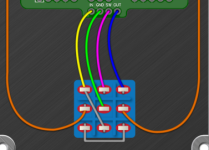
rather than just following it paint by number style, you can figure out any switch.

Passinwind
Well-known member
If you need parallel caps up to 68nF or so (for Kemet 426 5% polypro box caps, with polyester we could go bigger) in a more, less, none order with an On-On-On switch I have a breakout board for that:
 oshpark.com

Or if you need 3 way parallel in large, medium, small, then this slightly l;arger one:
oshpark.com

Regardless of potential Type 1 / Type 2 misnomer fun and games, this works with the usual supsects from Tayda, LMS, and SBP: Works for parallel resistors too. I use these for a 3 way midrange freq selector in my open sourse EQ pedals, so there's a pass through included from the EQ board to the out two mid pot lugs. That way we don't have to tack two wires on the pot lugs.

OSH Park ~
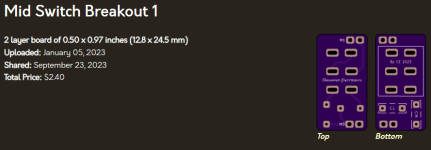
Or if you need 3 way parallel in large, medium, small, then this slightly l;arger one:
OSH Park ~
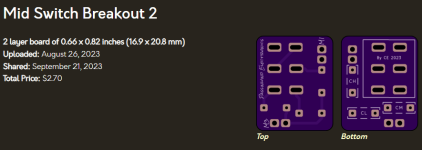
Regardless of potential Type 1 / Type 2 misnomer fun and games, this works with the usual supsects from Tayda, LMS, and SBP: Works for parallel resistors too. I use these for a 3 way midrange freq selector in my open sourse EQ pedals, so there's a pass through included from the EQ board to the out two mid pot lugs. That way we don't have to tack two wires on the pot lugs.
Well, this is fun!Bear with me a moment...
Somehow I had the bright idea of learning electronics/pedal building as an old guy with limited brains and spare time. It's been fun, frustrating, rewarding, invigorating and maddening sometimes in series and sometimes in parallel.
The toggle diagram posted by Jwin615 operates in such a way that with toggle UP both C2 and C3 are in play and since they are parallel you get whatever the two values are added together, simple math, no need for the online calc nor the formula (said formula is posted on the 1728 site if you insist on doing the math yourself for series capacitors).
This is what I thought and did the math for 2 caps in parallel, but when I asked for confirmation, Jwin615 said:
No, the second example is basically an or switch, no series or parallel. 1 2 or 3.
But the diagram he posted says:
TOGGLE UP sums parallel C2 & C3
Maybe I'm just thick, but how is this not a contradiction?
The problem with Tayda, as I recall, was they were selling Type-1 switches but since they were looking at them, IIRC, top-down (like an x-ray through the top down to the lugs) and so then called them a Type-2.
I read your detailed explanation (thank you!!) and re-read the datasheet, but I'm still not clear on whether the switch I linked to is type 1 or type 2?
I mean, look at that
I noticed that and it surely didn't help me understand a damn thing! ugh.
this seems straightforward. If I used a 220 pF cap across the top lugs and a 680 pF cap across the bottom lugs with a diagonal jumper, the cap values would remain at face value without any parallel summing math, correct? And just to confirm...this diagram uses a type 1 switch?
For a CENTRE-OFF position, just swap the diagonal cap for a jumper.
If I'm reading this correctly, the Type 1 example in this last diagram, is the same configuration as the previous diagram where the diagonal (in this case 10nF) cap could be replace with a jumper?I thought I'd posted a Rangemaster switcheroodoohickie, but I can't find the post...
Voila, still on the confuser's HD:
View attachment 121590
Phew!Yeah, okay. Enough.
These look like a nice tidy solution. I will consider them, but first I need to actually decipher switches in my brain the hard way. By the way, your site looks to be a great resource...I will peruse in more detail when I have some time, thanks!If you need parallel caps up to 68nF or so (for Kemet 426 5% polypro box caps, with polyester we could go bigger) in a more, less, none order with an On-On-On switch I have a breakout board for that:
OSH Park ~
View attachment 121605
Or if you need 3 way parallel in large, medium, small, then this slightly l;arger one:
OSH Park ~
View attachment 121606
Regardless of potential Type 1 / Type 2 misnomer fun and games, this works with the usual supsects from Tayda, LMS, and SBP: Works for parallel resistors too. I use these for a 3 way midrange freq selector in my open sourse EQ pedals, so there's a pass through included from the EQ board to the out two mid pot lugs. That way we don't have to tack two wires on the pot lugs.
View attachment 121607