Fingolfen
Well-known member
Back in June Steggo released its first original pedal design, the Dimetrodon Distortion. I love it (obviously), and a lot of other people have picked one up and really seem to be enjoying them. The only limitation of the original design was the fact that you had to pick one of the at least six major variations of the Big Muff based tone stack during the build unless you socketed components, which is a nightmare in a production pedal. I ultimately went with a fairly scooped mids version - the '75 Ram's Head - for the primary variant. However, at the time I mentioned that I wanted to try something like what was done on the AionFX Halo board and add a three way mids switch. After some work laying out the changes to the circuit and finding a switch that would work, Steggo is proud to introduce the next iteration of the Dimetrodon Distortion, the "Deluxe" which includes a three-way switch to toggle between three tone stack modes!
The Big Muff tone stack itself is a single knob passive control with only a few components controlling the frequency response. When I looked at how the AionFX Halo tone switch was designed, it made a couple of compromises in the layout to allow the use of both types of DPDT on-on-on switch in the build - which is ideal for a DIY kit, but I wanted to get closer to specific stacks in my design. That choice limited me to a specific version of the DPDT switch, but as I'm the only one building these boards, it seemed to be an acceptable compromise as it allowed me to match the three original stack values for resistors and capacitors exactly.
Big Muff Tone Stacks
Most of the tone controls which have been used in production Big Muff pedals are mids scooped - in other words, the middle frequencies are de-emphasized and reduced in volume relative to bass and treble frequencies - even in the center of the control's range. This combination works very well for some combinations of guitar pickups and amplifiers, but less well for others.
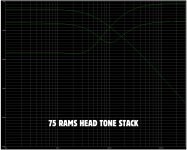
To make it easier to understand the frequency responses using the new mids switch, I created some plots using the Tone Stack Calculator. Unfortunately I wasn't able to generate different colors, but in all cases the top curve (from the left) is when the knob is turned all the way to the bass side, the middle curve is the knob at 12:00 (mid), and the bottom curve is when the knob is turned all the way to the treble side. As you can see above, the '75 Ram's Head is a fairly deep mids scoop.
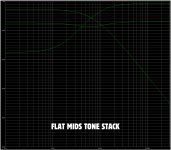
The middle setting is a "flat mids" response. As you can see from the curve above, this variant is still slightly mids scooped, but is relatively flat overall, and the treble response comes on earlier.
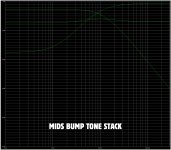
The final setting is a mids bump, which is a very slight bump. The flat mids and mids bump settings will be fairly close together over much of the range, with differences most noticeable only from about 10:30 to maybe 1:30 on the tone knob.
What About the "Regular" Dimetrodon Distortion?
To get three tone stack options easily packed into the Dimetrodon Deluxe, I decided to switch between as few components as possible. This meant I can use three, and only three of my standard Big Muff tone stack recipes in the Deluxe version of the pedal. While the original Dimetrodon is hard-wired for a particular tone stack, that stack can be any of six standard (and several non-standard) variants. So if you want a Dimetrodon with a Triangle, '73 Ram's Head, or Sovtek tone stack, those can only be done on the regular Dimetrodon Distortion at this point.
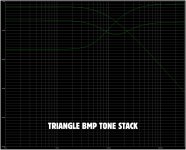
All three of those variants are mid-scooped stacks, but they tend to be a shallower scoop than the '75 Ram's Head in all cases. The Triangle (above) is shallower and reaches its minimum at a slightly higher frequency than the '75.
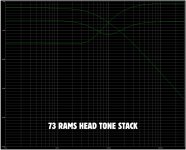
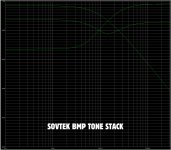
The '73 Ram's Head has a similar minimum when at noon, but is shallower than the '75 version. The Sovtek / Green Russian version (below) is very similar to the triangle. The degree of scoop is similar, but the breadth of that scoop is a bit wider than on the other versions of the pedal.
The Build
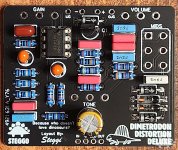
As you can see from photo of the PCB at the top of the article, this one was laid out entirely in house at the Studio using EasyEDA. I've done several layouts at this point and I'm finally building a decent library of what footprints work best with the components I typically keep in inventory. I've also worked out what layout of ground and offboard wiring connections work best for me, though generally these follow the PedalPCB standard of power coming directly into the board and grounding the audio jacks on the PCB as well. I do generally have my LED off board on the 3PDT daughter board as that tends to work best for the art layouts I prefer (and I have a lot of 3PDT daughter boards with left or right LED locations as well as an optional brightness control!).
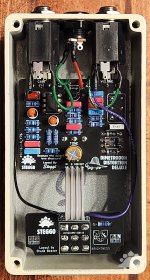
As the "Deluxe" version of the Dimetrodon shares most of its components with the original version, actually populating the PCB was fairly straightforward. The parts for my prototype are mostly new production. I used 1% metal film resistors, modern film capacitors, a couple of tantalum capacitors, and on electrolytic capacitor. The IC is new production and socketed. The only NOS components are some germanium diodes in the clipping section of the circuit.
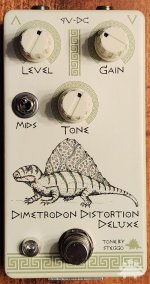
For the enclosure I went in a different direction than the original Dimetrodon - well, in some ways. The original dimetrodon dinosaur art was done by my wife, and the new one is another one of her awesome creations. This one is pointillist rather than one done in the style of medieval marginalia. Because of the different style, I decided to go with my more ancient Greek themed enclosure art style. The light green is off of the one of the ancient color palettes in Illustrator.
Overall I'm extremely happy with how the pedal turned out. This is the first pedal I've done from the ground up entirely in house. The circuit diagram, the PCB layout, the build, the enclosure, and even the enclosure art (thanks to my wife). When it's in '75 Ram's Head mode, it sounds exactly like my pre-production version, but then it has the two additional tone modes as well. I think I generally prefer the scooped mids version for most music I play with this pedal, but now that I have the option, I'm likely to find uses for the other modes as well.
Original blog article: https://steggostudios.blogspot.com/2023/10/updating-dimetrodon-distortion-new.html

The Big Muff tone stack itself is a single knob passive control with only a few components controlling the frequency response. When I looked at how the AionFX Halo tone switch was designed, it made a couple of compromises in the layout to allow the use of both types of DPDT on-on-on switch in the build - which is ideal for a DIY kit, but I wanted to get closer to specific stacks in my design. That choice limited me to a specific version of the DPDT switch, but as I'm the only one building these boards, it seemed to be an acceptable compromise as it allowed me to match the three original stack values for resistors and capacitors exactly.
Big Muff Tone Stacks
Most of the tone controls which have been used in production Big Muff pedals are mids scooped - in other words, the middle frequencies are de-emphasized and reduced in volume relative to bass and treble frequencies - even in the center of the control's range. This combination works very well for some combinations of guitar pickups and amplifiers, but less well for others.

To make it easier to understand the frequency responses using the new mids switch, I created some plots using the Tone Stack Calculator. Unfortunately I wasn't able to generate different colors, but in all cases the top curve (from the left) is when the knob is turned all the way to the bass side, the middle curve is the knob at 12:00 (mid), and the bottom curve is when the knob is turned all the way to the treble side. As you can see above, the '75 Ram's Head is a fairly deep mids scoop.

The middle setting is a "flat mids" response. As you can see from the curve above, this variant is still slightly mids scooped, but is relatively flat overall, and the treble response comes on earlier.

The final setting is a mids bump, which is a very slight bump. The flat mids and mids bump settings will be fairly close together over much of the range, with differences most noticeable only from about 10:30 to maybe 1:30 on the tone knob.
What About the "Regular" Dimetrodon Distortion?
To get three tone stack options easily packed into the Dimetrodon Deluxe, I decided to switch between as few components as possible. This meant I can use three, and only three of my standard Big Muff tone stack recipes in the Deluxe version of the pedal. While the original Dimetrodon is hard-wired for a particular tone stack, that stack can be any of six standard (and several non-standard) variants. So if you want a Dimetrodon with a Triangle, '73 Ram's Head, or Sovtek tone stack, those can only be done on the regular Dimetrodon Distortion at this point.

All three of those variants are mid-scooped stacks, but they tend to be a shallower scoop than the '75 Ram's Head in all cases. The Triangle (above) is shallower and reaches its minimum at a slightly higher frequency than the '75.

The '73 Ram's Head has a similar minimum when at noon, but is shallower than the '75 version. The Sovtek / Green Russian version (below) is very similar to the triangle. The degree of scoop is similar, but the breadth of that scoop is a bit wider than on the other versions of the pedal.

The Build
As you can see from photo of the PCB at the top of the article, this one was laid out entirely in house at the Studio using EasyEDA. I've done several layouts at this point and I'm finally building a decent library of what footprints work best with the components I typically keep in inventory. I've also worked out what layout of ground and offboard wiring connections work best for me, though generally these follow the PedalPCB standard of power coming directly into the board and grounding the audio jacks on the PCB as well. I do generally have my LED off board on the 3PDT daughter board as that tends to work best for the art layouts I prefer (and I have a lot of 3PDT daughter boards with left or right LED locations as well as an optional brightness control!).

As the "Deluxe" version of the Dimetrodon shares most of its components with the original version, actually populating the PCB was fairly straightforward. The parts for my prototype are mostly new production. I used 1% metal film resistors, modern film capacitors, a couple of tantalum capacitors, and on electrolytic capacitor. The IC is new production and socketed. The only NOS components are some germanium diodes in the clipping section of the circuit.

For the enclosure I went in a different direction than the original Dimetrodon - well, in some ways. The original dimetrodon dinosaur art was done by my wife, and the new one is another one of her awesome creations. This one is pointillist rather than one done in the style of medieval marginalia. Because of the different style, I decided to go with my more ancient Greek themed enclosure art style. The light green is off of the one of the ancient color palettes in Illustrator.
Overall I'm extremely happy with how the pedal turned out. This is the first pedal I've done from the ground up entirely in house. The circuit diagram, the PCB layout, the build, the enclosure, and even the enclosure art (thanks to my wife). When it's in '75 Ram's Head mode, it sounds exactly like my pre-production version, but then it has the two additional tone modes as well. I think I generally prefer the scooped mids version for most music I play with this pedal, but now that I have the option, I'm likely to find uses for the other modes as well.
Original blog article: https://steggostudios.blogspot.com/2023/10/updating-dimetrodon-distortion-new.html

