Cepheid Chorus

jcpst

Active member
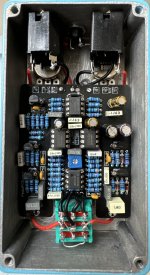
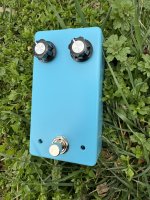
This is build number six. Lots of firsts for me. First build:
- using a predrilled powdercoat enclosure
- for someone else
- with this many components šŸ˜
- with a trimpot to tune

The only quirk is the oscillating LED is always running, even when the pedal is bypassed. My friend is ok with that, but I might dig around the troubleshooting threads before he picks it up.

It sounds awesome. I never owned a CE-2 so I donā€™t have a reference. I did the bass mod.
IMG_0409.jpeg
IMG_0408.jpeg
 
i JUST got this board in today hahaha! only on to the resistors though, might have to use a 3k instead of the 2k7 for R25 and a 7k5/5k6 for R11. i have to review the schematic to see if there's any material difference to the sound.

i love the enclosure color, it looks awesome! excited to put mine together.
 
The only quirk is the oscillating LED is always running, even when the pedal is bypassed. My friend is ok with that, but I might dig around the troubleshooting threads before he picks it up.
Not 100% sure about the cepheid, but this behavior is normal for most of the time-based effects I've built that include a rate LED. Thanks to this build report by @swyse, I recently learned you can pretty easily change the LED behavior by, "using the anode pad from the flashing LED and the cathode pad from the bypass LED."
 
This is my current build too. Finished drilling the enclosure. Excited to get to soldering. Those Love My Switches foot switches are so nice.

Iā€™m curious; by ā€œpredrilledā€ do you mean someone else did the drilling and powder coating specifically for your project? If so, where did you get that done?
 
I didnā€™t make the measurements. That was someone else that shared the drill template.

Once I made an account at drill.taydakits.com, which is separate login from tayda.com, I was able to click those drill template links and open up the template in their web designer. From there you can make tweaks if you need.
 
Oh. Ok. Thatā€™s a little more imposing. As hard as drilling enclosures is though, it might be worth it. I could probably get better at measuring quicker than drilling. Especially with only having a hand drill. Unfortunately I literally just received all the blank enclosures for my next projects in the mail a few days ago. Oh well. Theyā€™ll definitely be more projects to come. Thanks for this info.
 
Nice looking build! That was one of my first PedalPCB builds as well. It's a rock-solid reliable chorus. I dig your color choices too!
 
Oh. Ok. Thatā€™s a little more imposing. As hard as drilling enclosures is though, it might be worth it. I could probably get better at measuring quicker than drilling. Especially with only having a hand drill. Unfortunately I literally just received all the blank enclosures for my next projects in the mail a few days ago. Oh well. Theyā€™ll definitely be more projects to come. Thanks for this info.
Many forum members use the drilling service so there are a lot of templates going around. For most standard layout pedals, Tayda has pre-drilled options on their shop, so you donā€™t need to use the drilling service at all.
 
Oh. Ok. Thatā€™s a little more imposing. As hard as drilling enclosures is though, it might be worth it. I could probably get better at measuring quicker than drilling. Especially with only having a hand drill. Unfortunately I literally just received all the blank enclosures for my next projects in the mail a few days ago. Oh well. Theyā€™ll definitely be more projects to come. Thanks for this info.
I've gotten a ton better at drilling the enclosures, make sure to use a center punch the start the holes, that made it go from hard to medium. Then the step bit for the hand drill was the other missing piece. 30 bucks total probably but the step bit also saves a bunch of bit changes, i can drill out an enclosure in about 5 minutes now (10 including carefully taping on the template).

it is still a pain in the ass, and i hate the metal shavings, but for me right now it's worth saving the money. but that's also only a few pedals a week. my most sophisticated finish was gold spray paint, so that's also important to consider. if i wanted a nice enclosure i'd probably order from tayda.
 
@giovanni and @airbud Iā€™ll definitely search the forum first going forward. Iā€™ve utilized the pre-drilled from Tayda and run into the problem of the holes not being the right size for my LED bezels and dc jacks, and in the case of my Distortion 250 builds no 2 knob option. With the former I just ended up having to drill the pre-drilled. I feel my pedal construction skills are progressing nicely everywhere else but drilling the encloses. The learning curve is steep at around 8 bucks a pop for an enclosure. Thereā€™s no solder sucker for a crooked drill holešŸ˜† Not to mention drilling the enclosure fees like a chore next to the enjoyment I get from the rest of the process.
Many forum members use the drilling service so there are a lot of templates going around. For most standard layout pedals, Tayda has pre-drilled options on their shop, so you donā€™t need to use the drilling service at al
 
@giovanni and @airbud Iā€™ll definitely search the forum first going forward. Iā€™ve utilized the pre-drilled from Tayda and run into the problem of the holes not being the right size for my LED bezels and dc jacks, and in the case of my Distortion 250 builds no 2 knob option. With the former I just ended up having to drill the pre-drilled. I feel my pedal construction skills are progressing nicely everywhere else but drilling the encloses. The learning curve is steep at around 8 bucks a pop for an enclosure. Thereā€™s no solder sucker for a crooked drill holešŸ˜† Not to mention drilling the enclosure fees like a chore next to the enjoyment I get from the rest of the process.
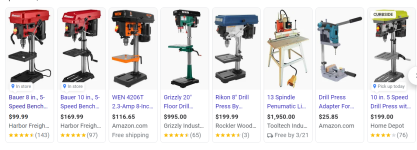
It may be a bit expensive but a drill press makes this 100X easier. I have had access to one in a Makerspace and it was life changing. Now Iā€™m considering buying oneā€¦
 
hand drill with a step bit is the best i can do.
thats all i ever do.
been working out alright so far.

tip:
get an automatic centre punch (i never thought i'd really use it much, but after getting one, i use it for every drill sesh.
 
thats all i ever do.
been working out alright so far.

tip:
get an automatic centre punch (i never thought i'd really use it much, but after getting one, i use it for every drill sesh.
they didn't have one at lowe's, i was crushed. high on my list of new tools.
 
Even with the center punch itā€™s easy to make mistakes. I recently made a laser cut faceplate for a pedal that I had hand drilled and used the center punch with and the holes were a bit off. Not enough that I couldnā€™t solder the pots in, but enough that the faceplate looked a bit off. I had to widen them with a round rasp to make it all fit better.
 
Even with the center punch itā€™s easy to make mistakes. I recently made a laser cut faceplate for a pedal that I had hand drilled and used the center punch with and the holes were a bit off. Not enough that I couldnā€™t solder the pots in, but enough that the faceplate looked a bit off. I had to widen them with a round rasp to make it all fit better.
I found that following the center punch mark with a center drill hole, then sizing with a Christmas tree bit helps a lot. Iā€™m also clamping into a vice and using a drill press so I feel any errors are likely layout errors in my case
 
Back
Top