Gerkin Fuzz question

Are D1 and D2 actually needed here? I see they are both just 3mm LED's but look to be a looper circuit. Why would you utilize LED's instead of an actual diode? I was looking at the traced schematic of the Way Huge somewhere else and it doesn't mention the need for D1 & D2 anywhere... furthermore, all the Diodes are 1N914. Maybe their drawing is incorrect but it looks fairly similar to the schematic here.

Just curious if anyone has built the Gerkin Fuzz and if you actually included the 3mm LED or if you just utilized a jumper in their place.
 
There's some versions of the swollen pickle that have don't them, but this one does.

If you don't want to use them, you can leave them out, along with C7 and the clip trim pot (and then will need to jumper between pins 1 and 2 of the trim pot).

There's no real good reason to leave them out though--this circuit adds more flexibility by including them as a clipping option.
 
I have a production Swollen Pickle (s/n AB12P065) and it contains a pair of yellow LEDs. It matches the Gerkin schematic. If you set the Clip trim to 50%, it effectively takes the 2nd stage clipping diodes out of the circuit. Overall, a very dense and bassy Muff.
 
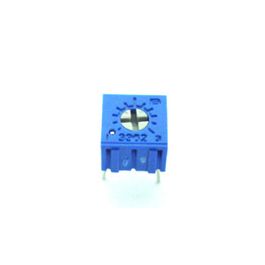
I would not use that style. Won't fit the board and they're kinda flimsy. You'll be much happier if you use the 3362P trimmer. Sure it costs a little more. Here's a good deal:

https://www.goldmine-elec-products.com/prodinfo.asp?number=G21986

You can score some other stuff them at the same time and amortize the postage.
https://www.goldmine-elec-products.com/prodinfo.asp?number=G25696
 
Yes it should work. Some PCBs have a trim pot location like this, specifically for the 3362P style:

Screen Shot 2022-02-22 at 7.34.27 PM.png

And the newer boards are fitted with holes for both styles. The two on the the bottom are connected giving you option of using either style of trimpot.

Screen Shot 2022-02-22 at 7.33.45 PM.png

As you can see, they have slightly different leg locations. However you can probably just bend the legs of the one you're looking at to make it fit, if you're dealing with the first kind. But if you're placing an order, you may as well get the one that fits exactly and not have to worry about making it fit.
 
Done and done!

I am excited to build my very first pedal and start using it on my board! I will try to post build photos as I go along otherwise will post photos of the completed work.

I am sure I will have some troubleshooting but if not, then maybe I am lucky? LOL

Can't wait for this "Way Huge" project to come to completion.
 
Back
Top