Idiot proof Tayda UV templates?

jwin615

Well-known member
I'm forcing myself to learn this. I really am. But, by chance, has anyone shared Adobe illustrator/other templates for tayda with specific enclosure sizes?
Even better, with the various PPCB drill templates in a layer?
If not, this would be an amazing community resource.
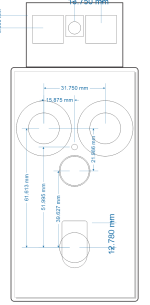
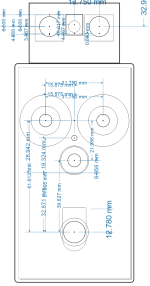
This box+this drill layout/template=this illustrator/designer/whatever template.
Man. Personally, that would save me several palpations. I'm a fool enough to throw something together but smart enough to know I probably messed it up trying to transpose the layout and all my pots will be pointing 10, 2 and 6 and I'll lack .5mm clearance on jacks or switches.

If they aren't out there, would some be willing to share?
Maybe a community drive folder? Ultimately, a master zip?

Learning new programs isn't especially difficult for me, but I only get time starting around 10-1030 at night. And that's difficult. Can't be the only one here.
Having "at least I know it will fit and my labels are centered" on my side would be awesome.
 
I usually bring over a sized template from Photoshop and leave it in the white layer to create guides (just make sure you delete it at the end!).

Are you looking for anything specific? If so, I may be able to hook you up...
 
Having "at least I know it will fit and my labels are centered" on my side would be awesome.
Here's what I do.

1.) Make circles the size of your knobs. So if you're using 19mm diameter knobs, make 19mm diameter circles.

2.) Align them to the center both horizontally and vertically first so they're right at the center.

3.) Use the move tool to move them to the exact locations of the holes for the pots.

You can use some existing templates to get the coordinates, for example I use Son of Ben to get the 4 knob template Tayda dimensions. Chop Shop has the 3 knob, Angry Charles I think is 5 knob and Frost Drive for 6 knob.

Now you should have correctly sized pot knob placeholders (obviously you need to remove them at the final stage when sending the pdf to be printed), use those to arrange the text so it's visible.

You can center the text using them too. You need to have created outlines for this, for editable text it will align the box you can write in, so if your box is not the exact same size as the text it won't work well.

It's easiest if you put the placeholders as the highest layer. Select both text and the pot, and on the align screen on the bottom right pick "Align to Key object". The pot should have a thicker outline, showing it's the key. Then just select the horizontal align (center), and it will center the text on the pot.

If the pot is not the key object, you can click on it after choosing "Align to Key object", but if the pot placeholder is right at the top of the layer list, it will be automatically the correct way around.

Hope this helps! I don't really have templates as such, I just pick one of the old ones, Save as and remove the old graphics. Oh, and I've noticed it's a good idea to save the "Pedal name.ai" in the most finished form, and then do a _final version for the pdf where you remove the placeholders, because if you spot a mistake at this point and already removed all the placeholders, it's a pain to recreate them. Plus the one with the placeholders included is handy as a semi-template.
 
Are you looking for anything specific? If so, I may be able to hook you up...
Yeah. Skills. 😂

In all seriousness...
Yes, I've built a Pharmacist for my Niece for Xmas but want to get a custom enclosure made to top it off. But I'm struggling, maybe mostly with the confidence of pasting in the PDF. I haven't done much graphic design since ?2000¿ or so.
If you, or anyone, has a template for that board, would be awesome.
I'm sure I'll get there, in time. I just need the ah-ha moment.
(Last effort seemed to be great, then I zoomed in and saw my drill template I imported was stretched ever so slightly on Y some how. I think the issue is maybe somewhere that I cut the enclosure, pasted and scaled but it didn't align with drill coordinates, sonwhow)

I do think a public/community repository of either templates or designs that members submit would be a really awesome addition to the hobby and forum.

But , if others, and I'm sure there's been many, find themselves in a similar circumstance, a respositlry would be great.

There's only what, 2-3 variations of the 3 knob, 1 4 knob with switch etc...
A respositlry of templates, maybe named the same as the tayda drill pattern, would be cool. It would "lower the cost of entry" for many trying to get into enclosure design but also allow them to get rewarding results while learning.

It's part of the PPCB conundrum. Easiest pcbs to build. But basic on many other aspects.(not a dig)
But, PPCBs community is top notch. Mods? Variants? Subs? All on the forum, not the doc. If the community could bridge the gap between pdf drill template and art/tayda template, would be a great thing for at least a subset like me.
 
Here's what I do.

1.) Make circles the size of your knobs. So if you're using 19mm diameter knobs, make 19mm diameter circles.

2.) Align them to the center both horizontally and vertically first so they're right at the center.

3.) Use the move tool to move them to the exact locations of the holes for the pots.

You can use some existing templates to get the coordinates, for example I use Son of Ben to get the 4 knob template Tayda dimensions. Chop Shop has the 3 knob, Angry Charles I think is 5 knob and Frost Drive for 6 knob.

Now you should have correctly sized pot knob placeholders (obviously you need to remove them at the final stage when sending the pdf to be printed), use those to arrange the text so it's visible.

You can center the text using them too. You need to have created outlines for this, for editable text it will align the box you can write in, so if your box is not the exact same size as the text it won't work well.

It's easiest if you put the placeholders as the highest layer. Select both text and the pot, and on the align screen on the bottom right pick "Align to Key object". The pot should have a thicker outline, showing it's the key. Then just select the horizontal align (center), and it will center the text on the pot.

If the pot is not the key object, you can click on it after choosing "Align to Key object", but if the pot placeholder is right at the top of the layer list, it will be automatically the correct way around.

Hope this helps! I don't really have templates as such, I just pick one of the old ones, Save as and remove the old graphics. Oh, and I've noticed it's a good idea to save the "Pedal name.ai" in the most finished form, and then do a _final version for the pdf where you remove the placeholders, because if you spot a mistake at this point and already removed all the placeholders, it's a pain to recreate them. Plus the one with the placeholders included is handy as a semi-template.
Thanks for this.
That part between old and new project could be a handy template to help a numbskull like me out.
Maybe add individual layers for common sized pots instead of one...(though I get that. That hasn't been my struggle. It's more the dread of knowing everything aligns)
Idiot proof it to the point of "add artwork and it will fit."
Idea being, you have this build that uses this drill template/coordinates, then use this .ai tamplate for your artwork.
 
Maybe add individual layers for common sized pots instead of one...(though I get that. That hasn't been my struggle. It's more the dread of knowing everything aligns)
You can just select the circle and change the diameter in the top bar, so you don't need different ones for different sized pots IMO.

But a template per knob layout could be useful.
 
You can just select the circle and change the diameter in the top bar, so you don't need different ones for different sized pots IMO.

But a template per knob layout could be useful.
I haven't even considered pot size. I've been too busy learning alignment and worrying about jacks v. caps.
See. Idiot(me) proof templates could help all us troglodytes. :)
 
Let me see if I can work something up for you - the catch is I have to run a drill template using the measurements in Photoshop to make sure everything actually lines up properly...

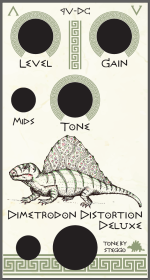
For example - here's some art I was working on today...

1696394948395.png

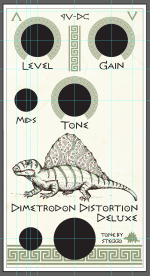
Here it is where you can still see the guides...

1696395010625.png

Here's what's hiding underneath all that...

1696395058036.png

The catch is the actual enclosure size on a drill template is going to be larger than the printable area on the Tayda 125B template - so you have to center it... and I still remeasure and adjust the drill template (even AionFX) from the Photoshop image...
 
Let me see if I can work something up for you - the catch is I have to run a drill template using the measurements in Photoshop to make sure everything actually lines up properly...

For example - here's some art I was working on today...

View attachment 57706

Here it is where you can still see the guides...

View attachment 57707

Here's what's hiding underneath all that...

View attachment 57708

The catch is the actual enclosure size on a drill template is going to be larger than the printable area on the Tayda 125B template - so you have to center it... and I still remeasure and adjust the drill template (even AionFX) from the Photoshop image...
Ah ha! 😄
Using and labeling the drill coordinates themselves. Doh!
Thanks @Fingolfen
 
Just to offer another perspective...

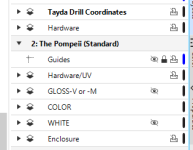
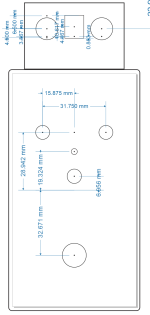
I'm one of the only forumites using Corel Draw. My design process is to basically design the graphics first, tweak circuit board layouts to match graphics, then create a "hardware" layer to verify how knobs and other external things fit and a "Tayda drill" layer that houses those coordinates.

Here is how I setup my .cdr files. The Pompeii:

1696430490970.png

Tayda Drill Coordinates:
1696430540432.png

Hardware layer:
1696431686657.png

Drill/Hardware Overlay:
1696431731518.png
 
I want to be along for this ride as well. I have been putting it off and need to learn it. I am comfortable enough to be dangerous in photoshop so I am hoping I can work in illustrator for by basic purposes without a major learning curve. If you would be willing to share your size templates for the enclosures in photoshop that would be one less thing to do, lol. I use 1590a, 125b and 1590bb mainly. If not no worries. I am pretty sure I can at least get that part sorted.
 
Back
Top