kweefthief
Active member
Hey guys 
I just finished the King Nothing build and it sounds great! I've also built the Particle accelerator and the old two knob version of it before. I think the KN has a more pleasing grit than the old PA and the new PA isnt really meant to have that much gain. The mode switch is real cool. The left side is a more aggressive gainy sound that has a little bite. The middle is the most neutral with less gain (my favorite). The right side has a smoother top end but same gain characteristic as the middle.
I expected a more transparent sound but it does seems to fill out the lower mids a bit, which isnt a bad thing. It doesn't do it in an artificial sounding way like a tube screamer though, more natural like turning ur amp up. I could definitely see this being an always on for some but I would miss the scoopy business from my princeton. More on this in the oopsie part.
I subbed out the 470k resistors for 510k's since thats all I had!
The Oopsie....
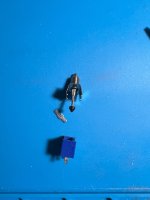
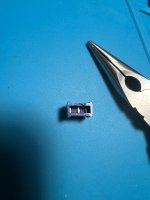
So I got a little too excited while tightening the Lows switch nut and snapped off the top part of it, popping out the lever. Unfortunately, that was my last on/off/on SDPT and I hate desoldering switches. I think it would be ever harder to do on this build due to the capacitors being very close to the switch. So, I opted to tape the hole up and use it as is.
I'm assuming the lever popping off essentially puts it in the off position, which would be no capacitor selected right? That would give me lower capacitance leading to more bass/lower mids going through?
Would there be an easy way to lower some bass? Could I solder a capacitor directly onto the lugs of the switch and make it work?
Lots of questions sorry!
I just finished the King Nothing build and it sounds great! I've also built the Particle accelerator and the old two knob version of it before. I think the KN has a more pleasing grit than the old PA and the new PA isnt really meant to have that much gain. The mode switch is real cool. The left side is a more aggressive gainy sound that has a little bite. The middle is the most neutral with less gain (my favorite). The right side has a smoother top end but same gain characteristic as the middle.
I expected a more transparent sound but it does seems to fill out the lower mids a bit, which isnt a bad thing. It doesn't do it in an artificial sounding way like a tube screamer though, more natural like turning ur amp up. I could definitely see this being an always on for some but I would miss the scoopy business from my princeton. More on this in the oopsie part.
I subbed out the 470k resistors for 510k's since thats all I had!
The Oopsie....
So I got a little too excited while tightening the Lows switch nut and snapped off the top part of it, popping out the lever. Unfortunately, that was my last on/off/on SDPT and I hate desoldering switches. I think it would be ever harder to do on this build due to the capacitors being very close to the switch. So, I opted to tape the hole up and use it as is.
I'm assuming the lever popping off essentially puts it in the off position, which would be no capacitor selected right? That would give me lower capacitance leading to more bass/lower mids going through?
Would there be an easy way to lower some bass? Could I solder a capacitor directly onto the lugs of the switch and make it work?
Lots of questions sorry!