SOLVED Wrectifier effect barely audible

Kroars

Well-known member
Hello All,

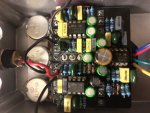
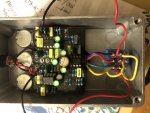
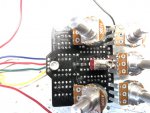
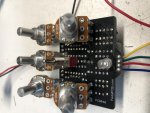
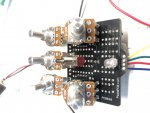
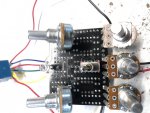
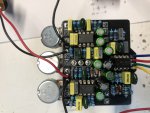
Just finished the Wrectifier pedal and am having difficulty with it. I’ve got a clean signal when in bypass. Although when I turn the effect on via foot switch, LED comes on but I can barely here the effect through amp and only when I turn both gain and volume (on pedal) all the way up. I’ve don’t the typical troubleshooting with grounding issues and shorts, can’t find anything.
Like I mentioned, if I turn volume and gain all the way I can faintly here the effect through my amp, I can even hear changes in tone when I mess with the tone knobs. When I turn my amp volume to noon, I can here the effect pretty good -but then if I turn effect off my clean is screaming loud.

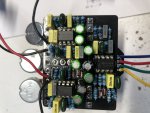
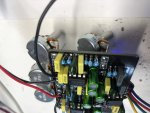
what could cause this? All components (even resistors) individually tested for correct value during installation. I suppose I didn’t test the 3 IC’s, but they’re part of a lot I purchased and others from same lot worked great in other builds.

Thanks!!
 

Attachments

  • 80664EFB-44BF-420D-B269-AC9FB8AE8F96.jpeg
    80664EFB-44BF-420D-B269-AC9FB8AE8F96.jpeg
    103.3 KB · Views: 33
  • DB16D01A-A6B3-4CE7-8985-F92E46A782DF.jpeg
    DB16D01A-A6B3-4CE7-8985-F92E46A782DF.jpeg
    107.3 KB · Views: 29
1- have a wiggle. Poke around on the board and push and pull things around. I spent days trying to diagnose a tremolo only to find a 1uf cap, that looked perfectly fine, wasn't 100% soldered. I went crazy and was ready to throw it in bin but having a poke saved the day.

2- scrub the back of the board with isopropyl alcohol and a toothbrush. This removes any errant bits of metal (they only need to be microscopic) and removes flux from the surface. A useful precision and again, something that's saved my builds more than once.

Simple. Effective. Easy.
 
2- scrub the back of the board with isopropyl alcohol and a toothbrush. This removes any errant bits of metal (they only need to be microscopic) and removes flux from the surface. A useful precision and again, something that's saved my builds more than once.

Second this, a good wash with isopropyl is a great habit to get into on every build.
 
1- have a wiggle. Poke around on the board and push and pull things around. I spent days trying to diagnose a tremolo only to find a 1uf cap, that looked perfectly fine, wasn't 100% soldered. I went crazy and was ready to throw it in bin but having a poke saved the day.

2- scrub the back of the board with isopropyl alcohol and a toothbrush. This removes any errant bits of metal (they only need to be microscopic) and removes flux from the surface. A useful precision and again, something that's saved my builds more than once.

Simple. Effective. Easy.
I use an aerosol electronics cleaner, works great. Every build I’ll spray, scrub then spray again.
I’ll keep wiggling.
 
tracking the audio signal through your circuit with an audio probe will be the easiest way to find out where your volume loss is coming from.
Yeah, I suppose that’s my next step. Just hoping there was a common culprit for this particular issue. Thanks!
 
the common culprit can be a bad solder joint or a wrong part value in multiple places, and perhaps even more than one. the audio probe is easy to build so you can compare the parts on the PCB to the schematic to isolate the place where you are losing volume.
 
Ok, this is driving me crazy. Only pedal out of nearly 20 that I can’t figure out. I’ve had a few issues before, mostly shorts through grounding on enclosures -easy fix.

I’m now, after reflowing everything and rewiring (including new 3pdt footswitch), down the audio probe. I’ve used it before with success, but now stumped.

I started at the input and went directly to R1 (1M) and nothing. In fact most will have no sound. The only components that will register with probe is R23, C25, faintly C16 and volume pot legs. Also, when toggle switch is in down position I get a reading from the lowest of three legs -although, nothing on any of the legs when toggle is up.

As requested here are a few more pictures.
 

Attachments

  • 9899828E-CD32-455E-A12F-9D397E27350D.jpeg
    9899828E-CD32-455E-A12F-9D397E27350D.jpeg
    91.9 KB · Views: 8
  • 51882355-F5D0-4F4A-914C-746678B4DF4C.jpeg
    51882355-F5D0-4F4A-914C-746678B4DF4C.jpeg
    106.4 KB · Views: 8
  • 214D9682-0ED3-44CB-9407-8255F7E99431.jpeg
    214D9682-0ED3-44CB-9407-8255F7E99431.jpeg
    80.2 KB · Views: 11
  • CA8F4A81-29D7-42F2-B89B-0867260B61D8.jpeg
    CA8F4A81-29D7-42F2-B89B-0867260B61D8.jpeg
    98.9 KB · Views: 9
Few more:
 

Attachments

  • 4F5F4D9A-399D-4763-8C43-A814441942E3.jpeg
    4F5F4D9A-399D-4763-8C43-A814441942E3.jpeg
    290.8 KB · Views: 11
  • 57FC43EA-160F-420D-A287-484E14502C7F.jpeg
    57FC43EA-160F-420D-A287-484E14502C7F.jpeg
    246.5 KB · Views: 10
  • BCC96B6C-6D30-40C7-89A1-90D4E680101F.jpeg
    BCC96B6C-6D30-40C7-89A1-90D4E680101F.jpeg
    235.2 KB · Views: 12
  • C22879B1-2EE4-4818-871F-EFB1F29C88B1.jpeg
    C22879B1-2EE4-4818-871F-EFB1F29C88B1.jpeg
    282.2 KB · Views: 12
OK, With a DMM set all your Potentiometers in the Middle.
Start with the Volume Pot , followed by Gain , Bass, Middle, Treble.
Check to see if your Pots are varying in Resistance by Probe on Middle Lug 2 & Lug1 reading & then Middle Lug 2 & Lug 3 reading.
Adjust Pot to Full Clockwise & Check to see if it Changes.
If Not, You have a Faulty or Cracked Pot.
Repeat this process on all the pots.
Depending on the Value of the Pot will be a small & large change in resistance as long as they are varying.
In this case, the Treble pot will be less.
 
Back
Top