Tayda UV Printing

Hello,
Just to give you the "end of the story", Tayda ended up printing the enclosure anyway and the white layer didn't print. The gloss layer kinda make it a little better. At the end it wasn't too bad.

On a side note, I got a partial answer but I'm still not getting it right.
On the Affinity forum this was discussed: https://forum.affinity.serif.com/index.php?/topic/146258-multi-layer-pdf-export-problems/
(thanks @Grubb for the link)
As suggested on that forum, I've checked the entire template for things outside of the template and it still got my layers clipped into one when opened with Illustrator (thanks again @Grubb for checking it for me).

Somebody's having the same problem?
Hello,

I've got some information for those struggling like me...
Posted a question on the Affinity Forum and they sent me a link to the Adobe Forum:
https://community.adobe.com/t5/illu...rts-have-a-clipping-mask/m-p/11828784#M263694
Didn't find anything I could use other than the first conclusion of another Affinity user "zilla" :
"i had to manually size it down thru trial and error so there were several mm between the edge of the page and the graphic."

So, for now we need to size down or not put objects too close to the border of the document otherwise the pdf will clip all the layers together when opening it with Illustrator. :(

This is weird because I did print with Tayda without any issues in November 2021. So maybe Affinity did a "bad" update... ?
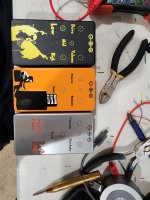
 
Just received my first UV prints. Didn't really know how to use Illustrator (only a little bit of Photoshop) before I started reading this thread last year but I learned quite a lot, so thanks everybody. :) None of these designs are anything spectacular but I'm actually blown away by how good these look in real life. All of them had data in the White, Color and Gloss (GLOSS-V) layer. None of them had the white layer printed twice, I can see how that would make sense on some designs now, though .

I printed two designs (Windmill and Marigold) on pre drilled enclosures and interestingly enough both didn't line up 100%. But it doesn't really matter because the hardware will cover the prints on these parts anyway.


First row: Caesar, Spirit Box, Marigold, Windmill
Second row: Madbean Tone Virus, Madbean Rat, Madbean Wavelord and Muffin
uv1.jpg uv2.jpg uv3.jpg
 
I printed two designs (Windmill and Marigold) on pre drilled enclosures and interestingly enough both didn't line up 100%. But it doesn't really matter because the hardware will cover the prints on these parts anyway.
Typically, you'd want to remove the drill marker for pre-drilled enclosure, and not use markers for the pot (as they will most likely be offset with the print tolerance).
Apart from that, great job, these look great!
 
Just received my first UV prints. Didn't really know how to use Illustrator (only a little bit of Photoshop) before I started reading this thread last year but I learned quite a lot, so thanks everybody. :) None of these designs are anything spectacular but I'm actually blown away by how good these look in real life. All of them had data in the White, Color and Gloss (GLOSS-V) layer. None of them had the white layer printed twice, I can see how that would make sense on some designs now, though .

I printed two designs (Windmill and Marigold) on pre drilled enclosures and interestingly enough both didn't line up 100%. But it doesn't really matter because the hardware will cover the prints on these parts anyway.


First row: Caesar, Spirit Box, Marigold, Windmill
Second row: Madbean Tone Virus, Madbean Rat, Madbean Wavelord and Muffin
View attachment 24535View attachment 24536View attachment 24537
Those look amazing. Nicely done!
 
Typically, you'd want to remove the drill marker for pre-drilled enclosure, and not use markers for the pot (as they will most likely be offset with the print tolerance).
Apart from that, great job, these look great!
Totally makes sense now that I think about it :ROFLMAO: Thanks!
 
Just received my first UV prints. Didn't really know how to use Illustrator (only a little bit of Photoshop) before I started reading this thread last year but I learned quite a lot, so thanks everybody. :) None of these designs are anything spectacular but I'm actually blown away by how good these look in real life. All of them had data in the White, Color and Gloss (GLOSS-V) layer. None of them had the white layer printed twice, I can see how that would make sense on some designs now, though .

I printed two designs (Windmill and Marigold) on pre drilled enclosures and interestingly enough both didn't line up 100%. But it doesn't really matter because the hardware will cover the prints on these parts anyway.


First row: Caesar, Spirit Box, Marigold, Windmill
Second row: Madbean Tone Virus, Madbean Rat, Madbean Wavelord and Muffin
These look amazing!

What font did you use on the muffin?

Again well done!
 
  • Like
Reactions: fig
View attachment 24539
wrksctzn3sbzrq3f0iav.jpg
Light Box photo? Nicely done.
 
I am having an issue with the graphics above. I need the lettering inside the faux rubber footswitch pad to be punched out but when i try and use the "Back Minus Front" tool, it does not seem to remove that material from the rounded rectangular shape.
I've had trouble getting anything but fairly basic fonts/shapes to subtract, and I've always had to "Create Outlines" on any text...

Aion Aurum - 03.jpg
 
I am having an issue with the graphics above. I need the lettering inside the faux rubber footswitch pad to be punched out but when i try and use the "Back Minus Front" tool, it does not seem to remove that material from the rounded rectangular shape.
Whenever I have this problem (in Illustrator) I go to Object > Compound Path > Make, and if both the text and the item I'm punching the text out of have had this done to them, it works most of the time.
 
My phone camera does not do this thing justice, but I got this from Tayda just now and it's come out really well. Double white UV with gloss, on a matte black enclosure. It's a commissioned Precision Drive build for a friend/client. I'm not sure if he realises that the name of the pedal is a pun yet 😅
IMG_20220405_115604_copy_1728x3456.jpg
 
FYI, seems like the printing process is going faster than listed. I ordered my first batch of three last Monday night and I got a shipping notice early this morning. Interesting considering the UV printing page says it will take 12 business days and when I checked out I got a notice saying Tayda was closed for a holiday from 14-18. Should point out that I used Illustrator to create these designs. Will post pics when they get here, hopefully Friday.
 
Finally getting around to trying a Tayda print job using Affinity Designer. My layers are exporting to PDF in reverse order, i.e White/Color/Gloss. Has anyone else encountered this and was it a problem?
 
FYI, seems like the printing process is going faster than listed. I ordered my first batch of three last Monday night and I got a shipping notice early this morning. Interesting considering the UV printing page says it will take 12 business days and when I checked out I got a notice saying Tayda was closed for a holiday from 14-18. Should point out that I used Illustrator to create these designs. Will post pics when they get here, hopefully Friday.
So here is the photo of those. I'm very happy how the Dark Esbat Sabbath print came out amazing. I used the black matte sand enclosure. I'd definitely go that route again for any black enclosures.
 

Attachments

  • 20220425_184000.jpg
    20220425_184000.jpg
    1.1 MB · Views: 61
Here are my first two UV prints. I used Inkscape and Scribus, both free to use.

Inkscape to design the graphic, then Scribus to set the correct colors, create the 3 layers, and export the pdf.

The Abyss is a black enclosure (gloss), the Spatialist is matte black. Both have a gloss-V layer.

Both graphics were traced to vector by Inkscape.

Overall, I’m pretty happy with them. I was prepared to open the box and see a jumbled, smudged mess. In retrospect, I could try to crop the abyss around the blue to get rid of the black background. But for a non-artist using freeware, I’ll take it :geek:


88597A7A-7C96-445B-AC86-2797B26E55B7.jpeg
 
Scribus works for the Roland swatches?

I have a design I want to order in the next day or two, but my dad’s away for a while, so I don’t have access to his Adobe suite to apply the spot colors in illustrator.
 
I have not been following this thread for a while, but I have been thinking about something and want to know if anyone has tried it.
A graphic that uses ink as the background and negative space (the color of the enclosure as the art) So essentially like a negative/opposite print. So I guess the template would be a solid fill background and the art would just clip out of that.
 
Scribus works for the Roland swatches?

I have a design I want to order in the next day or two, but my dad’s away for a while, so I don’t have access to his Adobe suite to apply the spot colors in illustrator.

Yes. You load the swatch file. Then open the design (in my case from the inkscape file), then replace the inkscape colors with the swatch spot colors for white and gloss. Then tweak the rest of the RGB colors to CMYK.

I had issues with Scribus 1.4.x, sometimes the layers would not output correctly. But when using 1.5.x (whatever the latest "development build" is), I've had no issues. The colors, the size, and the layers are correct in the final PDF.
Awesome! Thanks for the info!
 
Back
Top