Tayda UV Printing

Anyone ever had Tayda throw a “cant print gloss because no RDG_Gloss is in the gloss layer”?

I just pulled the files and all the PDFs have RDG_Gloss in there.

In stumped and they are already taking fucking forever to get this job done so I’m looking to resolve.

Files are here if anyone can give me a second set of eyes. Could be my error here as well:


My workflow is a bit of a mess since I use Inkscape/Scribus neither of which can actually re-read the generated PDFs back correctly, but I've done several prints at Tayda with this method, so I know the output is fine. Looking at the files you shared with Scribus, here's what I see:

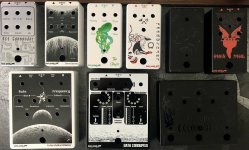
In 'The Pompeii (Color Test - 125B - UV Standard - Rev. 0002).pdf' the spot colors are there for RDG_GLOSS and RDG_WHITE, but they are using the "Lab" Color Model and not CMYK, which may or may not be problematic. But whatever you did for this file appears to be closer to correct than the others.

View attachment 51097

When I open 'Monk Buffer (125B - UV Blackout - Rev. 0002).pdf' and 'The Pompeii (125B - UV Standard - Rev. 0002).pdf' I do not see the spot colors at all.

I get similar results. The gloss swatches are spot colors, as they should be, but illustrator shows that certain colors are RGB rather than CYMK (that’s just the alert it popped up, I can’t tell you which colors it is still reading as RGB).. I would just convert them all to CYMK and send it back to you but, for whatever reason (I am no illustrator expert) the file that I opened in illustrator only shows one layer as opposed to three that were likely in your original file, and I don’t wanna make things worse.

Mike
 
Using Corel is part of my problem, as their process seems optimized to and geared towards AI.

I’m not learning a new workflow though so hopefully someone can help me troubleshoot this and I can just determine what the best output settings are.
I'm not entirely convinced that you've done anything wrong here, despite the response from Tayda. I've inspected the last file you've linked and it shows the correct spot colors in the corresponding layers.

Yes, Tayda's workflow is designed around AI, but it's not AI exclusive. All of the prints that I've done with them were created in Affinity Designer (AD) and they've all worked with only a couple having issues that ended up being user-error.

I've attached your file where I've reapplied the gloss and white spot colors I use in AD. If you're interested, you could resubmit the file as a "test" to see if it's something caused by software or something on their end. Just to reiterate, your file looks just fine to me before doing this, but perhaps you'd like to rule out software as a cause of the problem.
 

Attachments

My guess is that even if they could spot the issue they may not want to take the responsibility of fixing it?
I think their policy is that they don’t fix anything. That being said, I do believe they occasionally take pity on people and do a fix if they can quickly. I can think of at least one job where I got blocked due to a very similar error and then suddenly the print job went through while I was preparing an updated file. But I think I just got lucky, or maybe they realized there wasn’t an error after all.

In my personal case the “no gloss in the gloss layer“ or “no white in the white layer“ has ultimately turned out to be because somehow, when my daughter and I have been collaborating and she sends me her changes, those swatches are no longer spot colors. So once I change them back to spot colors that generally fixes the problem. But again, both my daughter and I are working natively in illustrator and not having to deal with the additional hoops that non-illustrator users have to jump through.

Mike
 
You may already know this- with spot colors you're specifying the use of a certain kind or color of ink. In this case the RDG_GLOSS/WHITE tells the printer to use white or gloss instead of the cmyk combination that usually creates colors for print. Once you think about it, it makes sense- you can't make white from printed colors and you need to print it by itself.

Here's an image I pulled up that shows the difference:
1687788894814.png
 
I just wanted to give a big thank you to the community here for the help with the drilling and printing process. I just got back my first drill/print order from Tayda of 9 pedals and I'm pretty satisfied with the results based on first impressions. The black on black designs are harder to capture properly on camera, but I was surprised they came out as well as they did especially since I had an extra white layer with the design so thankfully none of it shows. The one problem is that the design and drill marks on the Parentheses enclosure are off by a bit; I'll have to check the drill template and print to see where the problem is, but hopefully it won't be that noticeable once the knobs are on.
 

Attachments

  • IMG_1989.jpeg
    IMG_1989.jpeg
    435.4 KB · Views: 52
Enclosures arrive today.

A few notes:

1.) After talking it over with @Guardians of the analog, I think gloss varnish on the faux stomp pad may be too much. Some of the detail is swamped out and in reality, a rubber pad would be matte anyway in appearance;

2.) The Matte Light Blue enclosure for The Buffer clashes with the rest of the styles so I am going to switch to the Gloss Light Blue.

3.) The Blackout scheme is a mess. I did not realize the faux stomp pad had so much color until seeing it on a black enclosure. Furthermore, the white underlayment is an issue and I'll be removing that. I've already prepare another file where I have darkened all the Blackout out and removed the white.

Overall though, I am very happy with the results.

View attachment 51449View attachment 51448View attachment 51447View attachment 51446View attachment 51445

Here is a mockup of The Pompeii:

View attachment 51450
I like the flat light blue one the best! The matte varnish for the rubber will look great in the gloss enclosures.
 
  • Like
Reactions: Nic
One of the things Chris and I discussed was removing the white underpayment to let the dark text blend better into the background and overall to use matte gloss.
You can also use an alpha value in the gloss layer so that it doesn't go on as thick. Since you're mimicking the pad on the Fuzz Face maybe consider a ripple effect in the alpha matching up with the lines. That should leave a slight texture (especially with multiple gloss layers).
 
One of the things Chris and I discussed was removing the white underpayment to let the dark text blend better into the background and overall to use matte gloss.
Ya, definitely don’t want to use white in this instance:


img_0667-jpeg.51445
 
Stupid question of the day: it’s not possible to have both matte and gloss varnish for the gloss layer, is it?

I’d love to keep the text gloss and have the faux rubber pad as matte but that seems like it’s not feasible.
It’s absolutely possible. But you’ll need to write Hugo directly and ask him about it with your order number. I had a pedal where I wanted all of the gloss layer to be matte, except for certain lettering to be gloss varnish. I created a PDF that had two gloss layers (one labeled GLOSS-M, one labeled GLOSS-V so they would know the difference since they use the same swatch). I then wrote Hugo with my order number and asked if it was possible to do this. He said (uncharacteristically without snark) that they had never tried it before but he would be happy to give it a shot. It came out great. As you can see, everything on the face is matte, except for the word STOMP in gloss.

edit to add – as I remember the process, I placed my order and then wrote to ask him if it could be done. I believe he then asked me to specifically also send the file to him directly as well so that he had it and could oversee it personally it when it actually went into production. I assume that he simply sent an order to the shop to hold this order so that he could be personally involved in making sure that it printed with the file I provided.

Mike
IMG_1659.jpeg
 
Last edited:
When you put in the order did you add a second gloss layer or did they do both matte and gloss while only paying for a single layer?
I was not charged for the second layer (I don’t even believe there is an option when you set up an order using the set up tool to add a second gloss layer, much less to be charged for one. That may have changed – I did this order in March or April.)

This actually could have turned out even better if I put more thought into it. For the very top layer with gloss varnish, the only thing in the layer was the word STOMP - the matte varnish layer had all of the concentric circles and other design elements but, because I wasn’t sure they would even be able to do a separate layer, I also left the word STOMP in that layer so it could be covered in matte varnish if that was all they could do. Had I known ahead of time that they could do two separate layers, I would have clipped out the word STOMP from the matte layer so that it did not get printed twice with gloss – that resulted in that word being a little thicker than it would have been if that word had only been printed once in the very top gloss varnish layer And not also printed in the matte layer.

Mike
 
It’s absolutely possible. But you’ll need to write Hugo directly and ask him about it with your order number. I had a pedal where I wanted all of the gloss layer to be matte, except for certain lettering to be gloss varnish. I created a PDF that had two gloss layers (one labeled GLOSS-M, one labeled GLOSS-V so they would know the difference since they use the same swatch). I then wrote Hugo with my order number and asked if it was possible to do this. He said (uncharacteristically without snark) that they had never tried it before but he would be happy to give it a shot. It came out great. As you can see, everything on the face is matte, except for the word STOMP in gloss.

edit to add – as I remember the process, I placed my order and then wrote to ask him if it could be done. I believe he then asked me to specifically also send the file to him directly as well so that he had it and could oversee it personally it when it actually went into production. I assume that he simply sent an order to the shop to hold this order so that he could be personally involved in making sure that it printed with the file I provided.

Mike
View attachment 51663
That’s beautiful and definitely a great news— I had been hoping for ages to be able to do that, but always just assumed it would immediately be a no-go
 
In what order did you prepare the gloss? Was gloss varnish after matte?
I put the gloss varnish layer on the very top, so my file looked like, from top layer to bottom:

GLOSS-V
GLOSS-M
COLOR
WHITE

They print those layers in reverse order, so the white goes on first and gloss varnish (GLOSS-V) was the very last coat applied.

Mike
 
It’s absolutely possible. But you’ll need to write Hugo directly and ask him about it with your order number. I had a pedal where I wanted all of the gloss layer to be matte, except for certain lettering to be gloss varnish. I created a PDF that had two gloss layers (one labeled GLOSS-M, one labeled GLOSS-V so they would know the difference since they use the same swatch). I then wrote Hugo with my order number and asked if it was possible to do this. He said (uncharacteristically without snark) that they had never tried it before but he would be happy to give it a shot. It came out great. As you can see, everything on the face is matte, except for the word STOMP in gloss.

edit to add – as I remember the process, I placed my order and then wrote to ask him if it could be done. I believe he then asked me to specifically also send the file to him directly as well so that he had it and could oversee it personally it when it actually went into production. I assume that he simply sent an order to the shop to hold this order so that he could be personally involved in making sure that it printed with the file I provided.

Mike
View attachment 51663
that is a beautifully executed enclosure! well done sir!
 
Sounds like simply submitting a file in that proper format would go through just fine.
I’d still suggest you contact Hugo. I think their workflow is for the printer to run up to three times, so to speak, on an enclosure. Once for white, once for color, then once for gloss. I honestly can’t tell you if, absent them knowing to handle it differently, they won’t either just ignore the additional gloss layer and not print it at all, or instead kick it back as an error thinking that you mistakenly put an extra layer there that you did not want. Like I said, when I reached out to Hugo with my request, he acted like it was something completely novel and specifically said they had never done it before and that he would “give it a try” to see how it worked out.

They have certainly gotten accustomed to the idea of printing the white layer twice since so many people ask for that, but you have to check a dedicated option for it when setting up the order (and you have to pay for it) - but I don’t see that they have ever yet implemented a process for getting a second gloss layer printed absent some special one on one request.

Mike
 
Back
Top