AionFx Lab Series L4 Bass Preamp

Nic

Well-known member
Build Rating
5.00 star(s)
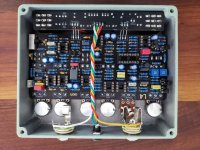
I must say, that board was the most intimidating I have ever bought. It's a fact, some people here dont like AionFx daughter board concept and I do not wish to start that debate again. To me it's never been a problem and I'll deal with it if I ever need to. My greatest fears was having to troubleshoot that board that is really crowded with components. I was almost certain it would have at least one problem.
20231221_140122.jpg

So I kept my time building it, almost procrastinating if truth be told. When I did work on it, I would go value by value, following the bom and marking every value placed. Every value was tested with my multimeter before selecting nearest values and I even found a dead film cap doing so.

The only value I replaced is the master volume pot. I could not get my hand on a A20k so I put a 25 instead. I may or maynot replace it if I ever get the correct one.

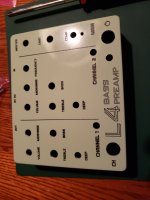
The drilling was not that much a challenge, but there is so many holes!!! I made a small mistake, nothing serious.
20231215_215402.jpg

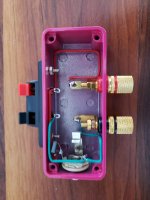
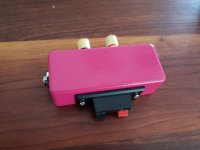
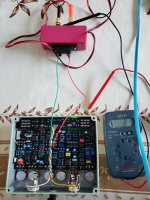
When I finally put everything together, I needed to set the trimmers, for that you need to inject a sine wave of 1khz at 30mv... I always wanted to make a better audio probe, now was the time to upgrade. The tool now could be used also to inject the signal. I delayed the first power up until I had no choice... it powered fisrt try and calibrating was not so hard once you get set up.
20231221_135736.jpg
20231221_135805.jpg

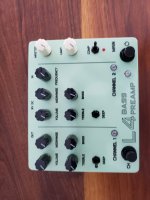
Long story short, that monster of a pedal ended up working on the first try ! It can be loud, I still need to play with it to get it to a sweet spot, but that was a really rewarding build.

20231221_144742.jpg

Now, the 25$ weller iron will need to be replaced, maybe I'll treat myself after xmas. I'm thinking weller 1010 or hakko.
20231221_140058.jpg
 
Impressive work !

The upgraded audioprobe is interesting too.

Did you build Aion's Spectron ?

That's another big one, also a very rewarding and very popular build.
 
Congrats on a Great Build, I hope you believe it was worth it as it appears it was stressful to build.
Aion makes great PCB projects but when you look at the components needed to build this, Values on the board would relieve so much stress off the person building it knowing he hasn't put the component in the wrong spot.???
Is it this way of doing it to sell more PCB's if you stuff up the Board, I don't get it?
I build PedalPCB projects with no instructions, it's that simple!
If I want to know what pots are needed or transistors ect, I ask & Robert replies with my request! if the Bom is not up.
Buyer Beware is all I can say.
 
No shade to that beautifully executed preamp, but that probe rig is kinda stealing the show for me right now. That thing looks awesome. I’d love some more detail on that! Might deserve its own build report…
I could. Basically a standard audio probe with connectors for more versatility. Funny thing is I did not need to use it as an audio probe this time, but would have liked au audio input to plug my phone directly in... so it's still a work in progress but was correct for the job.
 
Congrats on a Great Build, I hope you believe it was worth it as it appears it was stressful to build.
Aion makes great PCB projects but when you look at the components needed to build this, Values on the board would relieve so much stress off the person building it knowing he hasn't put the component in the wrong spot.???
Is it this way of doing it to sell more PCB's if you stuff up the Board, I don't get it?
I build PedalPCB projects with no instructions, it's that simple!
If I want to know what pots are needed or transistors ect, I ask & Robert replies with my request! if the Bom is not up.
Buyer Beware is all I can say.
I'm more afraid of bad solder joint or semiconductors than putting the wrong value in the wrong place in fact. I don't think I've ever mixed values, but it could have happened in my early builds. Stress is relative, I do this to relax from the stress of the day job, so I hoped it would work first try, but compared to stress at work it was nothing :ROFLMAO:

If you go one value at a time and place them carefully, that part is not so hard. But I agree @Robert stuff is really easy to build.

I will just say I was testing myself on this build and I guess I passed, makes me feels great and that's my goal here :) Is the build worth it, I guess time will say.

Thanks for the comments !
 
I have measured A20K's that have been 22.5k, I have measured A25K's that are 22.5K so as long as you have plenty of Volume, It will be fine.
 
  • Like
Reactions: Nic
Awesome build! I like to check each value as I go also seems like if I do that they almost always fire up first try. I’m wanting to do the L5 version but also feel a little intimidated. Seems like it will be a very versatile preamp.
 
Wonderful! Inside and out that's some great work. Monster boards are definitely intimidating for me. Nice work handling it all.

Great looking audio probe, too!

Watched a video on how to mechanically tune pots, but a lot of times if it's in tolerance it turns out alright!
 
Wonderful! Inside and out that's some great work. Monster boards are definitely intimidating for me. Nice work handling it all.

Great looking audio probe, too!

Watched a video on how to mechanically tune pots, but a lot of times if it's in tolerance it turns out alright!
I took my time, that's the key when it's intimidating. Take you time and plan all your steps. As for the pot, I figured that it could work. My compression trimmer is turned all the way up and I did not quite reach the target output voltage, and I think that's where it made a difference, but it's so close I called it good.
 
I took my time, that's the key when it's intimidating. Take you time and plan all your steps. As for the pot, I figured that it could work. My compression trimmer is turned all the way up and I did not quite reach the target output voltage, and I think that's where it made a difference, but it's so close I called it good.
Thanks so much for this, @Nic. Inspires me to take on Aion's similarly daunting IVP board sooner rather than later, which has been lurking near my workbench for some time now, not to mention finally quelling the odd exasperated glance from the IVP board when I take on something simpler.
 
You can do it! And if there is trouble, there is this community of people always wanting to help each others ...
 
Great work! I've been hunting some JST XH cable assemblies like Aion uses in their kits to make the daughter board connection less of a headache. The only ones I can find are 10cm and longer which is more length than required. I wish Aion would sell the 70mm 3pin assemblies as a component item.
 
Last edited:
  • Love
Reactions: Nic
Nice! I've ordered this pcb as well. Right now working in on the art to order the UV printed enclosure. I noticed that you placed the channels' LEDs in a better spot. I was going to use a bipolar 3 pins LED, but your solution might be better. Did you use already wired LEDs or just soldered wired to the terminals?
 
Nice! I've ordered this pcb as well. Right now working in on the art to order the UV printed enclosure. I noticed that you placed the channels' LEDs in a better spot. I was going to use a bipolar 3 pins LED, but your solution might be better. Did you use already wired LEDs or just soldered wired to the terminals?
I wired them to the terminals... I'm not 100% happy with the placement but I like how the selected channel is indicated.

Edit: If I'd do it again, I think I would align them with the volume/deep axis.
 
Last edited:
I wired them to the terminals... I'm not 100% happy with the placement but I like how the selected channel is indicated.
The bipolar LED path might be easier to implement, saves a hole and adds consistency with the bypass LED, but the LEDs lighting in each channel side is a neat way to go. I like it. I see your not 100% happiness with the placement. At first I thought about filling the gaps on the right sides of both Deep switches, but..

Edit: If I'd do it again, I think I would align them with the volume/deep axis.
.. yes, this option could be better. Making the Comp LED 5mm you get full consistency with the 3 LEDs under the switches.

Thanks for sharing!
 
  • This ROCKS!
Reactions: Nic
Back
Top