Disarray (Suhr Riot Reloaded)

rhaas

Active member
Build Rating
4.00 star(s)
Pretty short build report on this one. I decided to give it a try because I liked the original pedal in some of the demos I heard. While it's certainly a capable circuit, there's a fizziness in the note decay that I could never seem to dial out. Just not really my thing, I guess. (I'm having a hard time finding a distortion pedal that I like better than my Dynasty (Dyna Red Distortion) 😄).

The silver lining is that this one found a happy home with someone who was a Crunch Box fan.
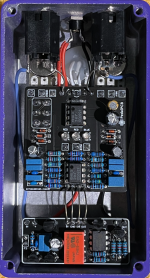
IMG_6620.png
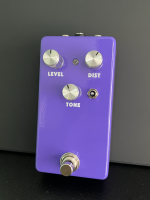
IMG_6613.png
 
Nice and clean! I wonder if that fizzy tone is because the op amps are distorting before the signal gets sent to the diodes. I was messing around on my breadboard a while back and built something like a crunchbox. You can change the sound a lot by changing the high pass filter on that first op amp gain stage. If I remember right the v1 Riot had a 720hz high pass there and the v2 bumped it up to 1k or 1.5khz, I can't remember which.
 
Echoing the above, nice and classily minimal. The labeling and guts are neat and clean, too. Well done!

One of these days I need to get some of those clear LED bezel thingies and try for relay bypass.
 
Thank you both! I went minimal with the design on this one because I was trying to get to the 10-enclosure-discount threshold at Tayda and I was running out of time to place the order. Similar situation with a Tellurian / Earth Drive I did as part of this batch, which I'm now really liking and wish I had invested more design effort in. 😂

The latching Basic Relay Bypass has become my default switching system. It adds a small amount of time and expense to each build but it's well worth it to me. The only issue I've had (and I've held off on posting a troubleshooting thread because it's so minor) is that sometimes, a pedal will power up in the ON state but the LED is not illuminated. Easy enough to tell once you start playing, and everything goes back to normal once you step on the bypass switch.
 
How are you securing that bypass board in the enclosure? Is it just sitting on top of the switch with the wires to the main pcb holding it in place?
 
How are you securing that bypass board in the enclosure? Is it just sitting on top of the switch with the wires to the main pcb holding it in place?
I use a dab of hot glue between the switch and PCB. The six pieces of bus wire alone (four to the main PCB and two to the switch) hold it pretty securely but I figure it's better to be safe. 😄
 
Yeah! And the best part is that you don't have to get 10 identical items: you can have a different drill and UV printing template for each of them and still get the discount.

This is awesome news. Since they don't mention it on their site, I'm very glad you shared that! Thanks!
 
Yeah! And the best part is that you don't have to get 10 identical items: you can have a different drill and UV printing template for each of them and still get the discount.
How do you get the discount? As a test I put 10 enclosures in my cart and went to the checkout page, and don't see any discount applied.
 
How do you get the discount? As a test I put 10 enclosures in my cart and went to the checkout page, and don't see any discount applied.
I should clarify: the discount is on the drilling and UV printing services, not on the enclosures themselves. For example, when you buy 10 drill service jobs, the price drops from $4.50 to $3.00 apiece. And UV printing drops from $4.00 to $3.00 (with a $0.50 discount on the gloss service too if you opt for that).
 
Back
Top