DEMO [Vero] CE-2 w/ mods

This post contains an audio or video demo

owlexifry

Well-known member
a few months ago I ordered a couple MN3007 (diyguitarpedals.com.au) and MN3101 (banzaimusic) NOS ICs and sat on them for a bit.

after recently getting the equinox II reverb (crabverb) build working, I got inspired to build again.
was also quite motivated since I need a chorus effect for a section in a new song (for a band ive been jamming with). i was previously borrowing the other guitarist's TC electronics afterglow (a great chorus pedal tbh)

i was very nervous about this build and the potential noise problems that can apparently plague these circuits, but somehow it was a great success.
i am ecstatic to report that there were no build errors and it worked immediately 😵

- on 9V supply, it works, but it's a bit buzzy.
- on 12V supply - perfect.

very pleased with how this circuit sounds. i think it might be my favourite build so far.
IMG_6037.JPG

unfortunately, tayda's 635C 'light sky blue' is a lot paler than i had anticipated. ah well.
IMG_6047.JPG

demos:

 
Last edited:
Just ordered a light sky blue... I hope double white will pop a little, really lighter than I thought.
good luck 🤞🏻

Wow great very build dude! I’m often inspired by these builds I might have to do one soon!
thanks! yeah they’re a bit more work, but there’s a level of satisfaction you get that i can’t quite describe.

Very cool, that’s a lot of Vero.
haha yeah it’s a little bit more than the usual vero build, but somehow i managed to get it right with no errors this time!

Beautiful!!! Very impressive. One of these days I’ll tackle a vero build. It looks intimidating but I bet it’s super rewarding.
ay thanks! it’s very rewarding. i reckon a smaller overdrive type circuit would be a great place to start with vero.

Man that's slick, nice work! I seem to have a pile of 3007/3101s so I'll need to build this :ROFLMAO:
cheers!
yeah do it! it’s an amazing sound. i’ve never had my own chorus effect before.

Nice job. Very clean looking vero, how long did it take you to make up the board?
thanks ✌🏻

idk, it’s not quick…
i guess it depends which stage of the build you’re referring to:
- board with jumpers?
- board w/ jumpers+resistors?
- board w/ jumpers, resistors + caps?
 
good luck 🤞🏻


thanks! yeah they’re a bit more work, but there’s a level of satisfaction you get that i can’t quite describe.


haha yeah it’s a little bit more than the usual vero build, but somehow i managed to get it right with no errors this time!


ay thanks! it’s very rewarding. i reckon a smaller overdrive type circuit would be a great place to start with vero.


cheers!
yeah do it! it’s an amazing sound. i’ve never had my own chorus effect before.


thanks ✌🏻

idk, it’s not quick…
i guess it depends which stage of the build you’re referring to:
- board with jumpers?
- board w/ jumpers+resistors?
- board w/ jumpers, resistors + caps?
Board with jumpers, I did a lot of vero when I was starting out. I feel like this one would take me several hours for just that stage.
 
Board with jumpers, I did a lot of vero when I was starting out. I feel like this one would take me several hours for just that stage.
ah yep. i reckon it’d be at least an hour - 2 hours max.
depends how nervous/confident you are with avoiding errors. (i’ve had so many on previous builds..)
 
Got lost in the demo. What were you demoing again? :)

That's a clean vero build. I can't get the hang of it. Cutting traces and all that and The traces absorb ungodly amounts of solder.

Great job!
 
I notice you have your pots side ways, never thought
Of doing that for some reason that would make a huge difference in pot wiring cleanliness I feel like. Do you not test it before boxing? And do you attach the wire to the pot first with the pot in the enclosure then to the board? I’m kind of mesmerized by the cleanliness here. Lol.
 
a few months ago I ordered a couple MN3007 (diyguitarpedals.com.au) and MN3101 (banzaimusic) NOS ICs and sat on them for a bit.

after recently getting the equinox II reverb (crabverb) build working, I got inspired to build again.
was also quite motivated since I need a chorus effect for a section in a new song (for a band ive been jamming with). i was previously borrowing the other guitarist's TC electronics afterglow (a great chorus pedal tbh)


followed this layout:
View attachment 37232

View attachment 37233 View attachment 37237

i was very nervous about this build and the potential noise problems that can apparently plague these circuits, but somehow it was a great success.
i am ecstatic to report that there were no build errors and it worked immediately 😵

- on 9V supply, it works, but it's a bit buzzy.
- on 12V supply - perfect.

very pleased with how this circuit sounds. i think it might be my favourite build so far.
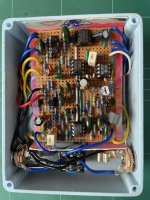
View attachment 37234

unfortunately, tayda's 635C 'light sky blue' is a lot paler than i had anticipated. ah well.
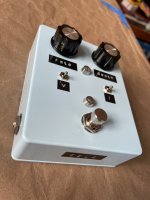
View attachment 37235

demos:

Awesome build! Sounds just like I’d expect a chorus to sound. That’s a monster vero, I bet that took a few hours. I’d be so worried it wouldn’t work after all that effort so you’re braver than me for sure!
Man that's slick, nice work! I seem to have a pile of 3007/3101s so I'll need to build this :ROFLMAO:
What was your source for yours? I don’t want to get hit with fakes or order from multiple places if I can help it.
 
Awesome build! Sounds just like I’d expect a chorus to sound. That’s a monster vero, I bet that took a few hours. I’d be so worried it wouldn’t work after all that effort so you’re braver than me for sure!

What was your source for yours? I don’t want to get hit with fakes or order from multiple places if I can help it.
Several, but Banzai was one of them, and they checked out. I haven't verified them all yet..I was wanting a more refined circuit to test them with.

@owlexifry - This layout ditches the jfet switching, as will I. Other than that, I'm using the Electrosmash schematic for the breadboard. Thanks again for the inspiration!
 
Got lost in the demo. What were you demoing again? :)

That's a clean vero build. I can't get the hang of it. Cutting traces and all that and The traces absorb ungodly amounts of solder.

Great job!
haha cheers 🤙🏻

feeding / flowing tonnes of solder to a joint is probably the most satisfying part, just wait til you try a tagboard / eyelet board 🤤

I notice you have your pots side ways, never thought
Of doing that for some reason that would make a huge difference in pot wiring cleanliness I feel like. Do you not test it before boxing? And do you attach the wire to the pot first with the pot in the enclosure then to the board? I’m kind of mesmerized by the cleanliness here. Lol.
well because i’m either foolish or build with too much confidence, i usually always build it as i box it and then test when it’s finished …..and then cry later when i have to troubleshoot (i’ve learned to at least leave the knobs off before testing now lol)

if you look at the layout again, i think you’ll see why i opted to position the pots sideways…. ;)
all wiring that attaches to the board is soldered in first, and then the pots were attached to their respective wires with it all outside of the enclosure. same with the switches.
the pots and switches are then fed / jiggled in through the holes when fitting into the enclosure.
[if you use stiffer bigger gauge wiring or solid core wire, it is a lot easier to dictate the positions of where pots and switches are positioned under the board, as well as the ‘lead dress’]

speaking of which, this is how i secured them:
47327DB5-521A-45D1-8605-B640FEE55E20.jpeg
i discovered yet another useful application for this random soldering tool piece (came from stewmac when i got an amp kit a couple years ago).
i don’t know how else i’d be able to successfully turn a nut over the thread… such a good tool.

Awesome build! Sounds just like I’d expect a chorus to sound. That’s a monster vero, I bet that took a few hours. I’d be so worried it wouldn’t work after all that effort so you’re braver than me for sure!

What was your source for yours? I don’t want to get hit with fakes or order from multiple places if I can help it.
thank you! i’m very pleased with the sound. was also surprised how well it takes getting flogged by an overdrive in front of it too.

well i managed to get a vero klon build working earlier this year and that wasn’t small either. i guess if you start with smaller circuits like an 808 or whatever and then build up your confidence with smaller builds, the prospect of something like this becomes more of a fun challenge than a daunting task. having said that, i was extremely nervous / tense when approaching the testing stage 🥵

Several, but Banzai was one of them, and they checked out. I haven't verified them all yet..I was wanting a more refined circuit to test them with.

@owlexifry - This layout ditches the jfet switching, as will I. Other than that, I'm using the Electrosmash schematic for the breadboard. Thanks again for the inspiration!
sure does, true bypass works for me.

no worries, have fun ✌🏻
 
this pedal has been on my board since i built it, it's been getting live use, and i find for some songs i'd really like to do some short interval engagements (like 4 quarter notes long) for some parts, but the 3PDT is too clunky and slow to do this well without throwing me off/keeping the riff tight.
i was thinking, yeah i probably need a soft switch relay bypass solution. but never really got motivated to do anything about it.

then i saw a relay circuit shared on chuck bones graveyard, and the thread got me inspired to try it out and do a vero layout (attached).

IMG_0055.JPG

IMG_0050.JPG

it works great. the response is perfect. the soft switch is sublime.
no noise or interference when testing through DAW... (but haven't tried it through my rig yet)

i will admit this 'mod' was quite a squeeze and tested my sanity.
initially thought it just wasn't going to fit. then i considered trying, and then i was like oh god what have i done, and then it somehow barely scared together.
can't wait to try it out at band practice tomorrow.
 

Attachments

  • CDB RELAY SWITCH.PNG
    CDB RELAY SWITCH.PNG
    59.6 KB · Views: 4
Back
Top