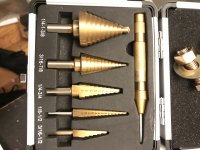
About to drill my first enclosure...anything I should know?

yazooligan

Active member
All the pieces are here. My WEN 4208 drill press, the drill press vise, the step bits, the non step bits, auto-punch...going to do a test 1590B before I do a customer's 1590BB.

Share your wisdom/warnings please!
 
Watch some videos on proper punch technique, if you get that wrong you’re screwed haha. I actually use two different size punches, one really fine sharp style and one just a bit bigger and more blunt. Drill a pilot hole after that with one of your smaller bits then move on to the step bits. Go slow and methodical!

If you don’t use bezels for your LEDs, drill that hole from the other side but don’t go all the way through, it will leave a nice little concave spot for your LED to sit in.


7702F0C8-1702-4108-B8E4-0C8AF758744A.jpeg
 
Yeah, I agree with everything said so far. Especially this
I actually use two different size punches, one really fine sharp style and one just a bit bigger and more blunt.
Granted I'm no expert and I only have a hand drill, but I still run into the occasional wandering bit. I use an awl and hammer to punch my starter holes. The only thing holding me back from getting an actual center punch tool is that all of them look like a needle point type tip. You definitely will benefit from a more blunt angle in your initial or second punch. Anything that more accurately represents the bevel angle of your step bit's (or pilot bit's) starting edge.

Also, reiterating to keep your step bits clean after each pass. That's where lube or a cleaning brush comes in handy.

Not that it's correct, but generally my process is this (with roughly 95% accuracy rate):
-Punch w/ awl & hammer.
-Use small 1/8" regular drill bit and align into the punch and drill all holes to create a shallow conical well without going through.
-Visually inspect and make sure pilot holes look true. Because I'm cuckoo, sometimes I have my digital calipers on hand to double check.
-Move onto step bit and drill to desired size. If my pilot holes weren't perfect, there's a judicious bit of wiggle room when drilling with step bits by gingerly shifting your body weight into the desired direction while it's spinning...use common sense here ?. Since I use a hand drill, I find it useful to make sure I drill all holes with the enclosure, my physical self, and electric drill in the same position, i.e. don't 180° the enclosure to get a better angle, don't take a break halfway through and come back after juicing up on caffeine.
 
Last edited:
Give me bezels or give me death...

But seriously, I do love that trick!

This is all great! I plan on doing some coats of clear before I apply the waterslide decal. Any suggestions on clear for the ones that are already powercoated and primer for the ones that aren't?
 
That's a great LED trick! I stopped using bezels (unless I accidentally drill too far).

I'm super impetuous and never want to go through the proper steps, so most of my personal builds are not perfect, but it's all about how much tolerance you have for slightly off-center holes etc. (basically, I'm saying listen to the folks above for actual advice, but you can still make cool things even if you mess up).

A punch, pilot bits and stepped bits were the biggest improvements for me (aside from a drill press). Good luck!
 
Give me bezels or give me death...

But seriously, I do love that trick!

This is all great! I plan on doing some coats of clear before I apply the waterslide decal. Any suggestions on clear for the ones that are already powercoated and primer for the ones that aren't?
Yeah started to use those 3mm tayra bezels.... Can't live without them now.... Can't stand looking at my old non-bezeled builds now xD
 
That's a great LED trick! I stopped using bezels (unless I accidentally drill too far).

I'm super impetuous and never want to go through the proper steps, so most of my personal builds are not perfect, but it's all about how much tolerance you have for slightly off-center holes etc. (basically, I'm saying listen to the folks above for actual advice, but you can still make cool things even if you mess up).

A punch, pilot bits and stepped bits were the biggest improvements for me (aside from a drill press). Good luck!

I always go a step above what I need for potentiometers, gives you some wiggle room to straighten them out if they aren’t exactly lined up.
 
I always go a step above what I need for potentiometers, gives you some wiggle room to straighten them out if they aren’t exactly lined up.
I usually start with precise, but end up going a step above when I inevitably realize I drilled off center a bit. ;)
 
Two things that have done me well. Life is very simple with a drill press.

Center punch of any sort that you can impact a dent into the taped on drill guide. No brainer here. Manual, spring loaded, whatever you choose, it is the best way to translate the drill guide to the enclosure. Just make sure you get this part accurate because everything downstream is dependent. Easy stuff, just take your time.​

Chuck up a 1/16th or so drill bit and let it drop into those dents. You really can use the finished hole size bit here but to be honest it's easier to let the drill press "find" the dent with a skinny drill bit. It's a feel thing and you'll use a light touch to let the bit center itself.​

Once those holes are done it's just a matter of chucking up the right size bit and literally "dropping" it into the hole you've made.

Set your drill press to be relatively slow. This is counter intuitive after using a hand drill. I have my cheap Ryobi set to 570 RPM's. This means that you have to have a light touch with the pressure on the bit. Don't rush it, get a feel for how the material is reacting to the drill. You don't want it to grab the piece.

Most importantly revel in the fact that this is likely the most accurate way to drill an enclosure. After a few drills you'll get used to how much pressure you can get away with and you'll be rewarded with nice consistent holes.
My drill press has been broken for a long time, but I follow these principles almost to a T. I'm deadly accurate with masking tape and a quick square tool..

1. Cover enclosure in tape to prevent finish damage from hot aluminum
2. Measure with square and sharp pencil
3. Center punch
4. Drill lead holes with 1/16" bit
5. Measure again
6. Drill with step bit

If I happen to be using a PPCB template, I'll verify the measurements after taping it to the enclosure. Nothing is worse than "following the template" and finding out everything is too far to the right or a little slanted. I've gotten "professional" pedals that were drilled like that (including a real deal King of Tone!), and it drove me crazy!
 
Back
Top